Posts

Acid-Fast Stain Protocols - Ziehl-Neelsen, Kinyoun, Truant Methods

Image
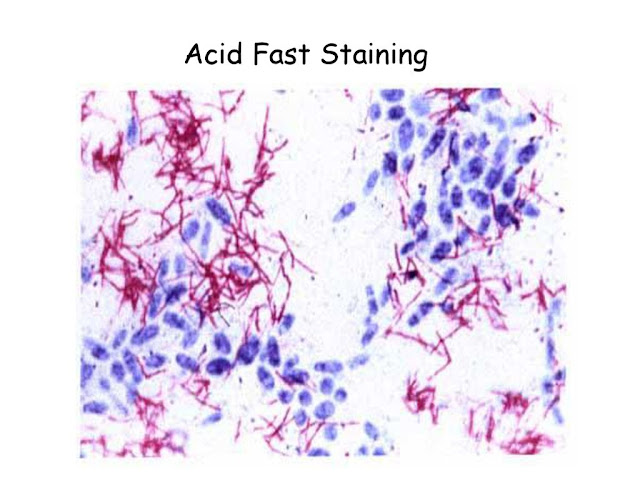
There are three common acid-fast staining methods, Ziehl-Neelsen (hot), Kinyoun (cold), and Auramine-Rhodamine Fluorochrome (Truant method). The Ziehl-Neelsen method has endured as a reliable and effective way to demonstrate the acid-fast bacteria. In 1882 Robert Koch reported the discovery of the tubercle bacillus (4) and described the appearance of the bacilli resulting from a complex staining procedure. During the same time period several other researchers (Ehrlich, Ziehl, Rindfleisch, and Neelsen), intending to improve on Koch’s method, introduced modifications to the reagents and the procedure. Franz Ziehl was the first to use carbolic acid (phenol) as the mordant. Friedrich Neelsen kept Ziehl’s mordant, but changed the primary stain to the basic fuchsin (first used by Ehrlich in 1882). This method became known as the Ziehl-Neelsen method in the early to mid 1890s. In this method heat is used to help drive the primary stain into the waxy cell walls of these difficult-to-s

Zebrafish Care and Experimental Techniques: In Situ Hybridization - Zebrafish Sections

Image
**Day 0: Goals: To preserve zebrafish and obtain sections using the cryostat. **Everything used on this day needs to be RNase free . Wear gloves and be sure to use only PBS that has been treated with DEPC. 1. Anesthetize zebrafish 2. Fix in freshly thawed BT fix for 3 hours at room temperature. Keep solution on the "belly dancer" so that it is constantly moving. 3. Rinse 3 x 5 minutes in 1X PBS. Leave embryos in pbs until you are ready to section them. Embryos can be stored in the fridge until sectioning, but keep the days between fixing, sectioning and staining as short as possible. 4. Rinse fish in 30% sucrose and PBS until embryos sink approx. 30mins. 5. Trnsfer embryos from sucrose to plastic molds, 5 fish pre mold, with heads facing the side with writing. Absorb as much sucrose as possible. 6. Add OCT to the mold, and swirl fish until they are oriented correctly. Freeze in -80 degree freezer. 7. Follow instructions for sectioning using the cy

Zebrafish Care and Experimental Techniques: Real Time PCR

Materials: -primers (24 and 25 are for slitrk 3) -cDNA (40 hour/90 hour) -10mM dNTP (nucleotides) -buffer 5x -water -enzyme (cooler in freezer) Combine in a PCR tube (50 microliters of solution): 1. 35.5 uL of water 2. 10uL 5x buffer 2. 1uL of JR 24 3. 1uL of JR 25 4. 1uL of dNTP 5.1uL of cDNA 6. 0.5 uL of Fusion hot start enzyme Add water to the PCR tube first. Make sure you use the PCR tubes because they fit in the machine. After all contents have been added, flick PCR tube and centrifuge for 4 seconds. To Run the PCR Machine: The power switch is on the back. The lid will click, and then the wheel should be twisted until you feel resistance. Program: JRRTPCR enable heated lid The reaction takes several hours. The machine with have a block temp of 4 degrees when done. Remember to turn off the machine when finished using it.

Zebrafish Care and Experimental Techniques: Midi-Prep of Plasmid DNA

Day 1: see "Bacterial Transformation by Heat Shock" **Day 2: Starter Cultures and Inoculate into Large Bacteria Flasks** NOTE: Starter culture is preferable, but not required; can immediately go to larger flasks if you want to STARTER CULTURE: 1. Aliquot 2ml of the LB+Amp solution (0.02g Amp/200ml LB) into 14ml round bottom tubes 2. Using a yellow pipet tip, pick up an isolated large colony and drop the tip into the correct tube 3. Cap and place into incubator (37C) with shaker set to 200rpm for ~6 hours Note: At this point, can refrigerate starter cultures until ready to inoculate and do midi-prep kit INOCULATION: 1) Add Amp to LB broth at 100ug/ml (so, for 500ml of LB broth, add .05g Amp) 2) Add 100ml of LB+Amp into a 1L flask for every plasmid you are inoculating 3) Transfer 200ul of bacteria from starter culture into corresponding flask 4) Cover each 1L flask with aluminum foil 5) Incubate for 12-16 hrs in Dana Incubator (if necessary, use paper towels t

Zebrafish Care and Experimental Techniques: Gel Electrophoresis

Materials: -All materials are EtBr exposed, so wear gloves! -Materials are kept on a tray on the lab bench 1. TAE solution 2. Agarose 3. EtBr 4. Plate set-up 5. DNA ladder (in fridge) 6. PCR product For 70mls of 1% gel solution: 1. Add 70 mls of 1X TAE to the flask 2. Add 0.7g of agarose to the flask 3. Microwave the solution for 1:30 mins, watching for bubbles 4. Microwave again until the solution clears and bubbles but does not overflow 5. Allow the solution to cool to 50 degrees celsius (warm to touch) 5. Under the hood, add 3.5uL of EtBr to the solution (before it cools completely!) 5. Stir the solution gently so that the EtBr dissolves 6. Once dissolved, pour the solution onto the gel plate set-up. Make sure the comb is properly oriented and that the screws are tightened. 7. Allow plate to cool for at least 25 mins 8. Place plate into buffer (TAE) and gently remove the comb 9. Add enough TAE to cover the wells 10. Use a DNA ladder, 20 uL in one well 11. Sp

Multichannel Images with Bright-field in Nikon Elements

To take a multichannel image in Elements: 1. click acquire --> capture multi channel image --> manually 2. There should now be an open window with tabs along the bottom for each of the image channels 3. Bright-field should be included in those tabs 4. If Bright-field is not included, you will need to add a channel. a. click acquire --> capture multichannel image --> multichannel setup b. click on an unchecked black box to add a channel, assign the channel the appropriate settings c. for Bright-field set the comp. color to Bright-field d. when you close re-open the multichannel image you should have a bright-field tab 5. Click the tab along the bottom that corresponds with the image you want to take 6. set-up the image using the microscope or i-control 7. click capture when you are ready to take the picture 8. Take all of the images you need to compile and then click the four box icon in the left hand corner. The icon is a shaded box with three colored boxes p

Calcium phosphate transfection protocol - Protocol for cell transfection using the calcium phosphate method

Procedure: Utilize the following mix components for all experiments. This protocol has been optimized for transfection of neonatal rat cardiac myocytes. For those experiments where more transfection mix is needed, simply use a multiple of the reagents described below: For cells on 24 well plates, combine equal amounts of the plasmid in question and normalization signal with L7RH-beta-Gal plasmid. Add 40 μl per well immediately after plating (20 μl each of the luciferase plasmid with 20 μl of the beta gal mix). All mixing (except that which requires vortexing) should be done in the sterile cell culture hood. Total volume 400 μl 600 μl 800 μl Sterile 2.5 M CaCl 2 25 μl 37.5 μl 50 μl Plasmid 10 μg 15 μg 20 μl Sterile H 2 0 Total of 200 μl when added to above. Bring to total of 300 μl with sterile H 2 0 Bring total to 400 μl with H 2 0  Combine the above three reagents in a hood using a sterile 1.5 ml Eppendorf tube. Mix gently. Do not vortex. Sterile 2X HBS (hepes buffered saline