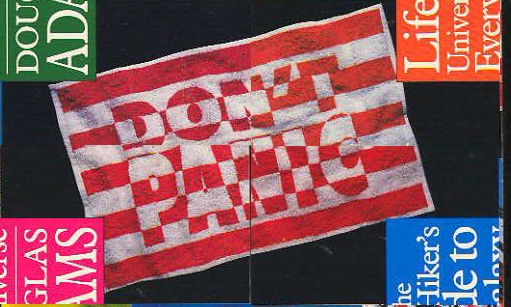
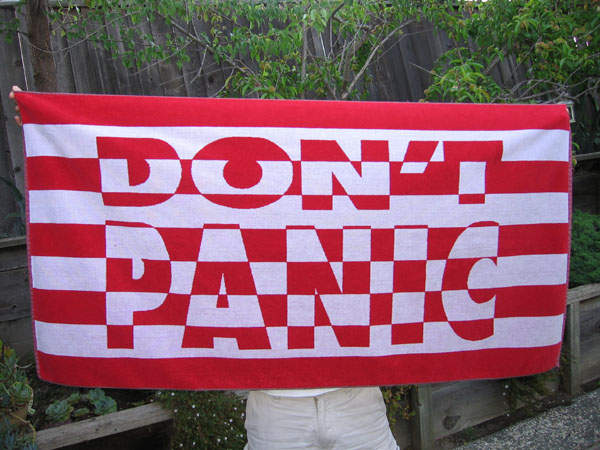
The Hitchhiker’s Guide to the Galaxy was one of my favorite series of books as a teenager. It has been republished many times with many different covers. But the one I remembered best is from around 1984 and was designed by Gary Day-Ellison while he was Design & Art Director at Pan Books. Each book had one quarter of a picture; once you had all four books you could arrange them to see all four complete images; the Heart of Gold, a Babel Fish, a portrait of Douglas Adams and a stripped red & white towel bearing the words “Don’t Panic”. Interestingly, this seems to be the cover art that Pan forgot. In an article on the Pan Macmillan website entitled The Hitchhiker’s Guide to the Galaxy – a visual history they completely omit the Day-Ellison covers.
The Pan TowelDouglas AdamsThe Heart of GoldA Babel Fish
In 1995 Pan had the towel manufactured by Hap’Lo perhaps as a promotional item and it became know as “The Pan Towel”. Alas, as of 2022 no photographic record of this towel remains within the reach of Google on the Internet, but my recollection of seeing a picture online around 2008 is that it was more pink than red. Be that as it may I always coveted such a towel and in 2008 embarked upon a quest to acquire one.
Why a towel? Well as any fan of HHGTTG knows a towel is a rather important piece of kit.
“A towel, it says, is about the most massively useful thing an interstellar hitchhiker can have. Partly it has great practical value. You can wrap it around you for warmth as you bound across the cold moons of Jaglan Beta; you can lie on it on the brilliant marble-sanded beaches of Santraginus V, inhaling the heady sea vapors; you can sleep under it beneath the stars which shine so redly on the desert world of Kakrafoon; use it to sail a miniraft down the slow heavy River Moth; wet it for use in hand-to-hand-combat; wrap it round your head to ward off noxious fumes or avoid the gaze of the Ravenous Bugblatter Beast of Traal (such a mind-boggingly stupid animal, it assumes that if you can’t see it, it can’t see you); you can wave your towel in emergencies as a distress signal, and of course dry yourself off with it if it still seems to be clean enough.
More importantly, a towel has immense psychological value. For some reason, if a strag (strag: non-hitch hiker) discovers that a hitchhiker has his towel with him, he will automatically assume that he is also in possession of a toothbrush, face flannel, soap, tin of biscuits, flask, compass, map, ball of string, gnat spray, wet weather gear, space suit etc., etc. Furthermore, the strag will then happily lend the hitchhiker any of these or a dozen other items that the hitchhiker might accidentally have “lost”. What the strag will think is that any man who can hitch the length and breadth of the galaxy, rough it, slum it, struggle against terrible odds, win through, and still knows where his towel is is clearly a man to be reckoned with.”
Douglas Adams, The Hitchhiker’s Guide to the Galaxy
But beyond even the strikingly useful nature of a towel there is another pressing reason to have such an item close to hand. That reason is Towel Day which since the untimely death of Douglas Adams in 2001 has fallen every May 25th and celebrates his life and works. It’s really rather simple, just carry a towel around, everywhere you go, for the whole day. And what better towel to carry than the Pan Towel?
It turns out that the only way to get such a towel is to have it made yourself. However, there is a thriving market of custom towel manufacturing for high-school swim teams in the USA so getting it manufactured was the easy part. The real issue was tracking down who might hold the copyright on the towel design itself. The book covers credit Peter Williams (obituary) as the photographer for the towel picture. However, in an email exchange in 2008 he was pretty sure the image was not his and gave me Gary Day-Ellison’s name and contact as the cover designer. Mr. Day-Ellison told me that the cover was a collaboration between himself and Douglas Adams, who he says “was always up for witty innovation”. He suggested I contact Pan who obviously own the copyright on the actual cover design for their permission, which they graciously gave me for a limited production of the towel.
A note from Douglas Adams to Gary Day-Ellison regarding the cover design (from the link to GDE above)
In the end I recreated the design manually and had the smallest possible batch of towels made – 25 pieces. I think they had problems, because it took a few months, but once they eventually arrived (just before Towel Day 2008) the result was well worth it. I kept two which I still use to this day, sent one to Mr. Day-Ellison and then sold the rest online to other geeks to cover my costs.
The OriginalMy RecreationJudge for yourself how close I got to the design
Here is the finished article, (32″x64″) 100% cotton, jacquard woven with velour finish
In thanks for his permission to use the design I sent a towel to Mr. Day-Ellison which I’m delighted to say he posted a picture of on his washing line.
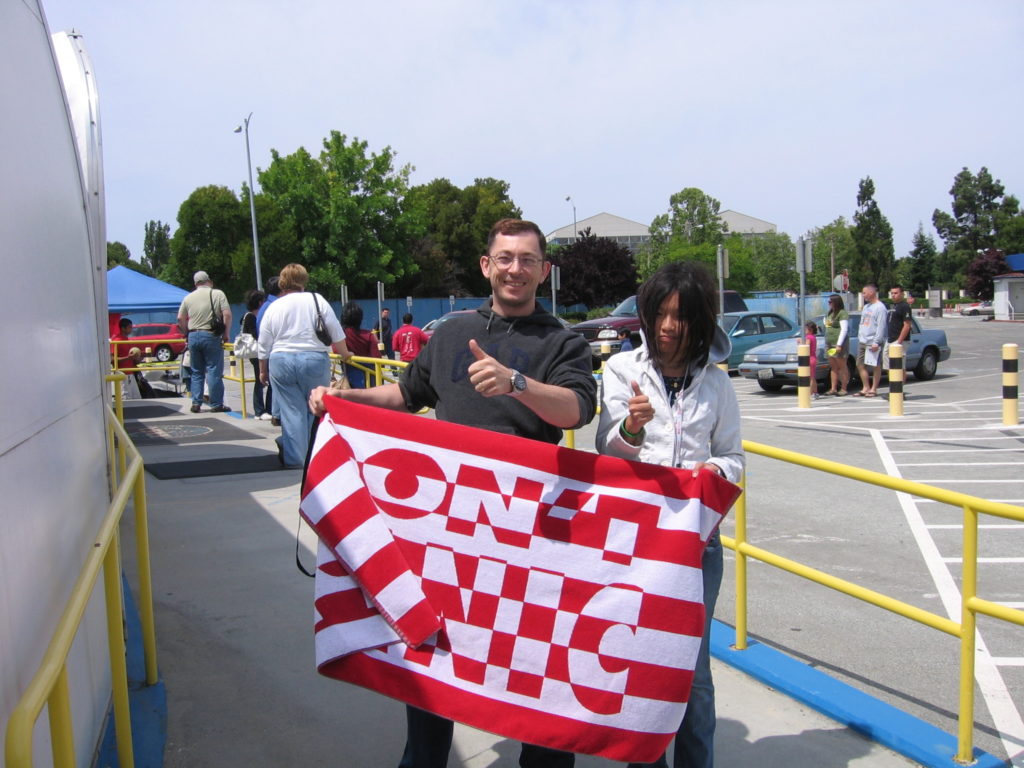
And here I am with my (completely embarrassed by her uncle) niece Lynda at the NASA Ames Research Center on May 25th, 2008 celebrating Towel Day and the Phoenix Lander’s arrival on Mars.
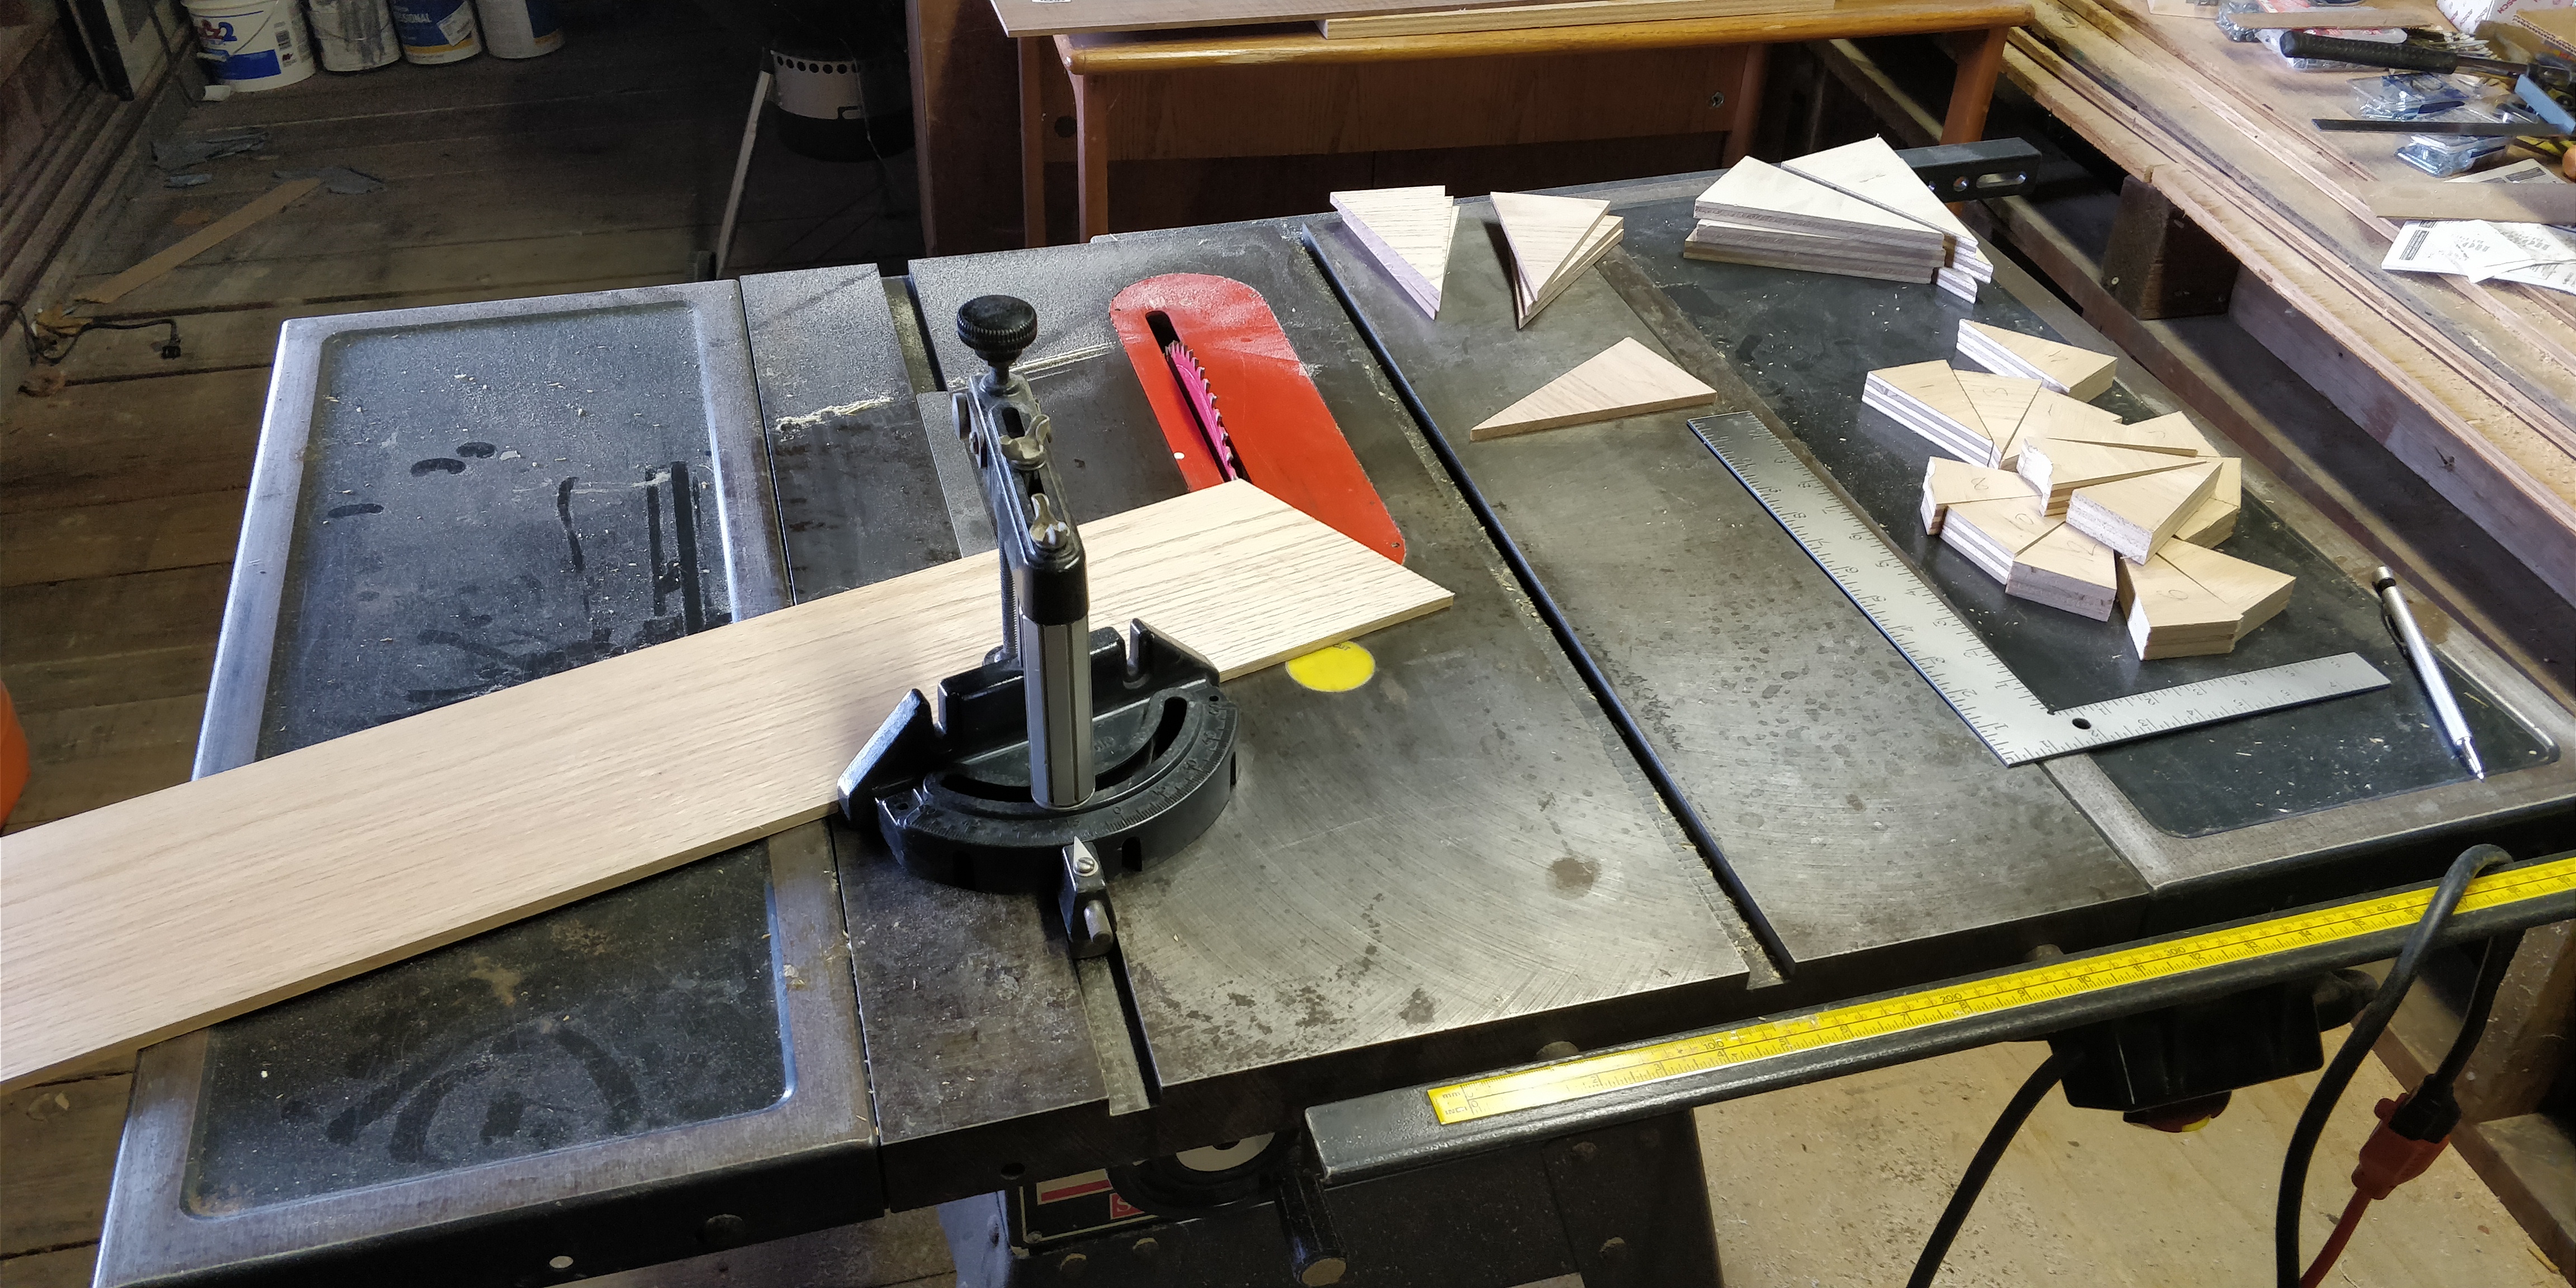
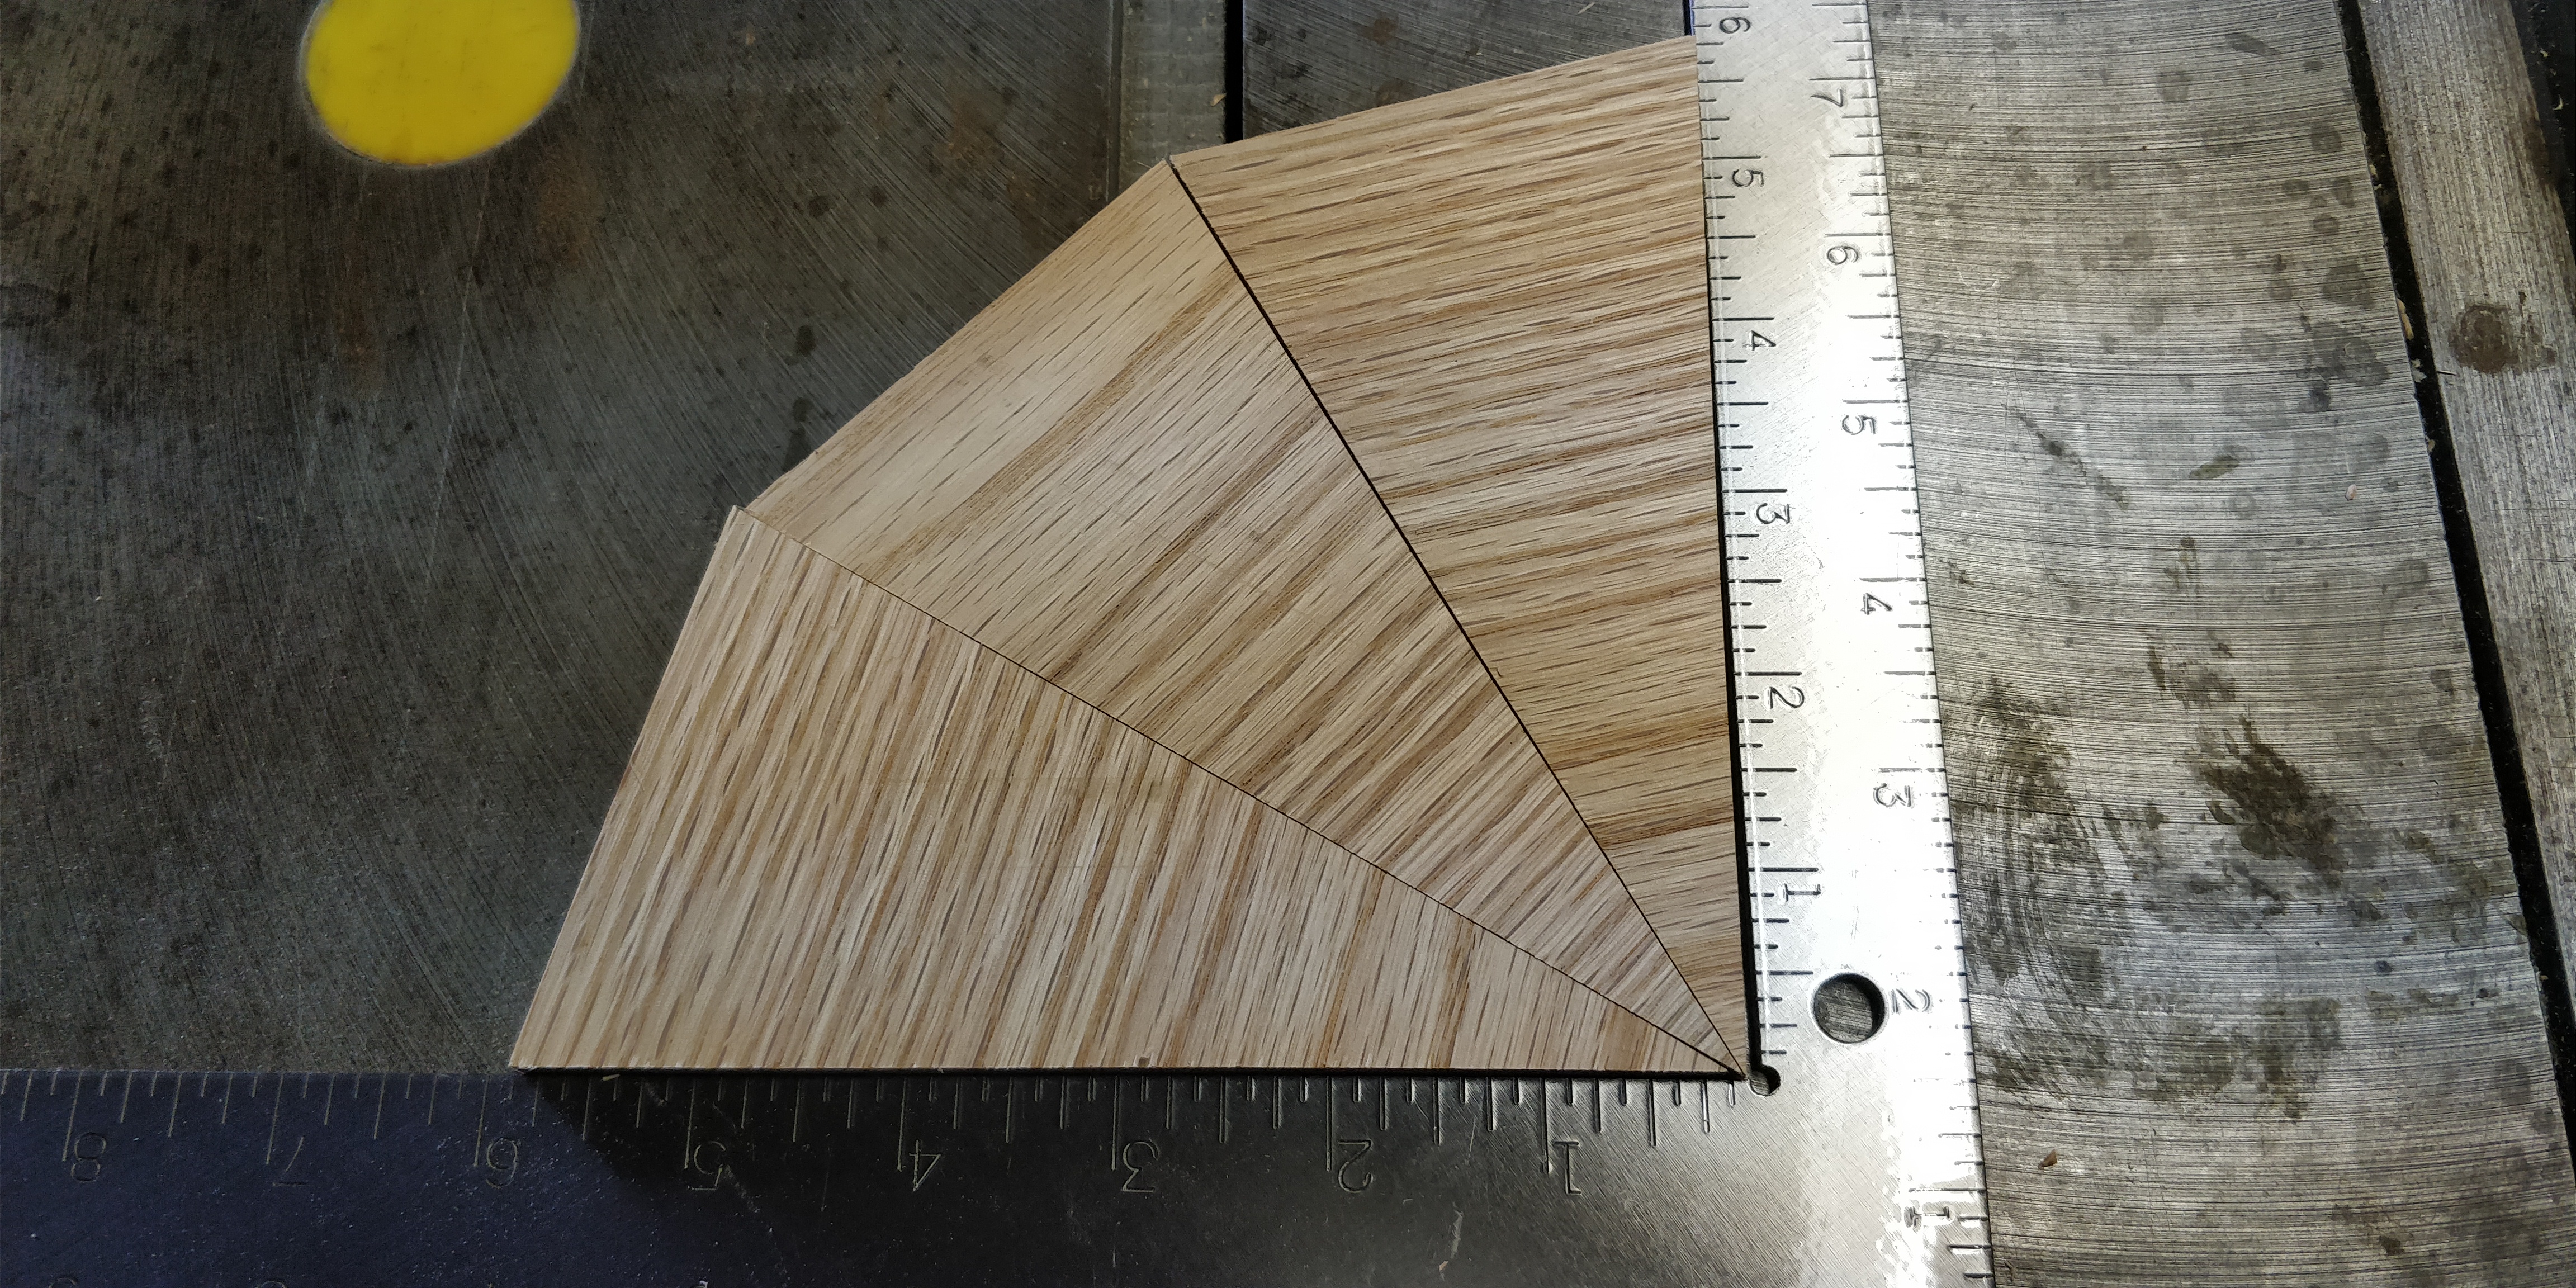
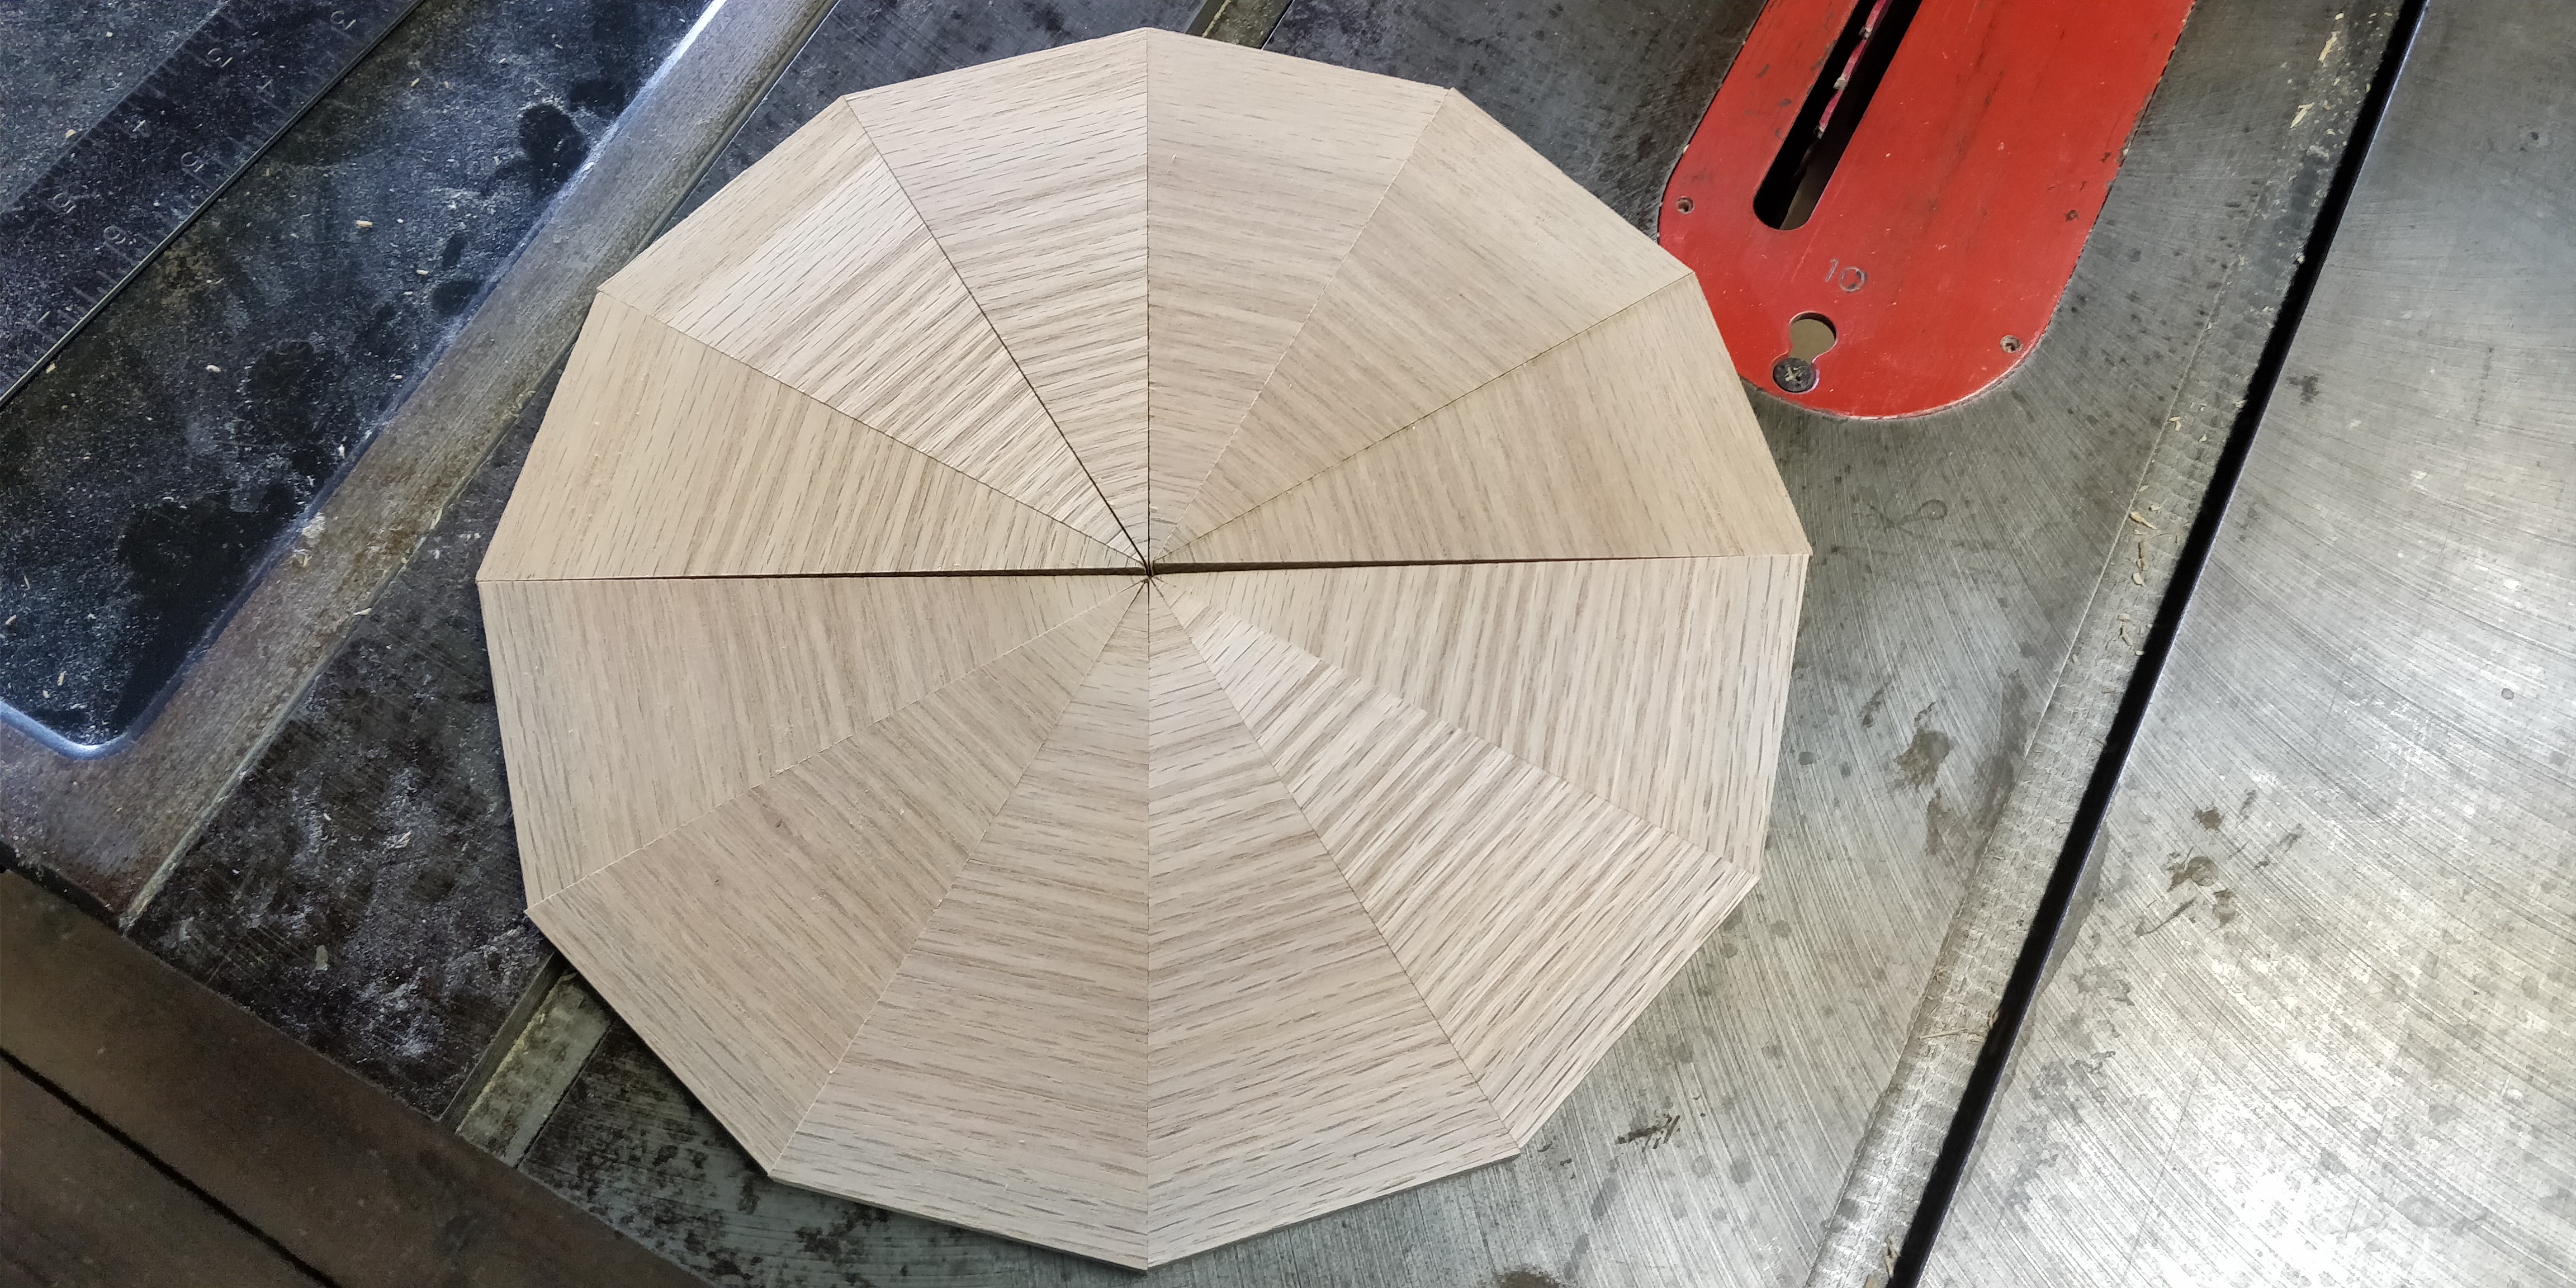
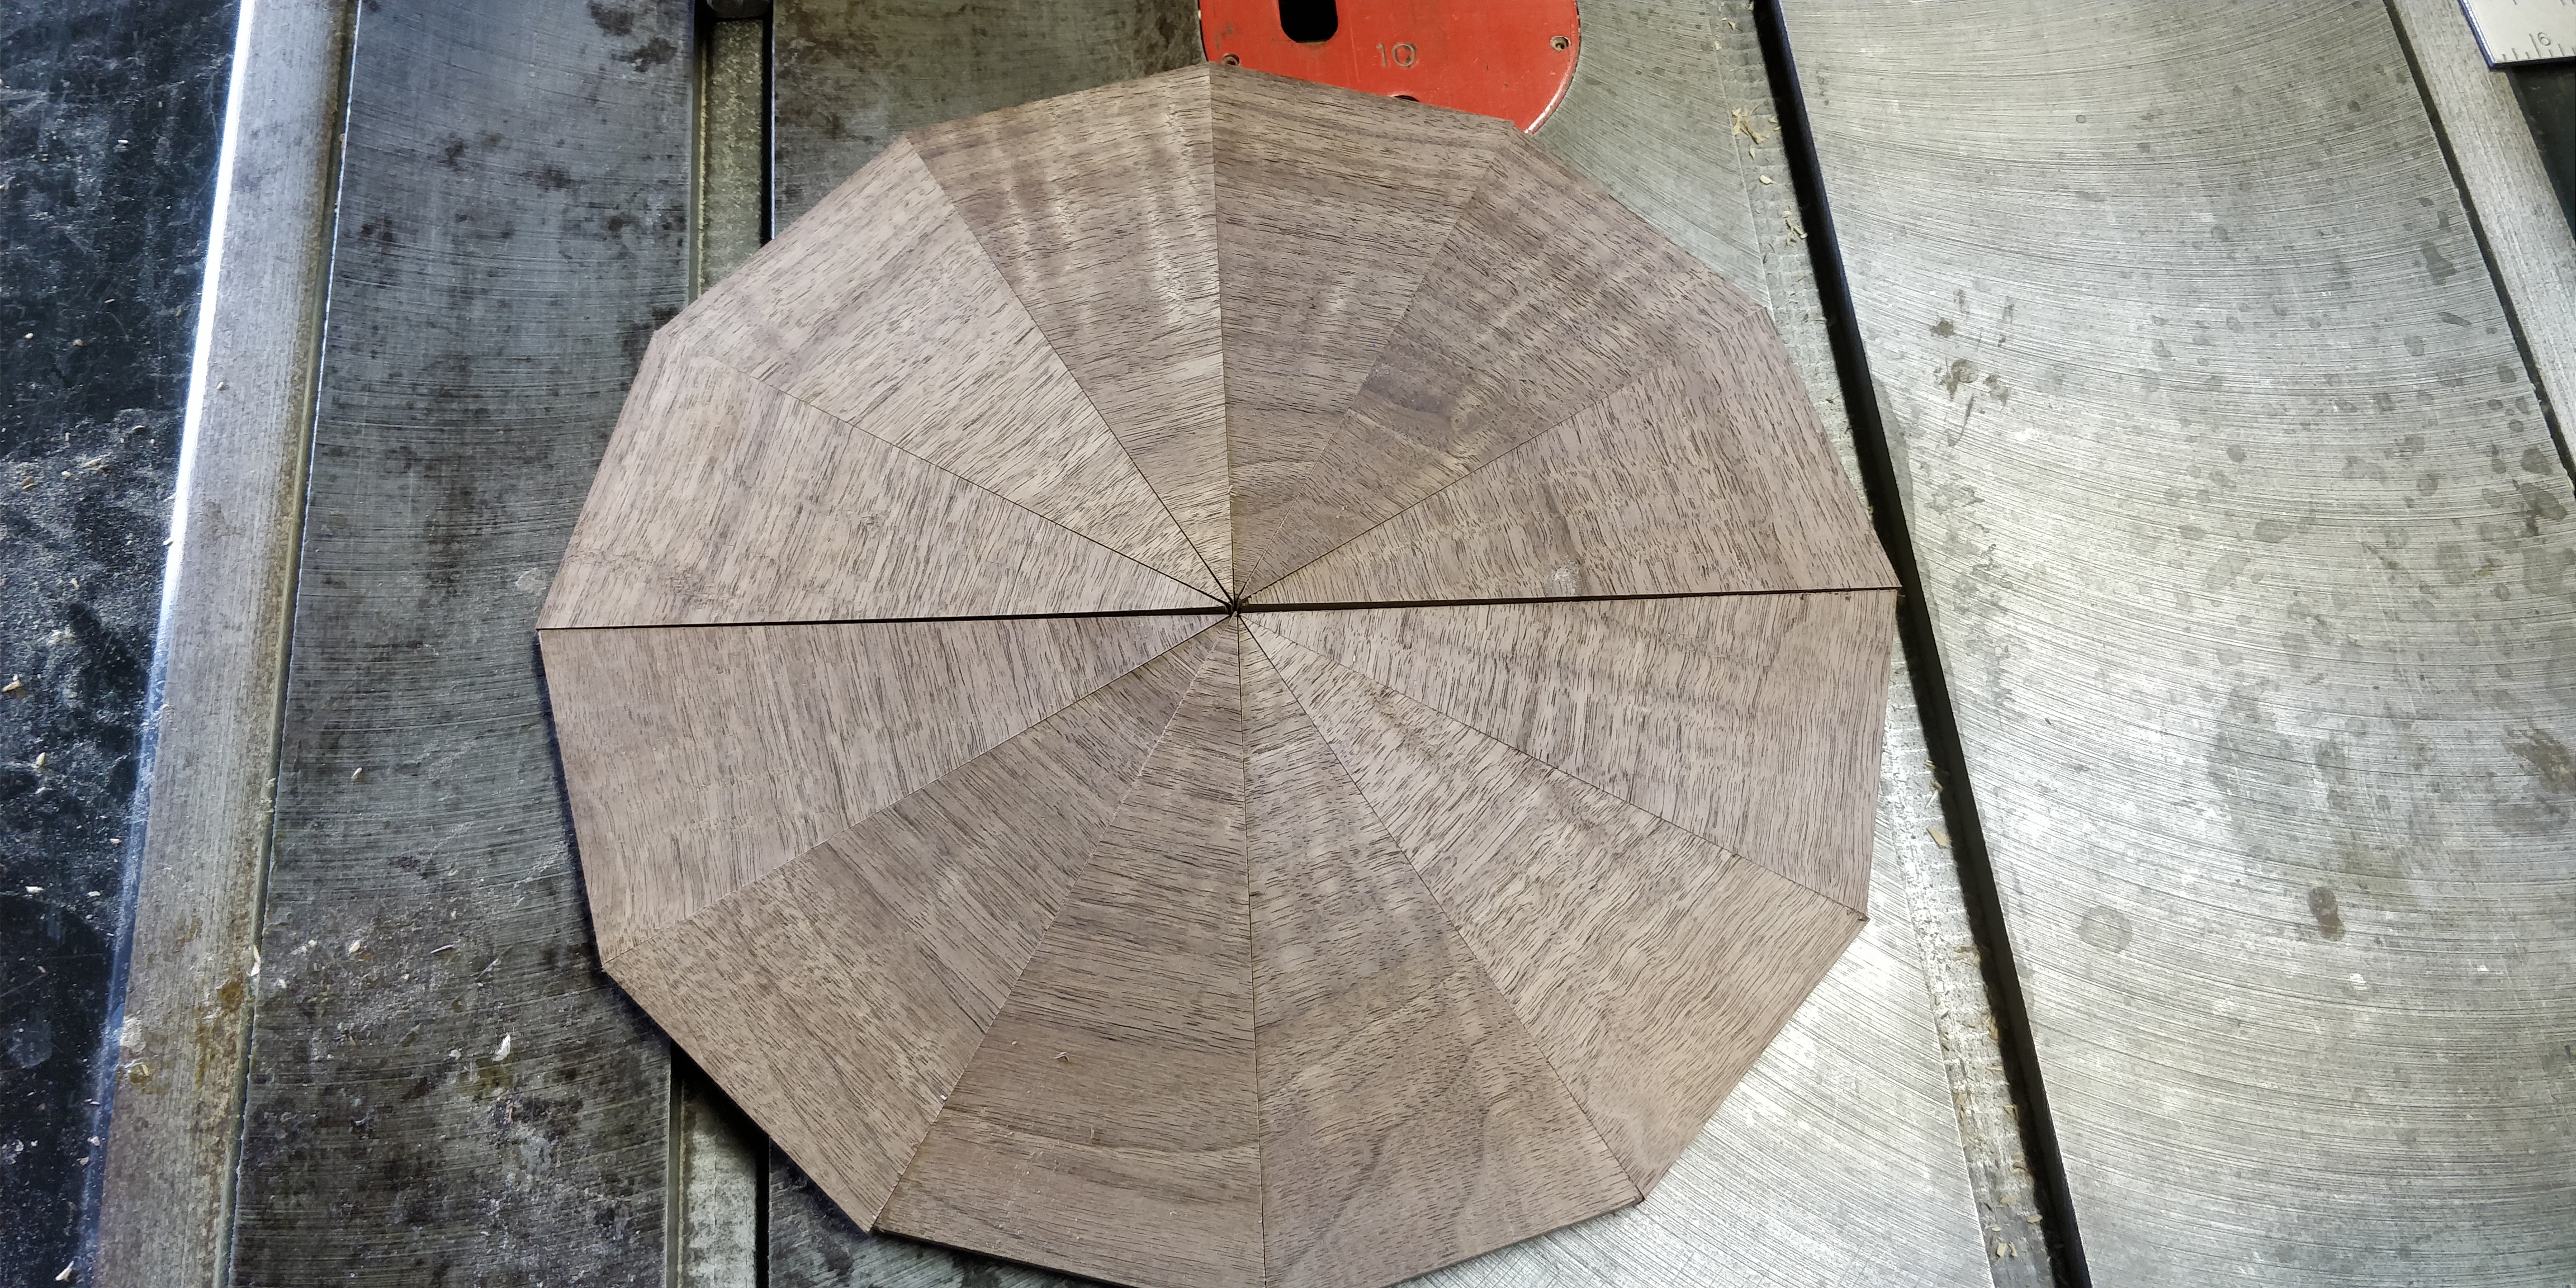
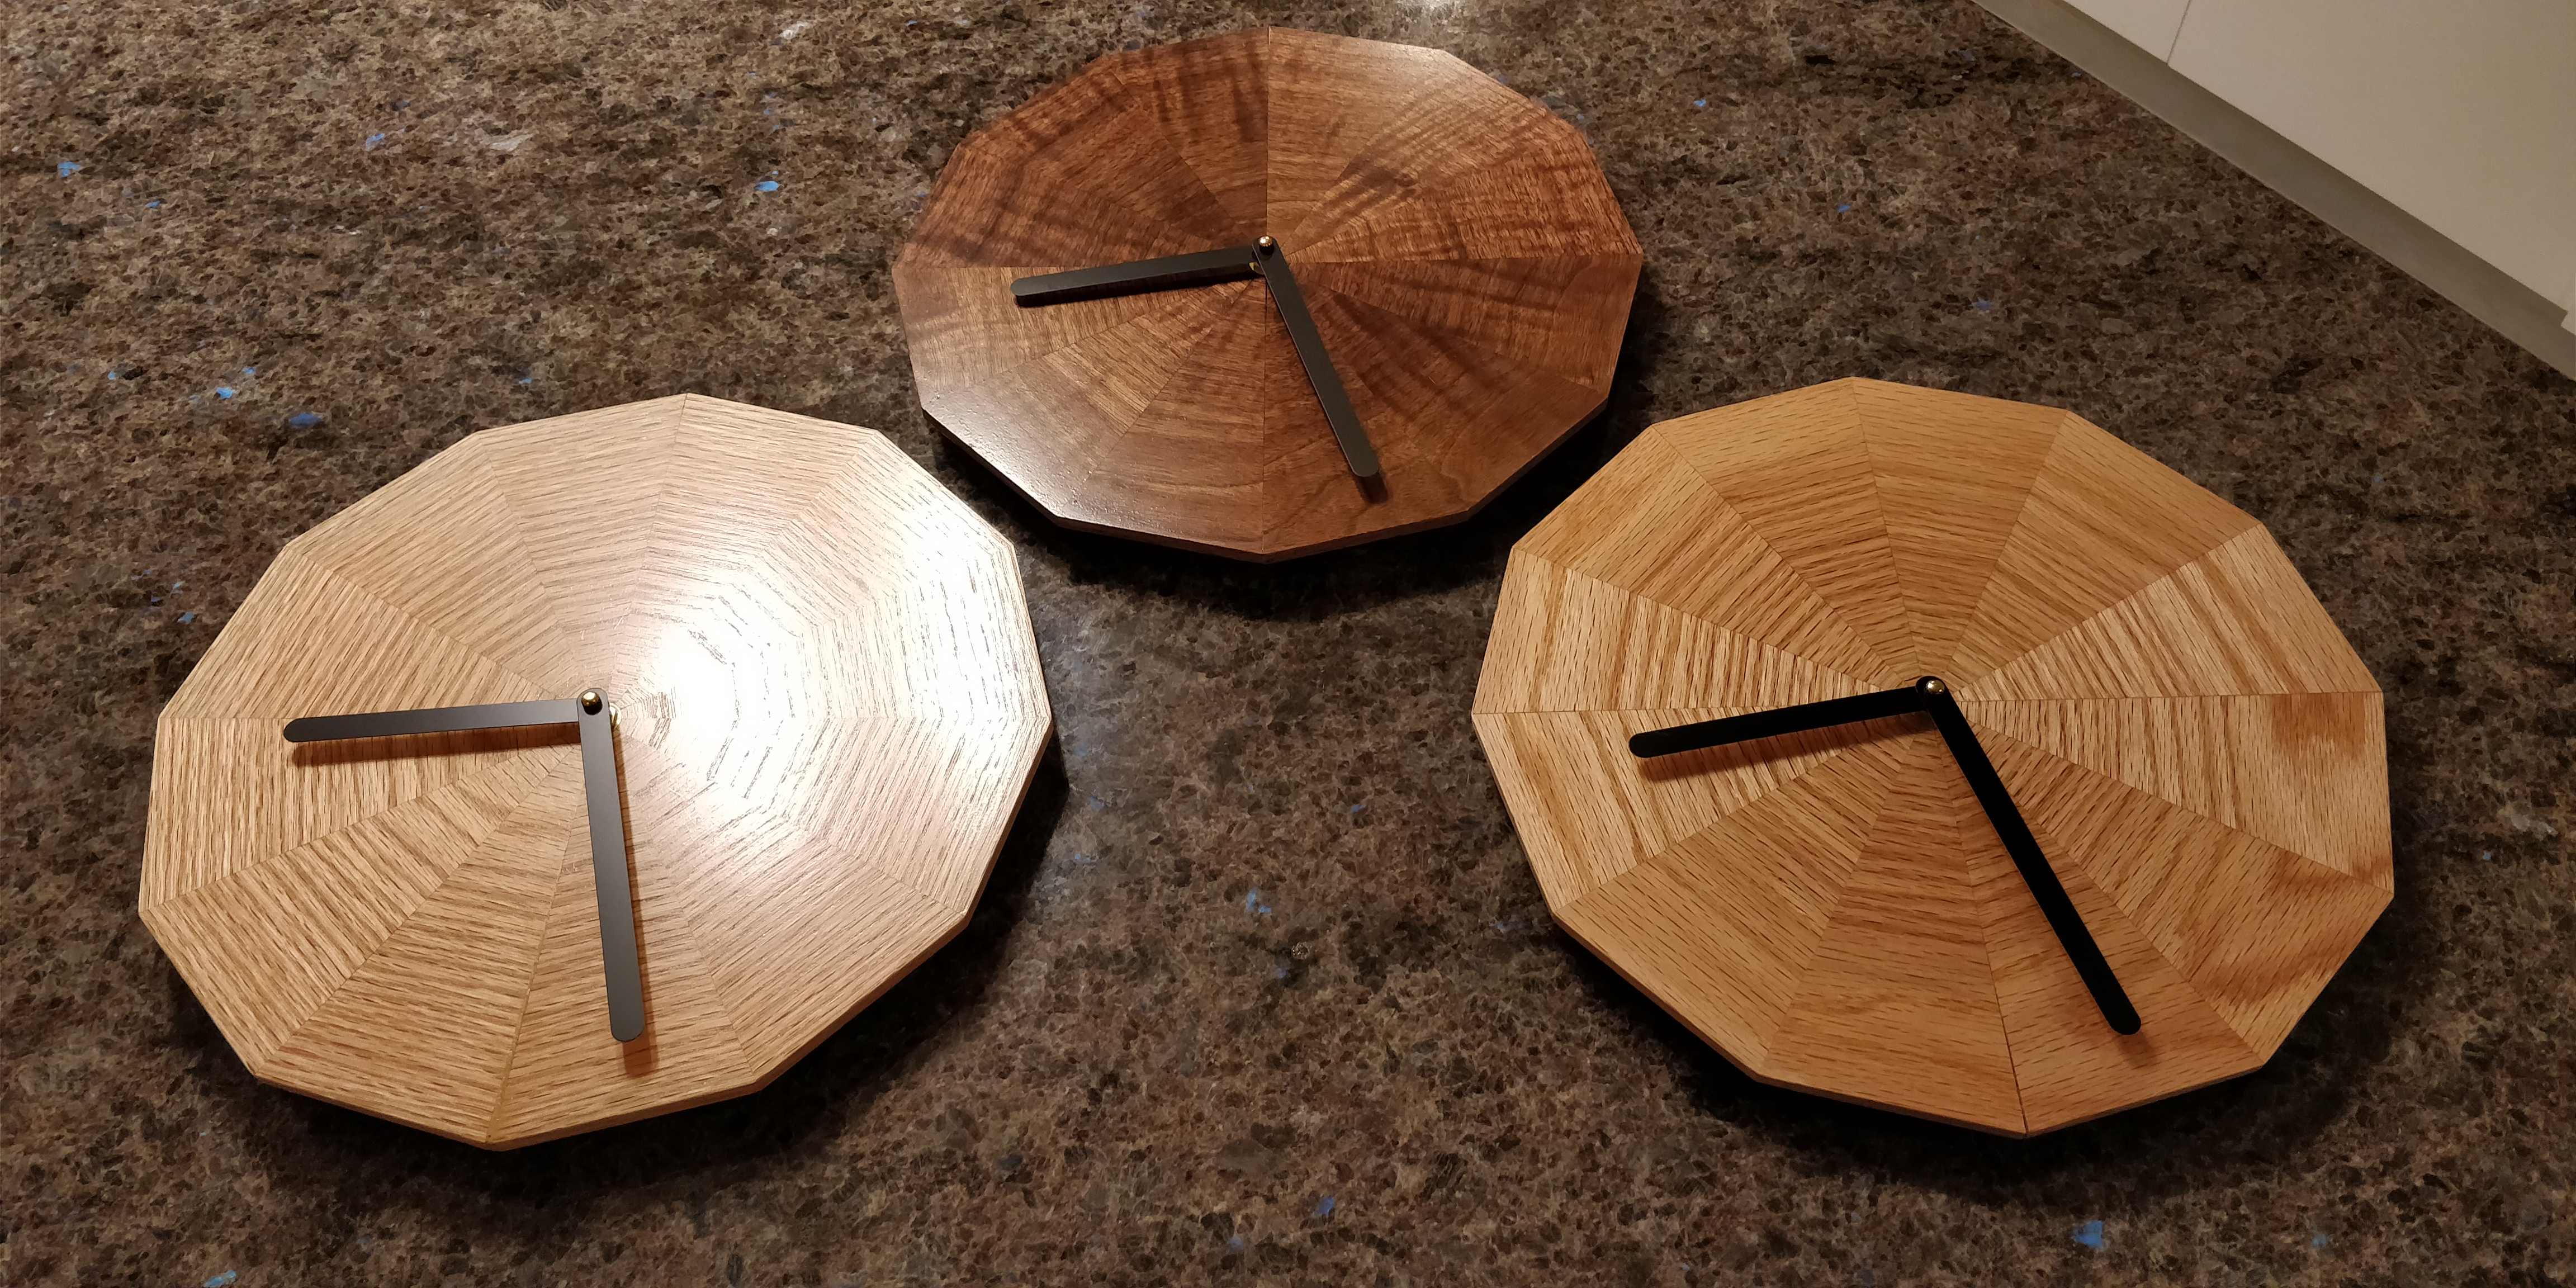
I had an idea to create a simple wooden clock face where the familiar clock dial was evoked through the basic shape and grain of the material. I wanted to try to wrap the wood grain around a full circle with subtle changes in grain direction marking the hour divisions. Originally I was just going to make one clock with red oak but there was a lovely bit of walnut that I couldn’t resist buying at the same time and I also ended up with apiece of oak twice as long as I needed. So three clocks with only 2.5 times the effort.
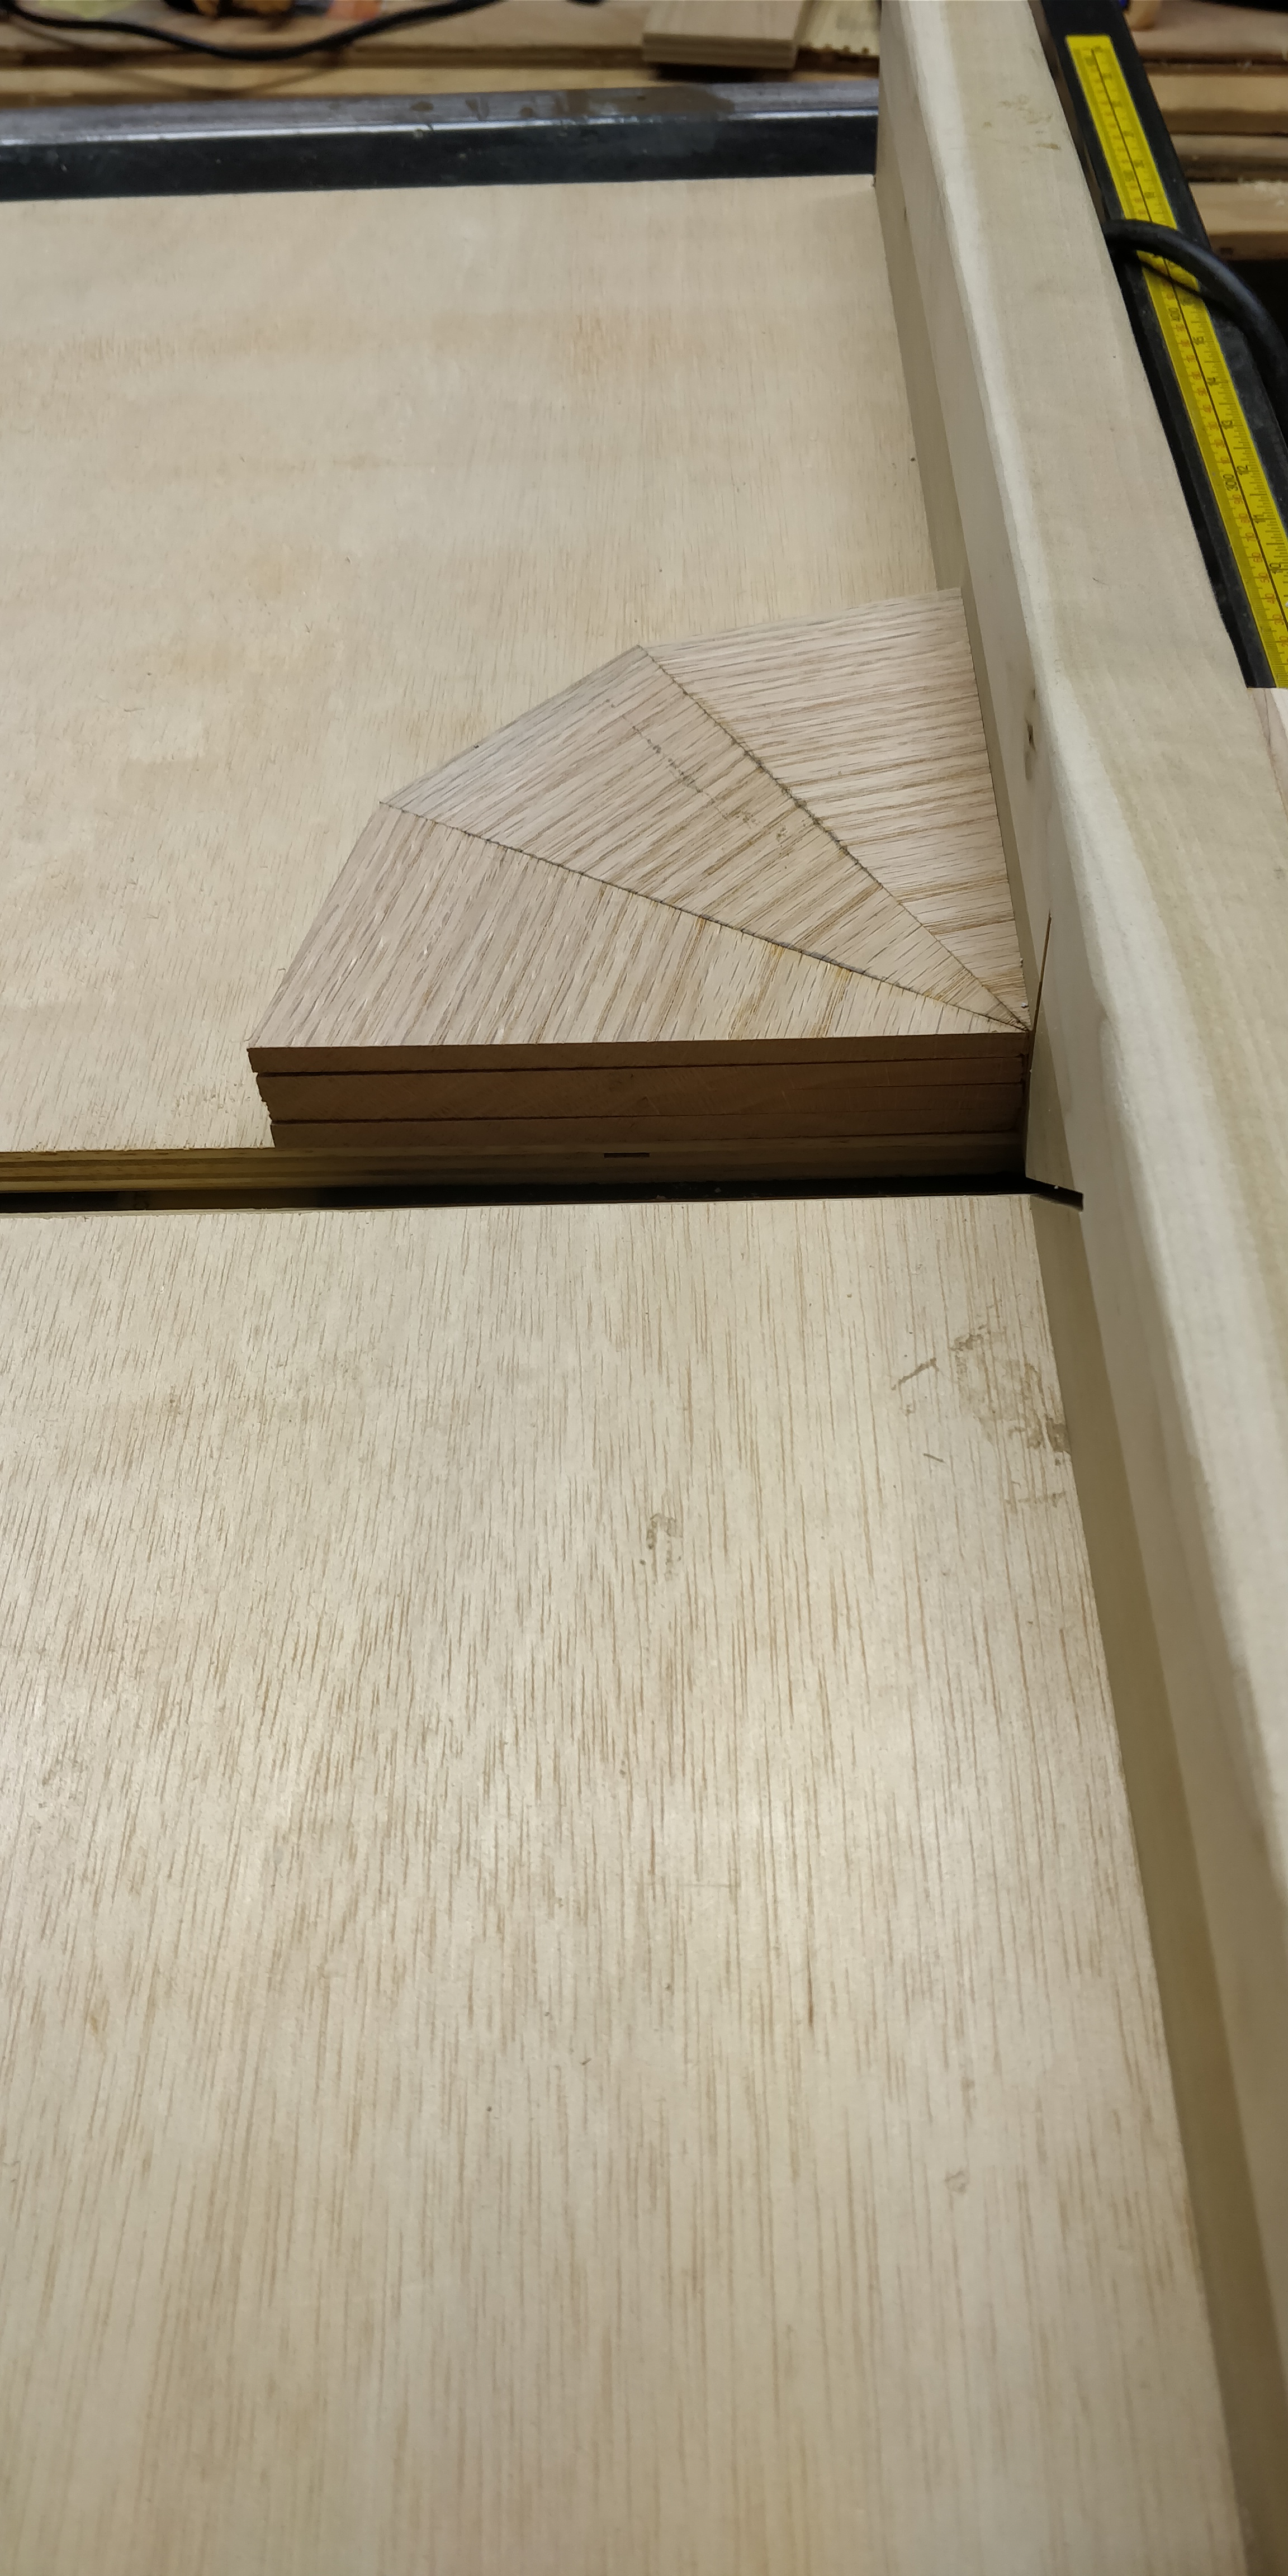
Cutting the 30-degree triangle sections using a miter gauge.
No matter how carefully you adjust the miter gauge, errors accumulate. So the best I could do was get as close to 90-degrees for 3 sections but be slightly over so I could trim to square later.
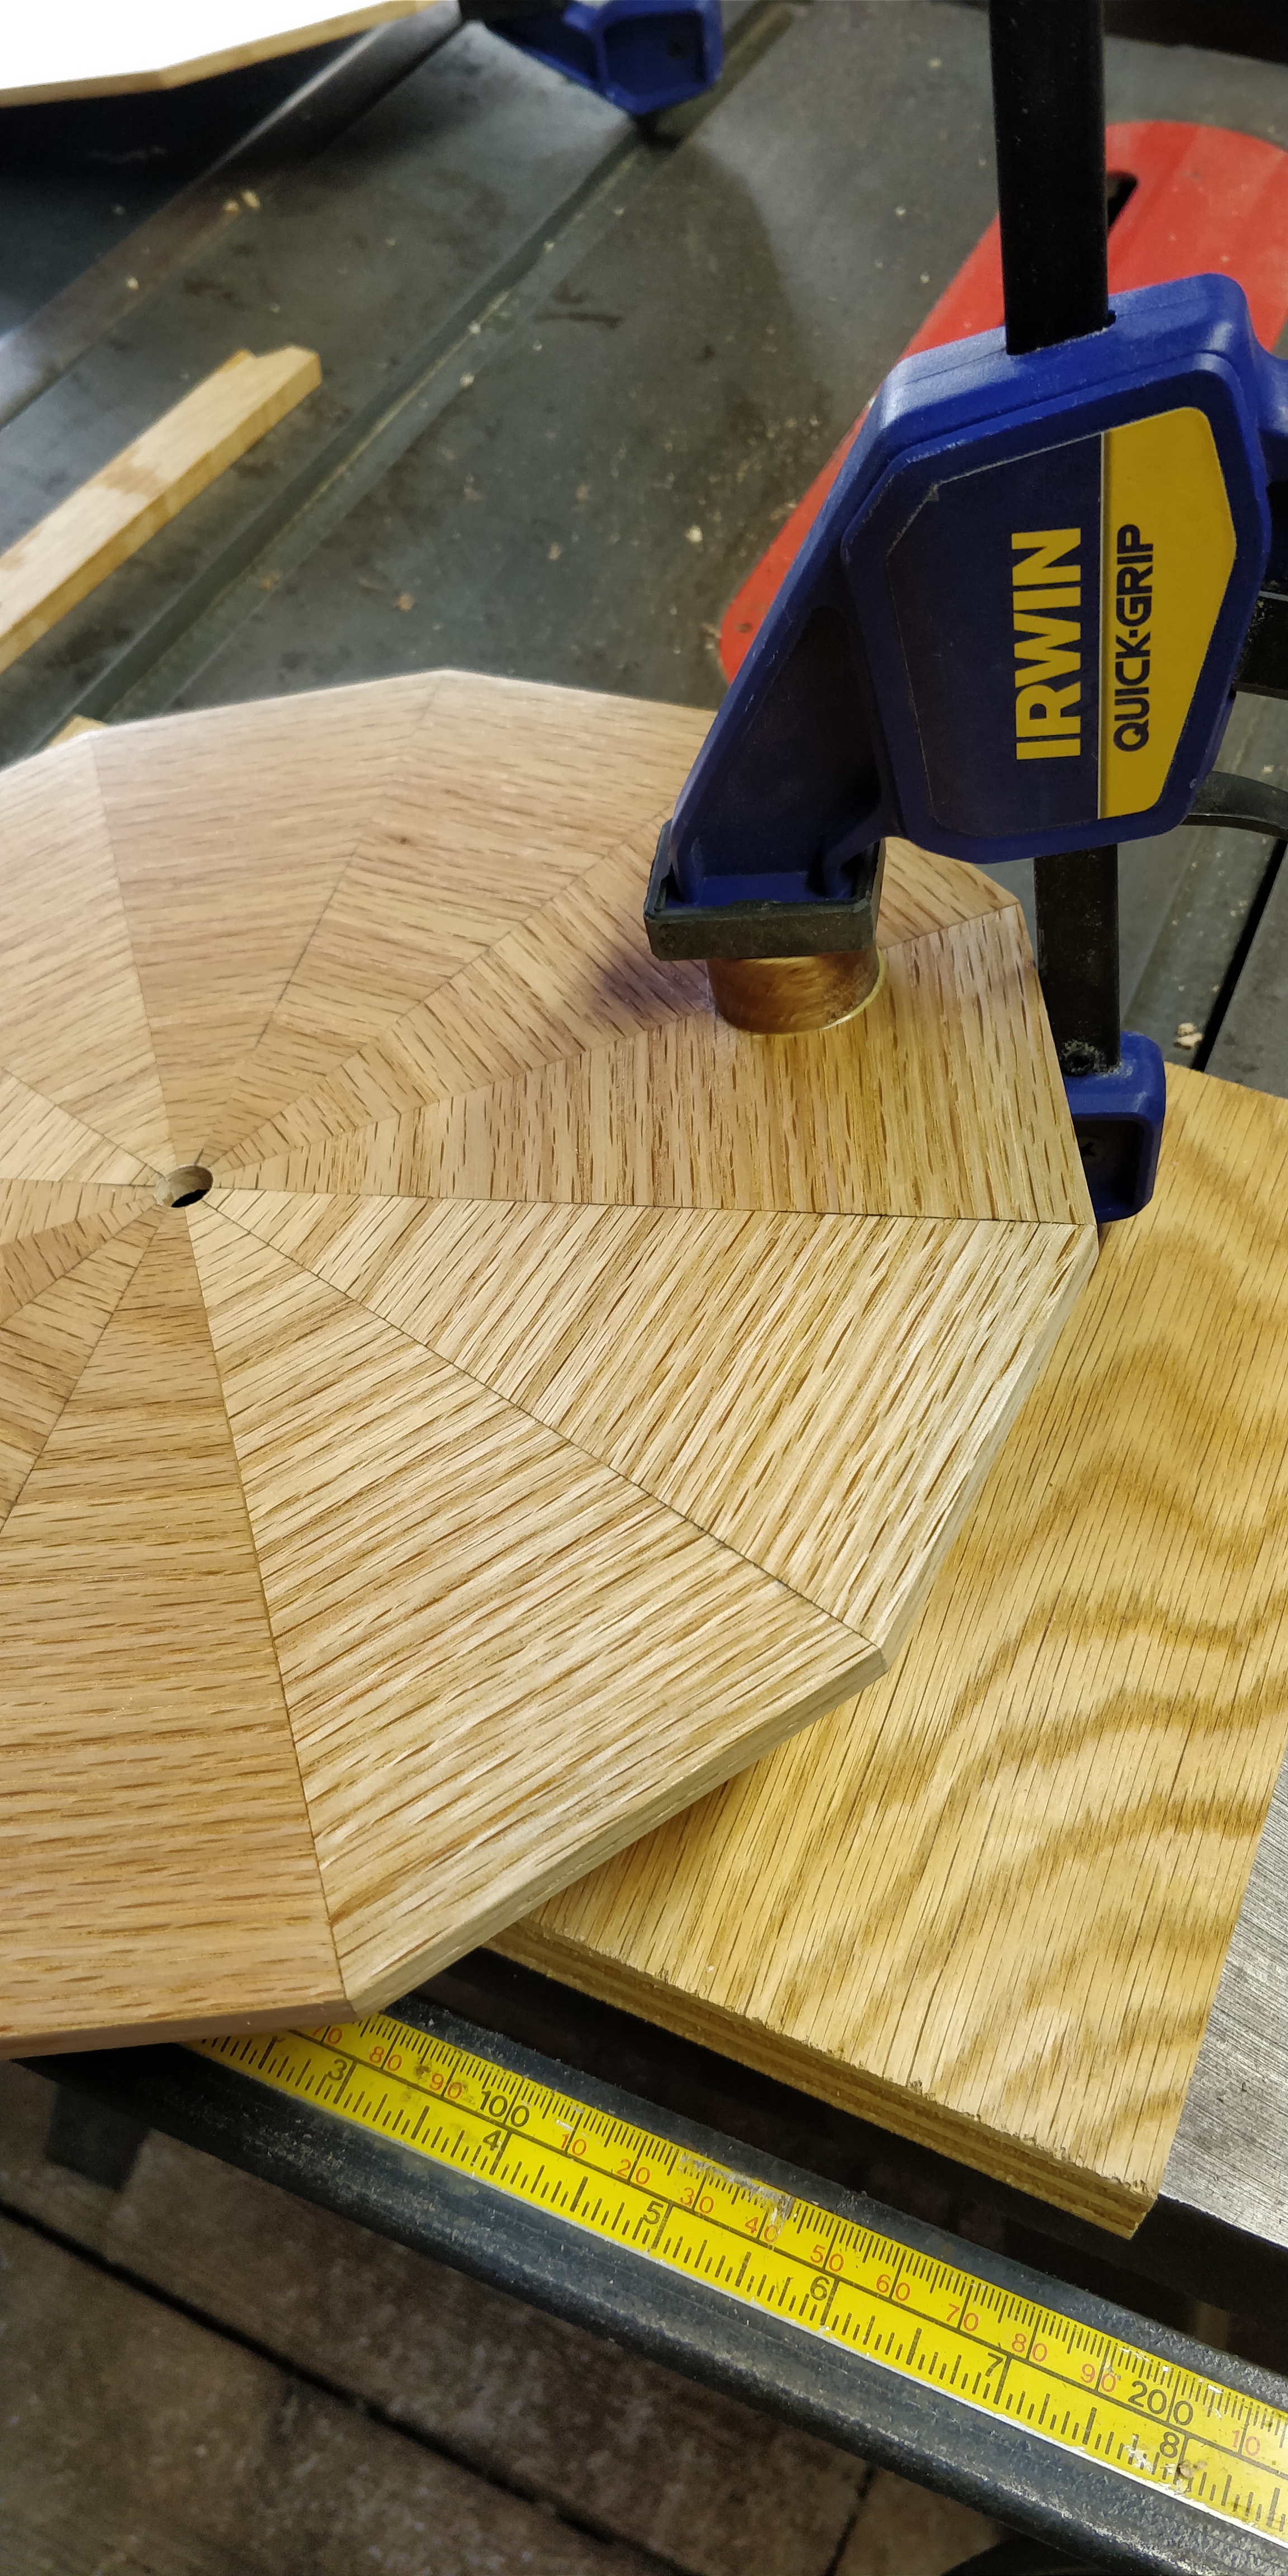
The basic idea of wrapping the grain around 360 degrees.
Here’s the sections as they came out of the piece of 5.5″ wide stock.
Here’s the Walnut sections before glue up.
Gluing a quarter section together, finicky.
Four quarter sections stacked up ready to square up on the table saw cross-cut sled.
Gluing 4 quarter sections together. This wasn’t the best way and it left me with some gaps to fill.
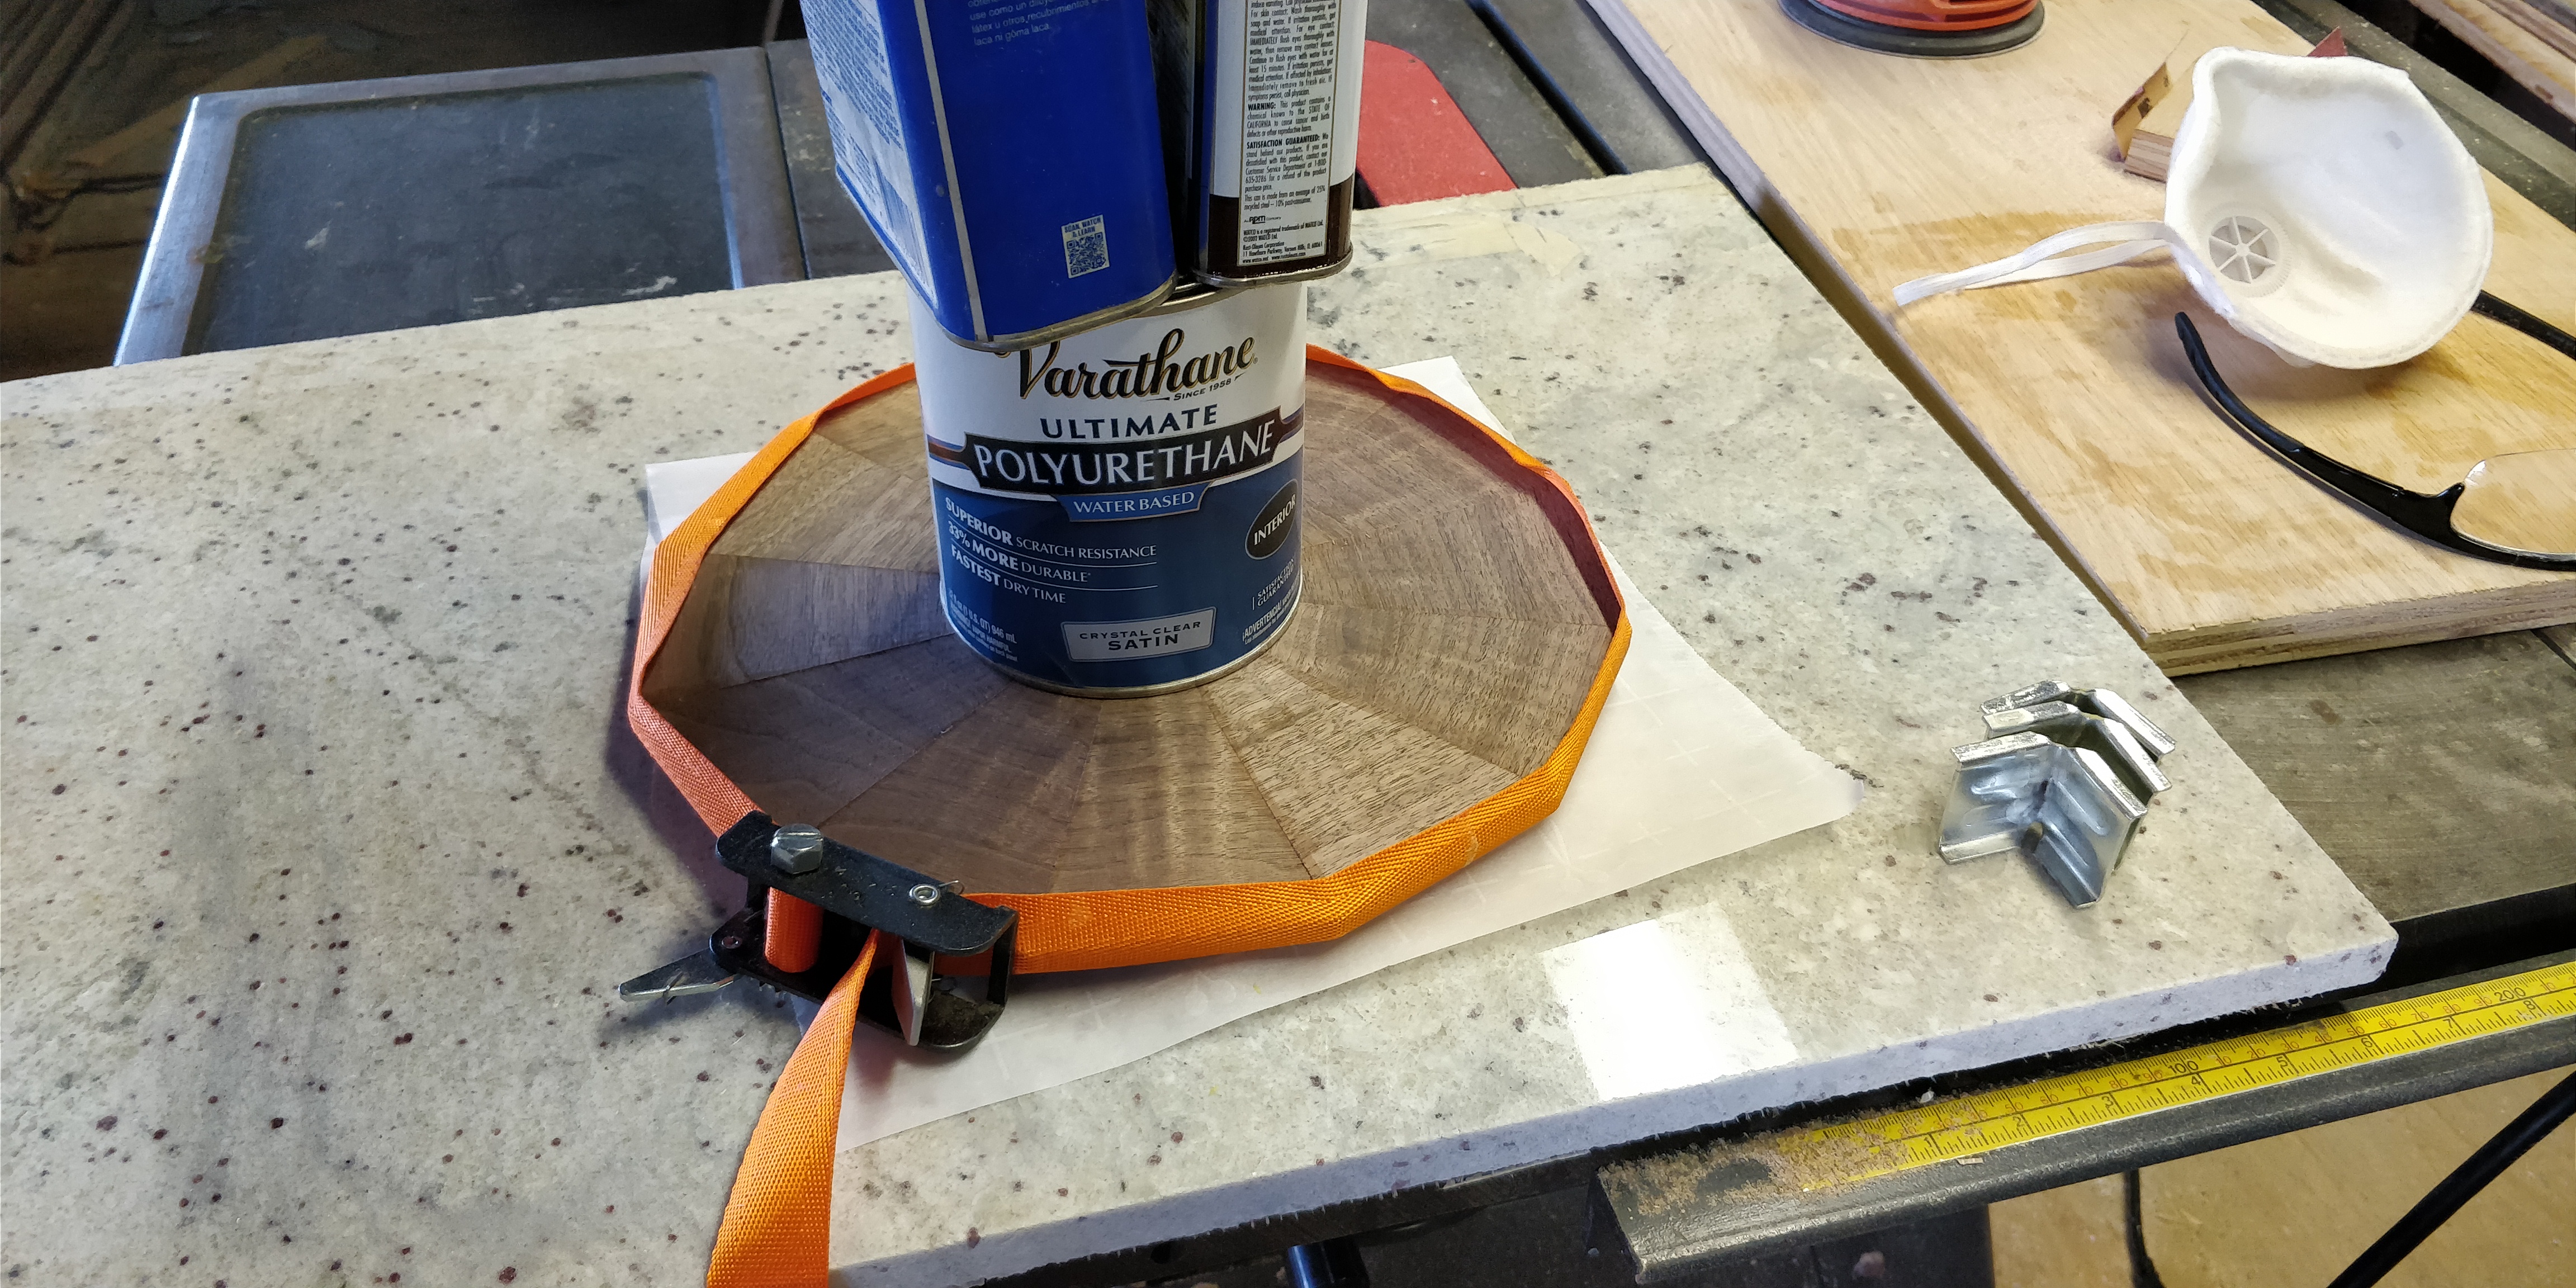
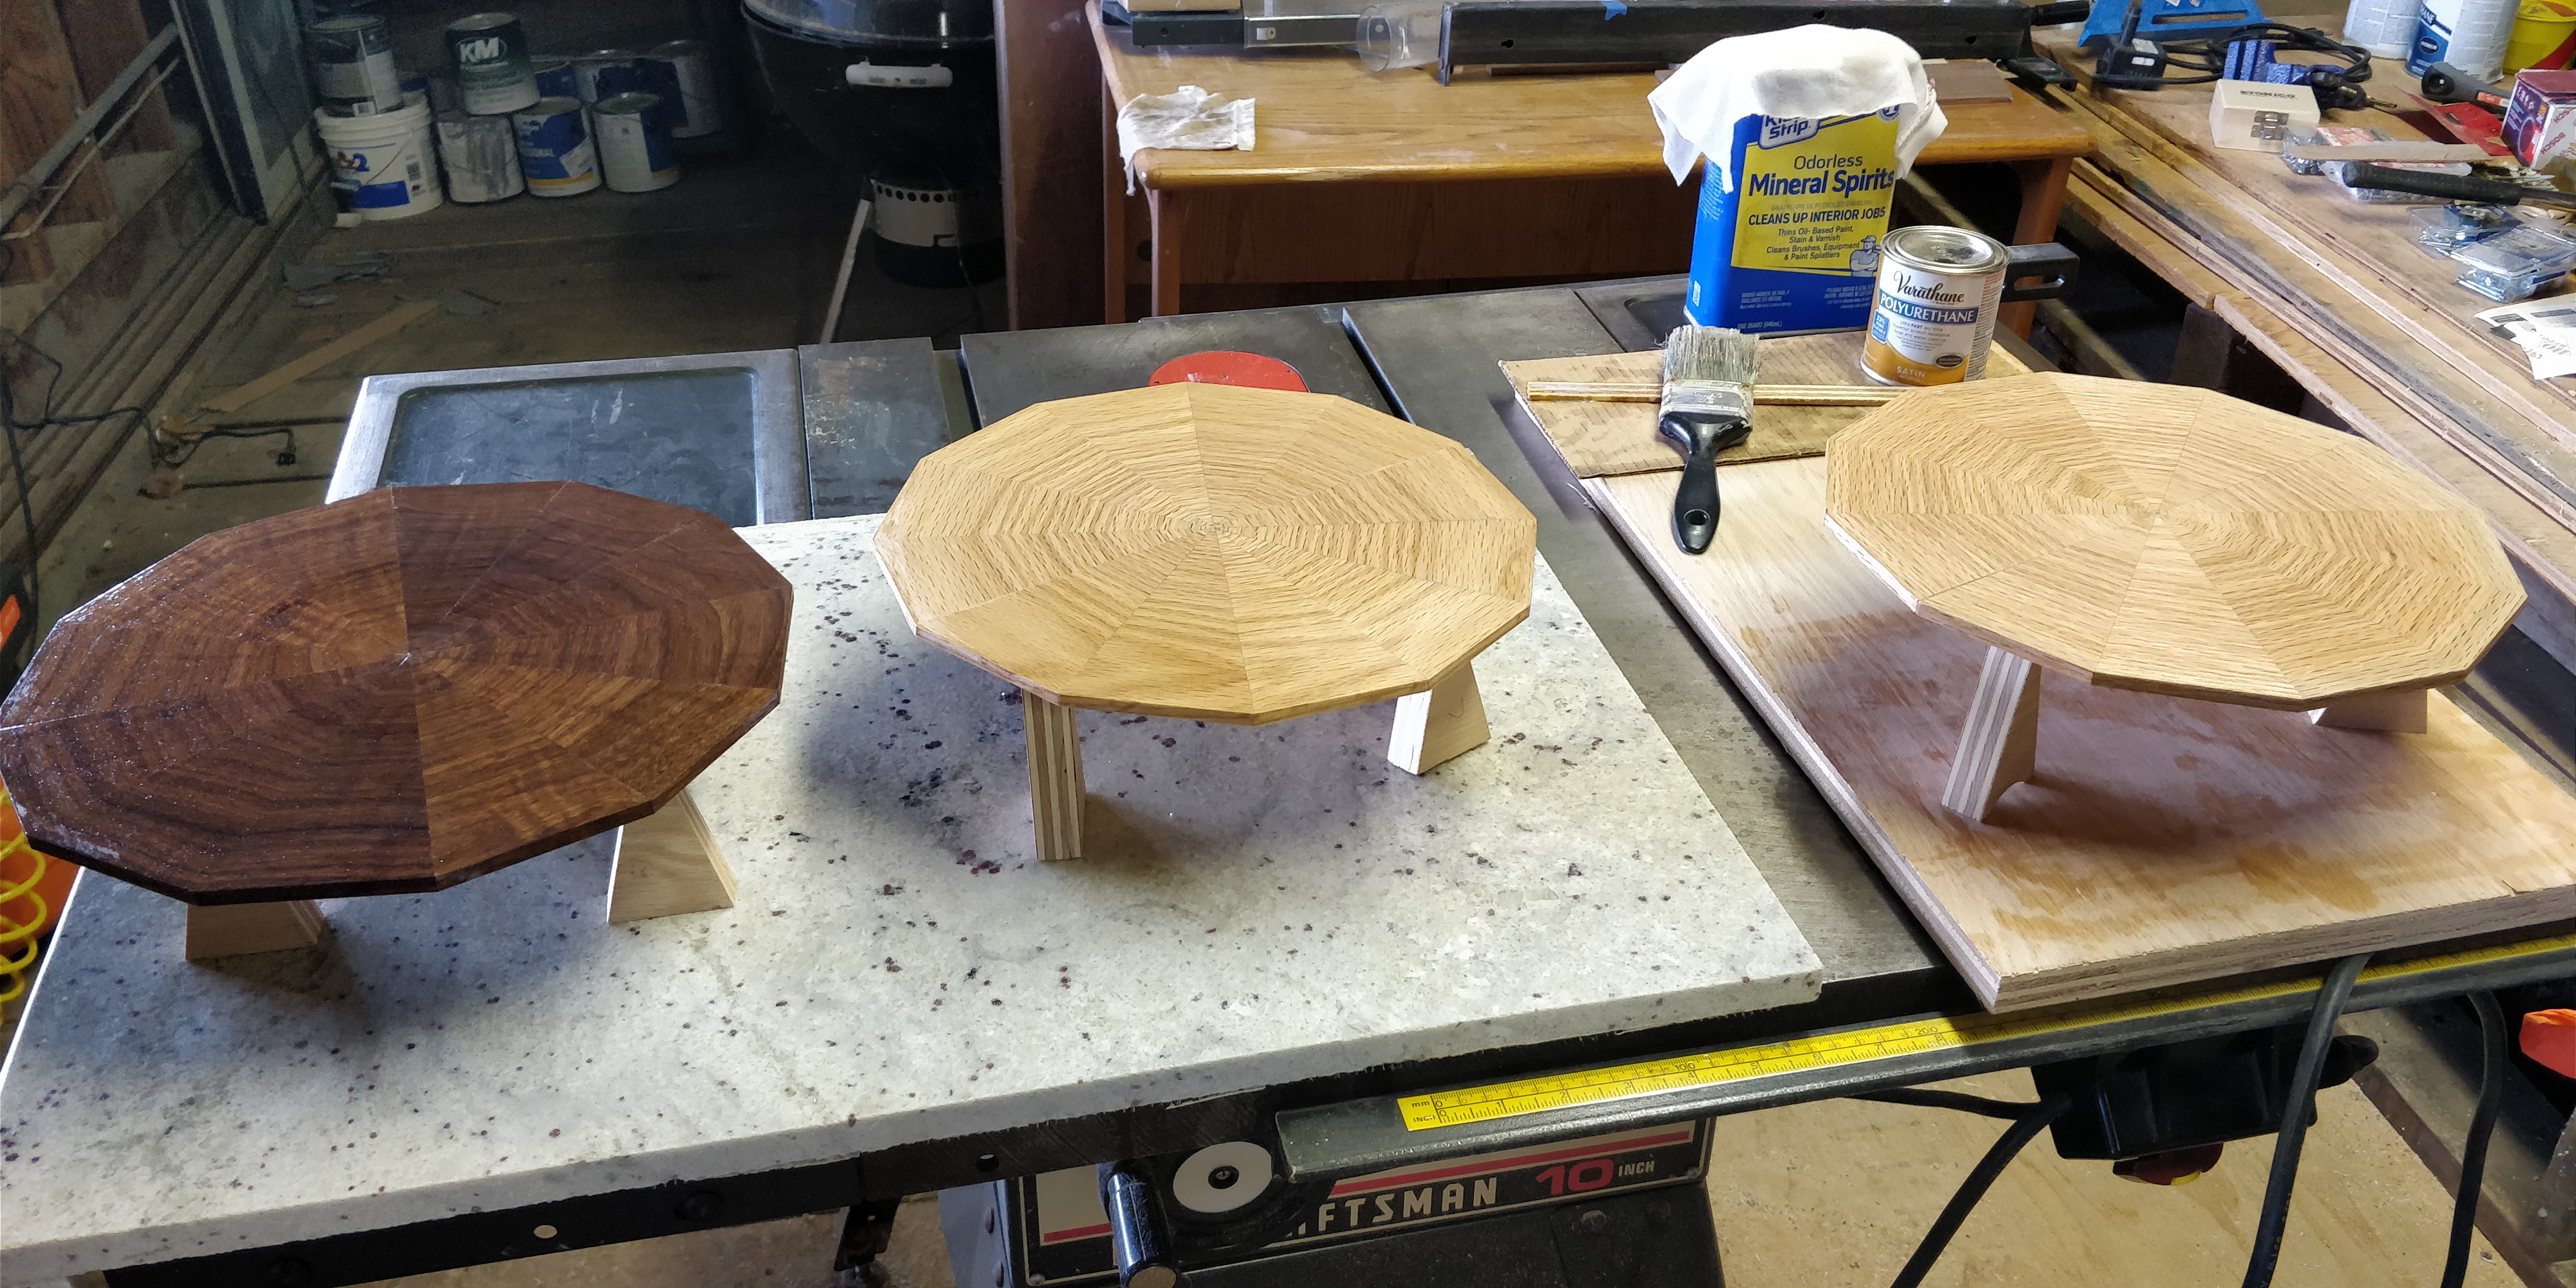
The three clock faces sanded with first coat of finish. I started with the water based Varathane satin polyurethane, but I really didn’t like the results after a couple of coats. So I sanded it off and started again with Arm-R-Seal wipe on polyurethane which worked much better.
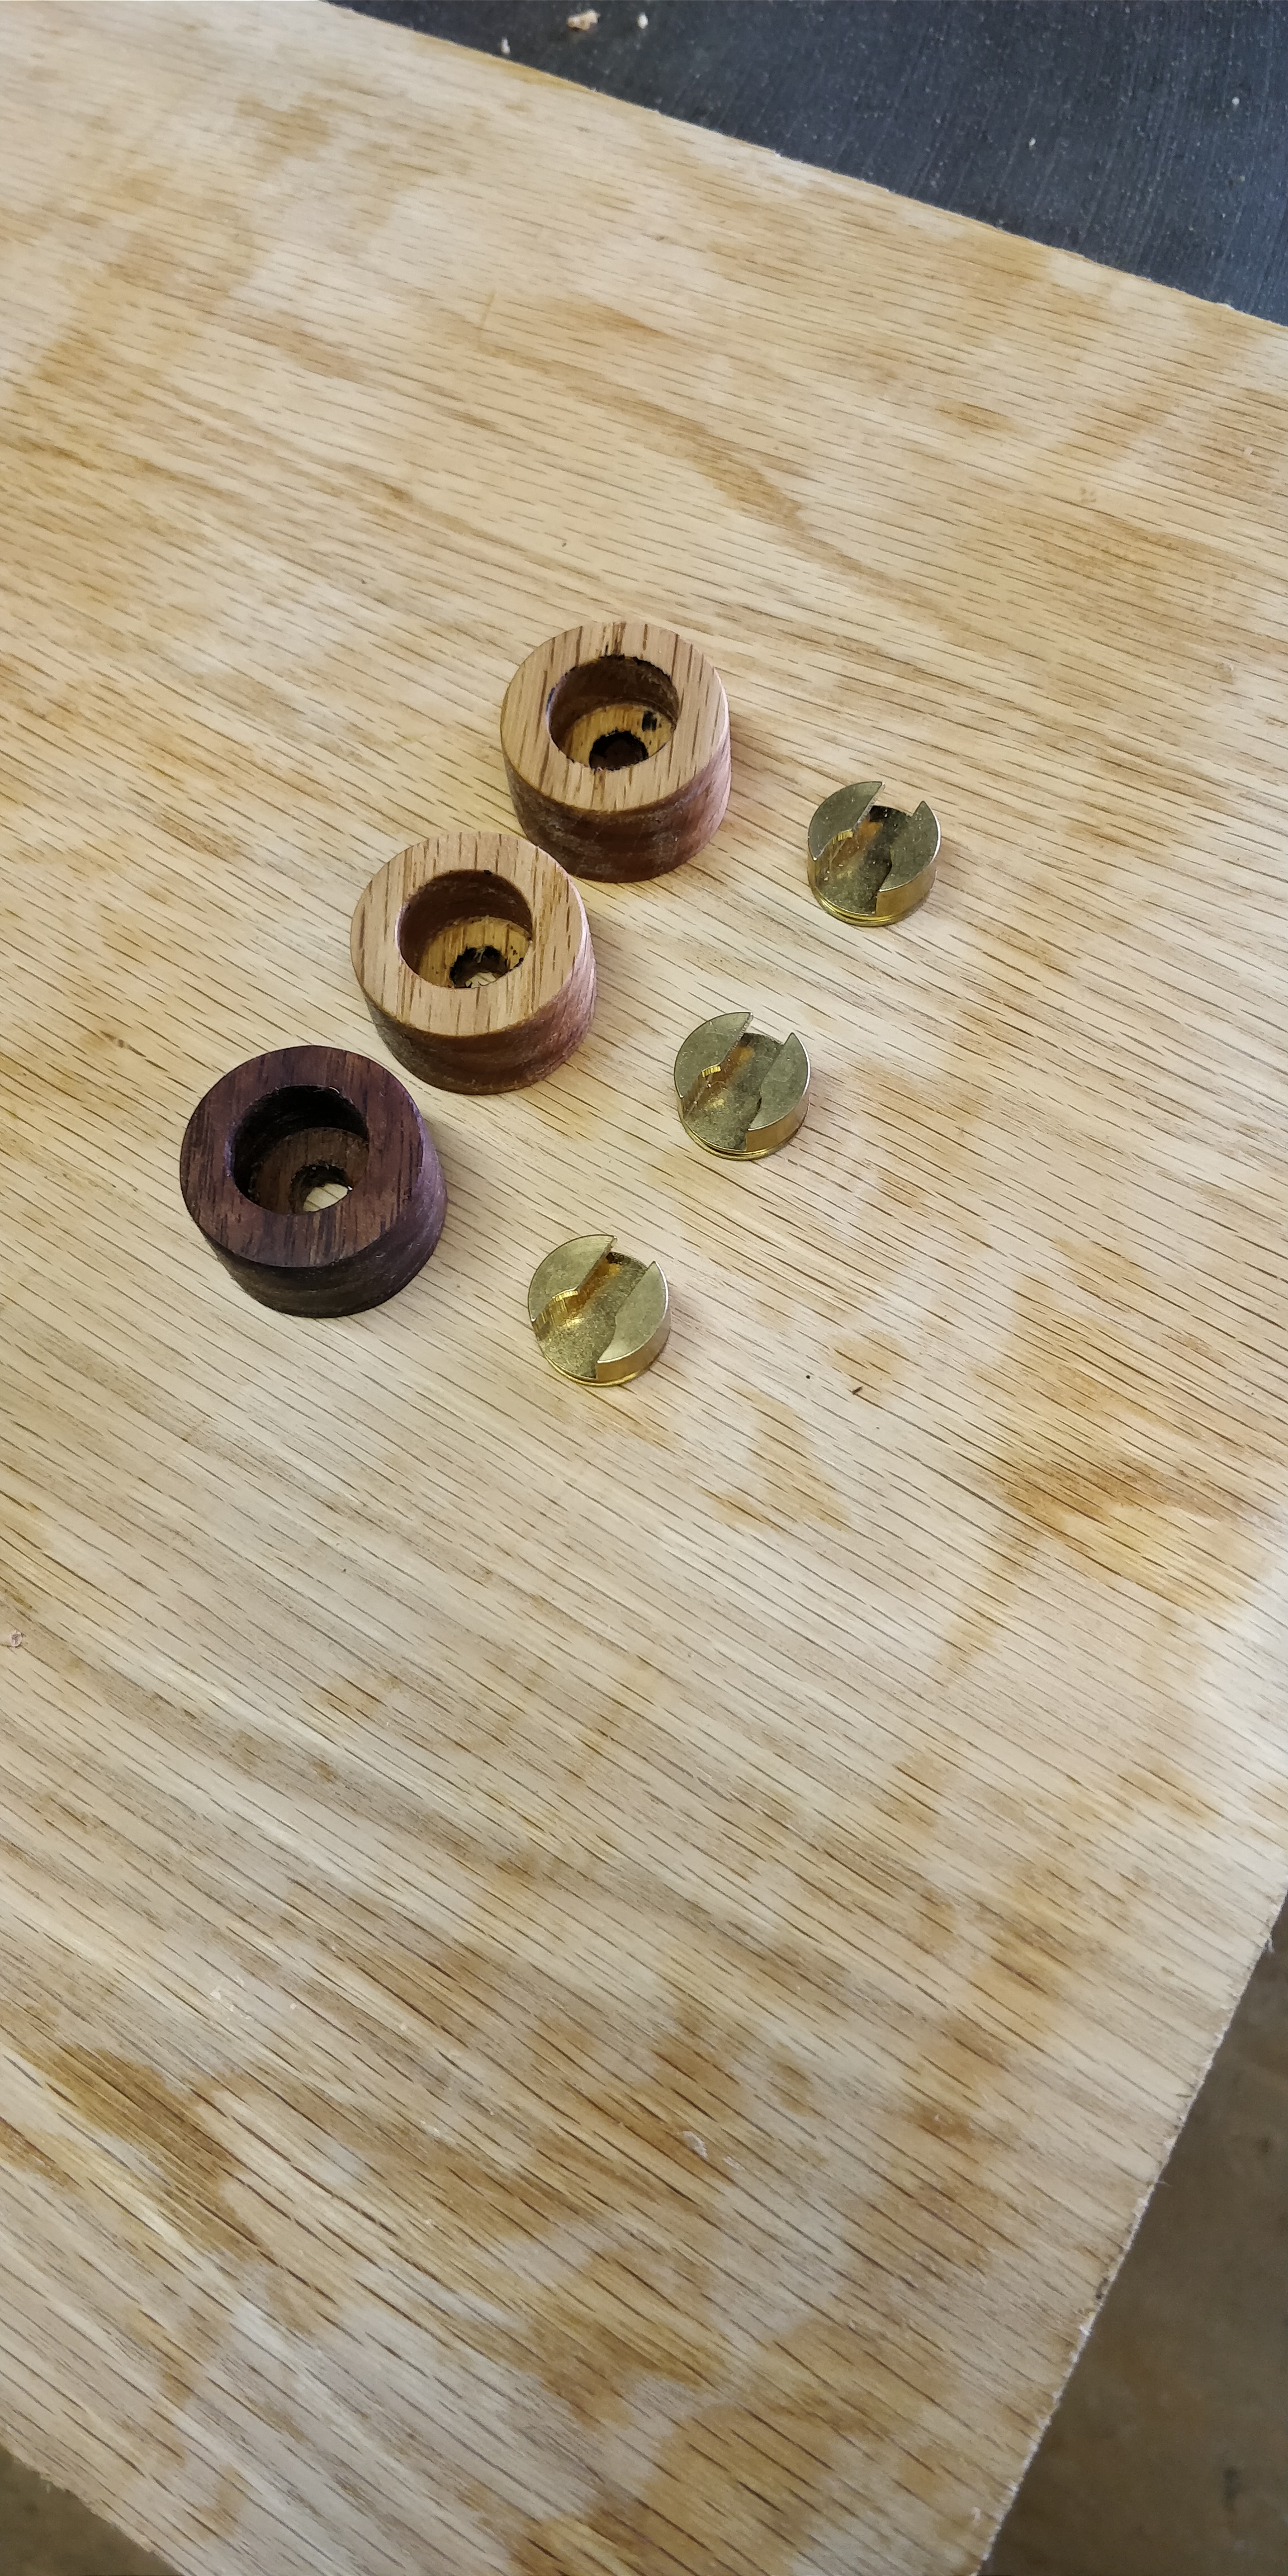
I found these very neat brass key-slot plugs for hanging onto a screw head and I fabricated wooden holders to attach them to the backside of the clock face.
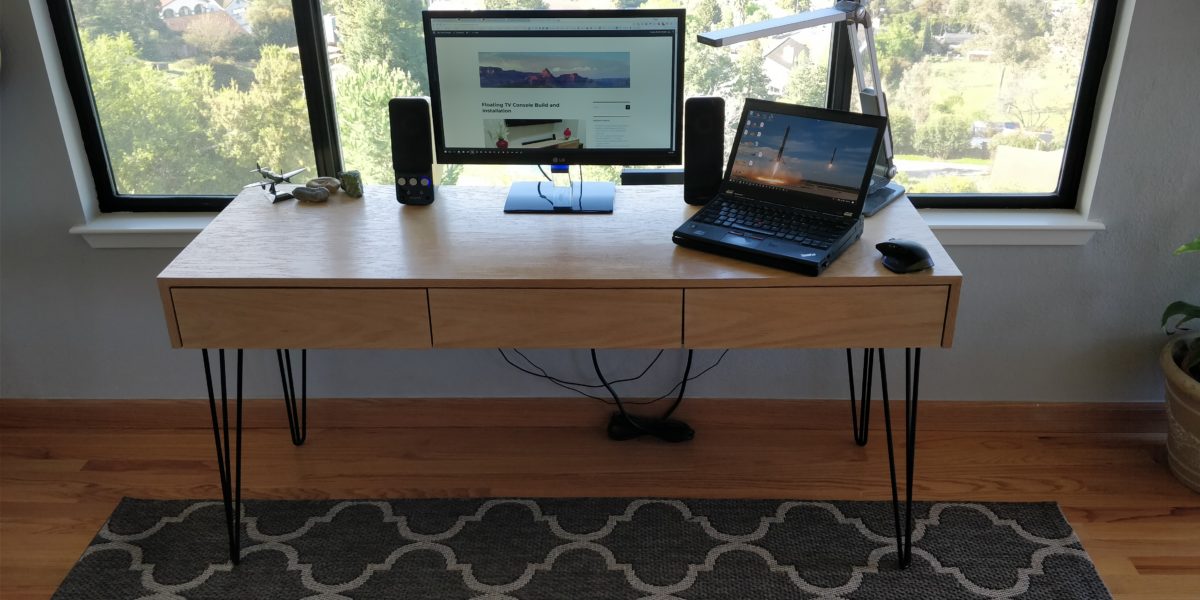
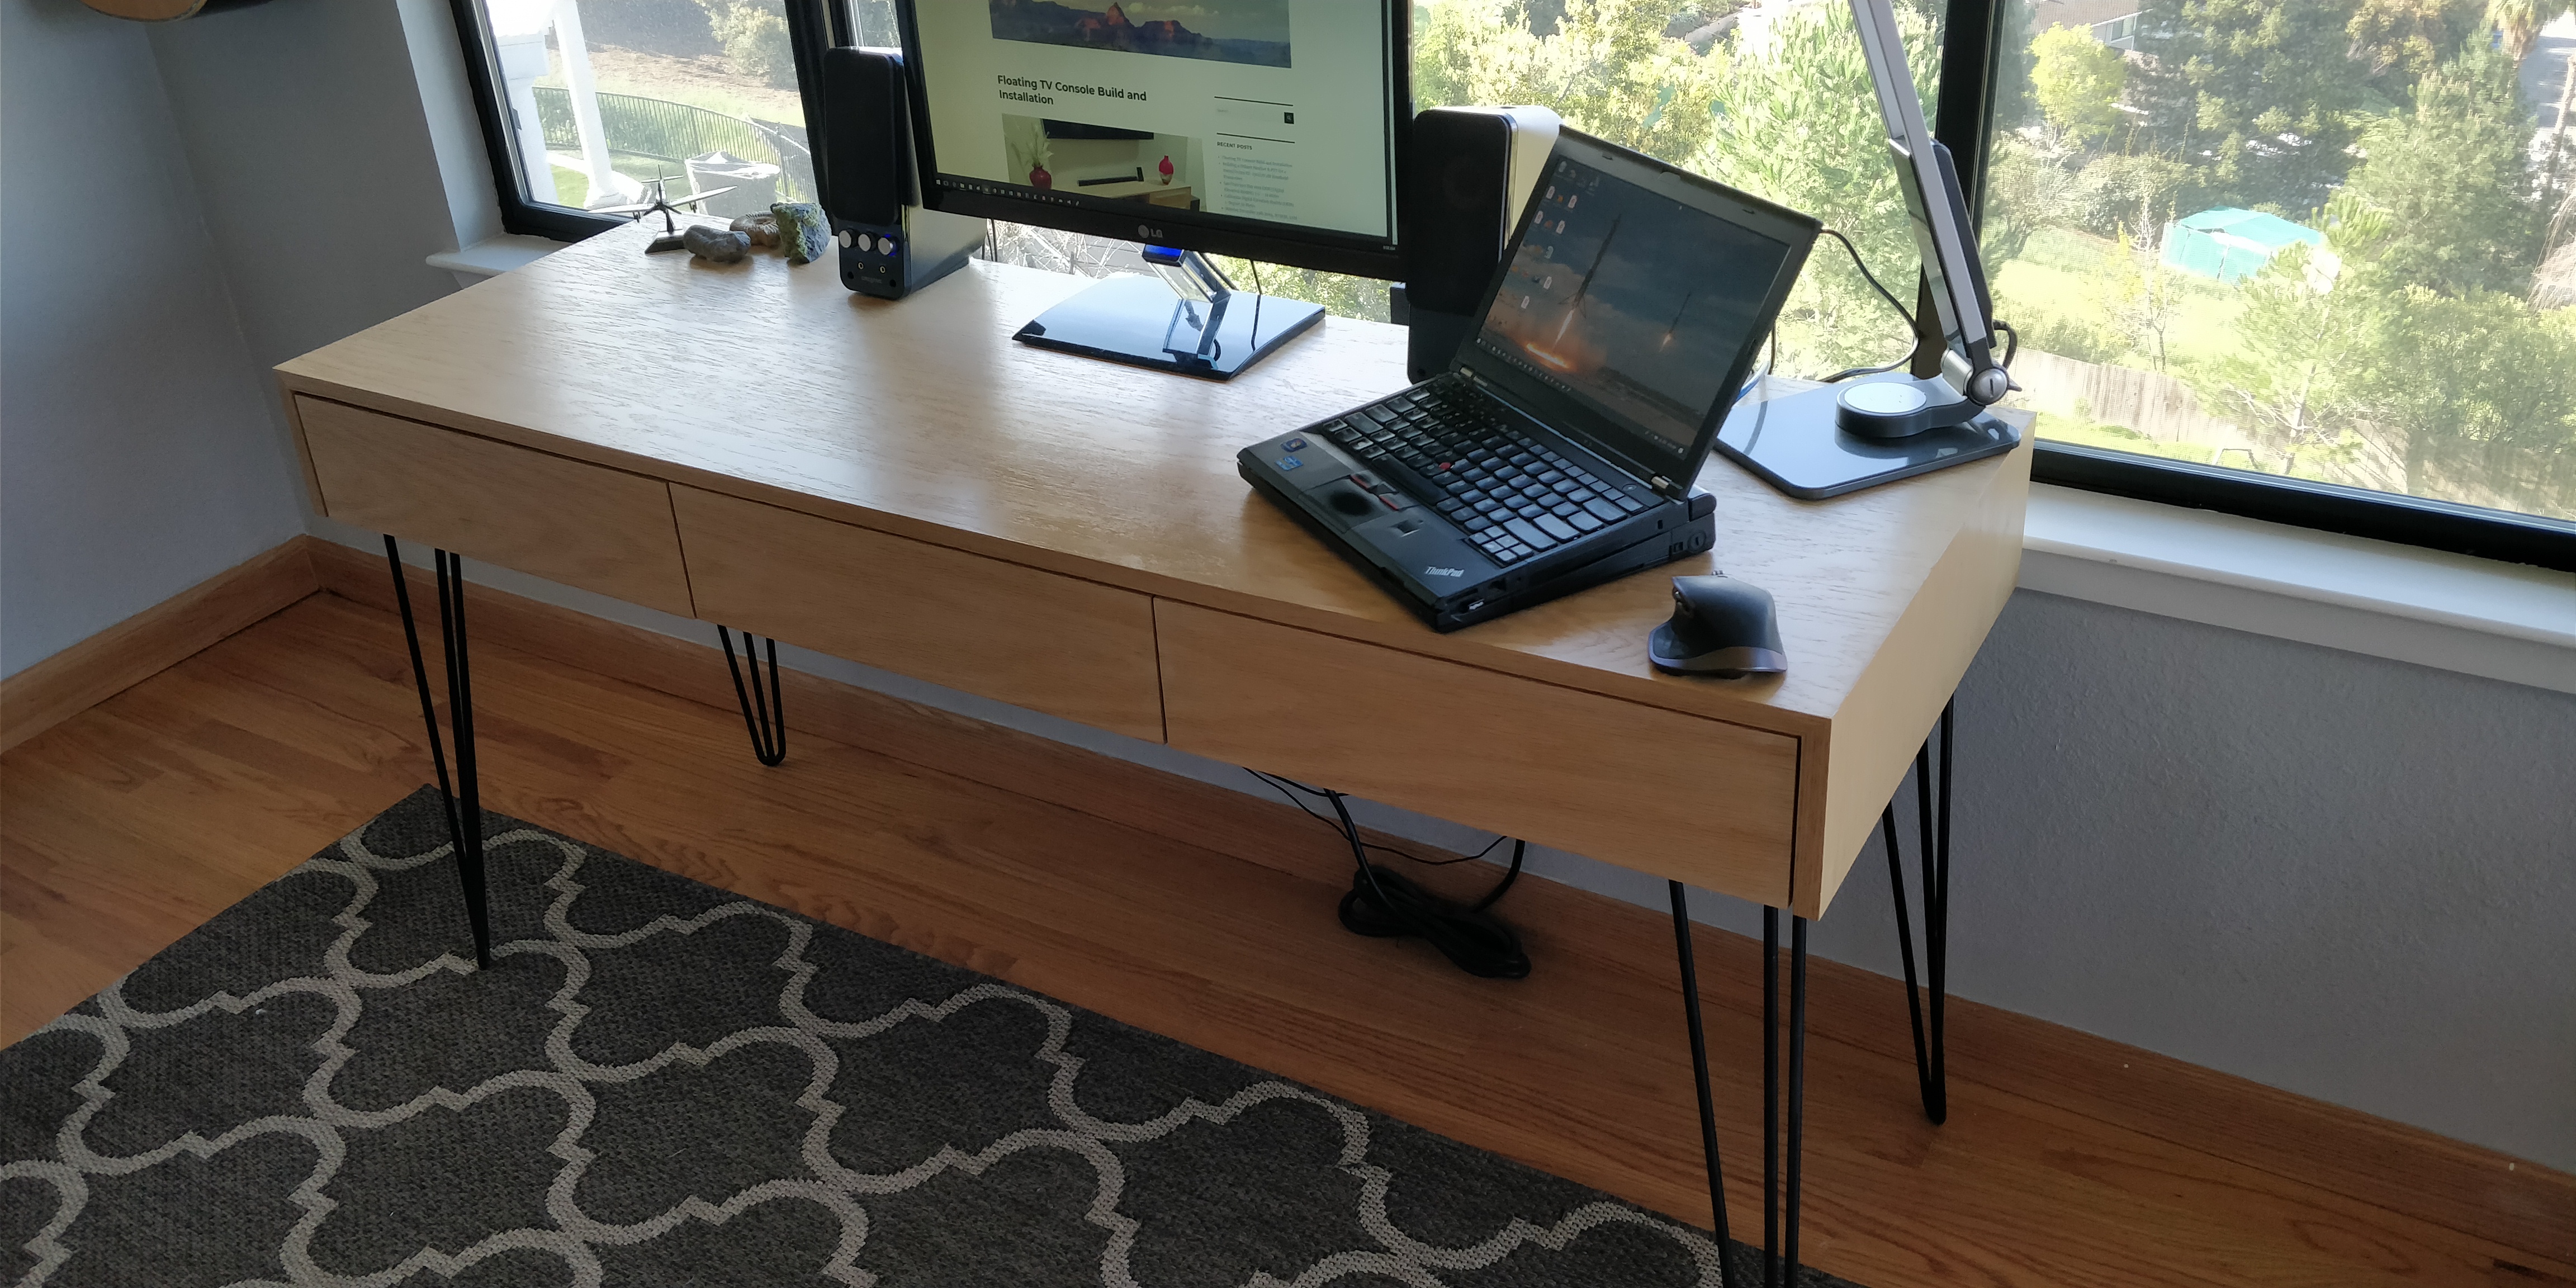
I spend way too much of my life sitting in front of a computer. Of course at work, but also a lot of the time at home. Our new home has a spectacular view of Silicon Valley and we put in a large window to take advantage of it as a place for me to work. I wanted a very specific desk, simple, unadorned with a modern style to match the house and most importantly clutter free. The design I came up with is essentially a box with three drawers on hairpin legs. The wood-grain on the top folds over the miter joints on the sides. With the red-oak plywood I used the effect isn’t that pronounced which was the point. There is a compartment behind the middle drawer to house a socket strip and all the various power supplier. Cables for phones/tablets etc. go directly into the middle drawer so they’re out of the way when on charge.
The mitered joint at the end of the table allow the wood-grain to ‘flow’ over the edge and down the side.
I used Sketch-Up to create the design and it’s available for download in their 3D Warehouse.
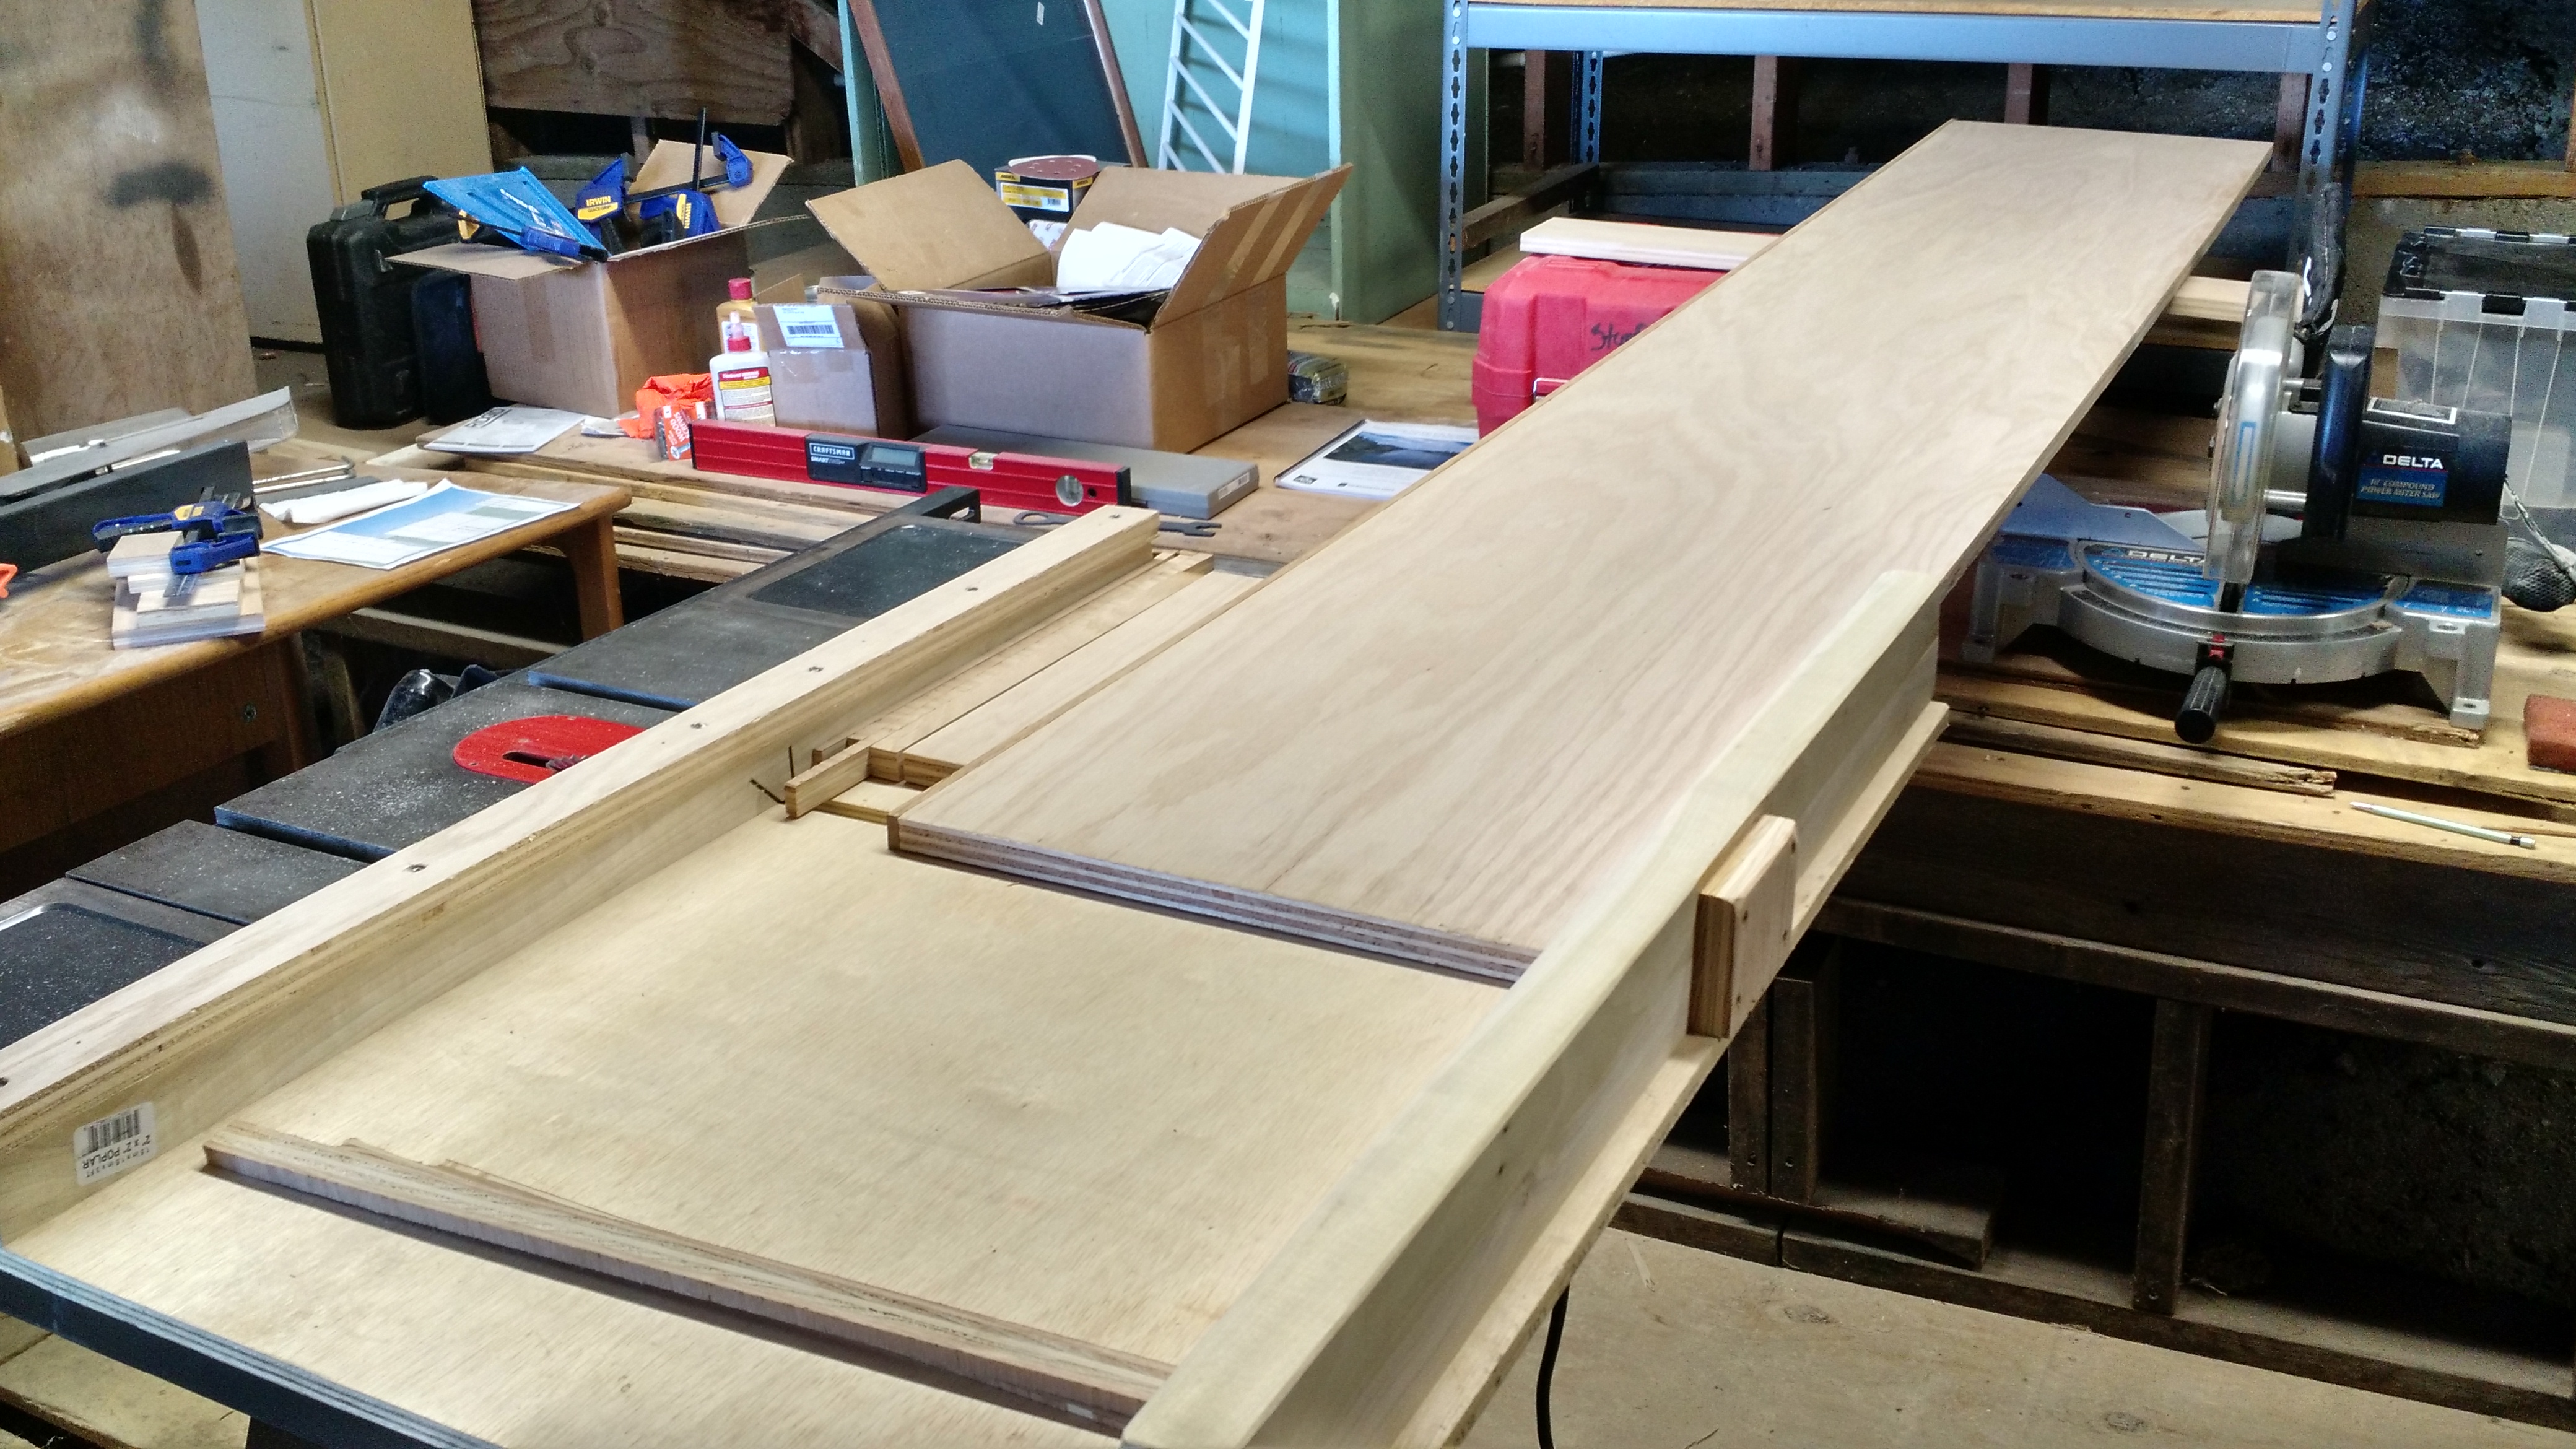
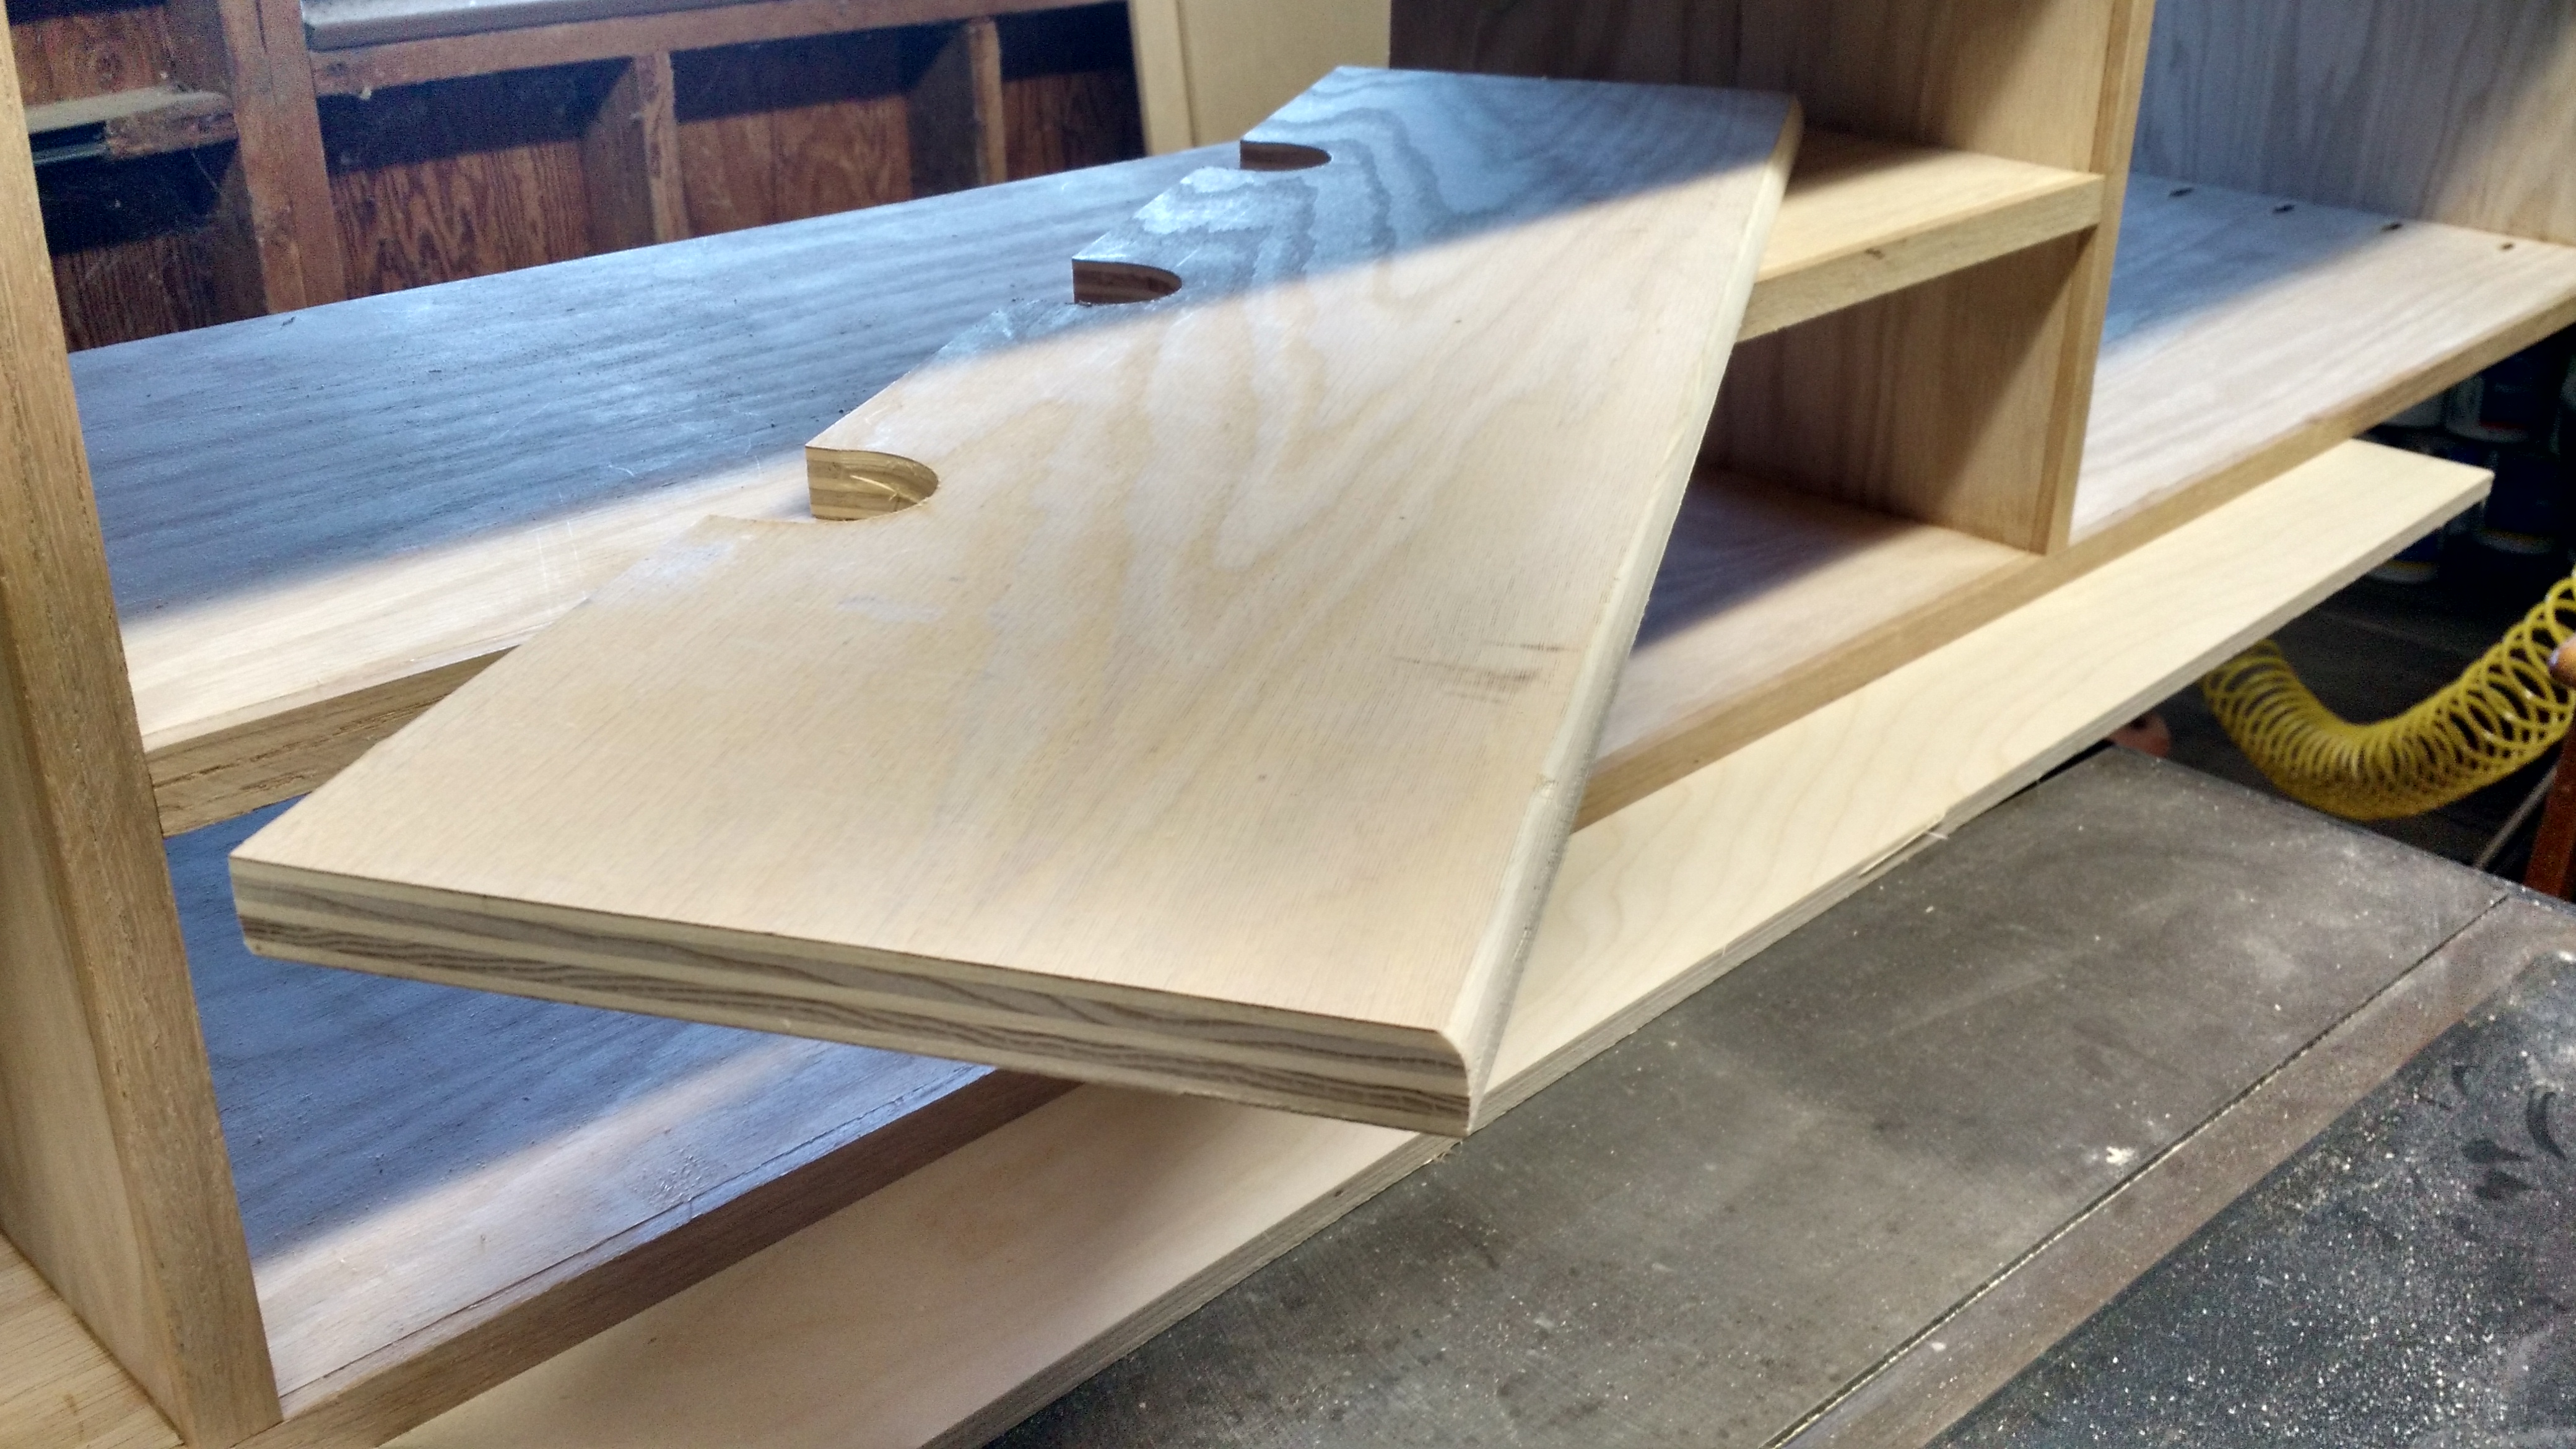
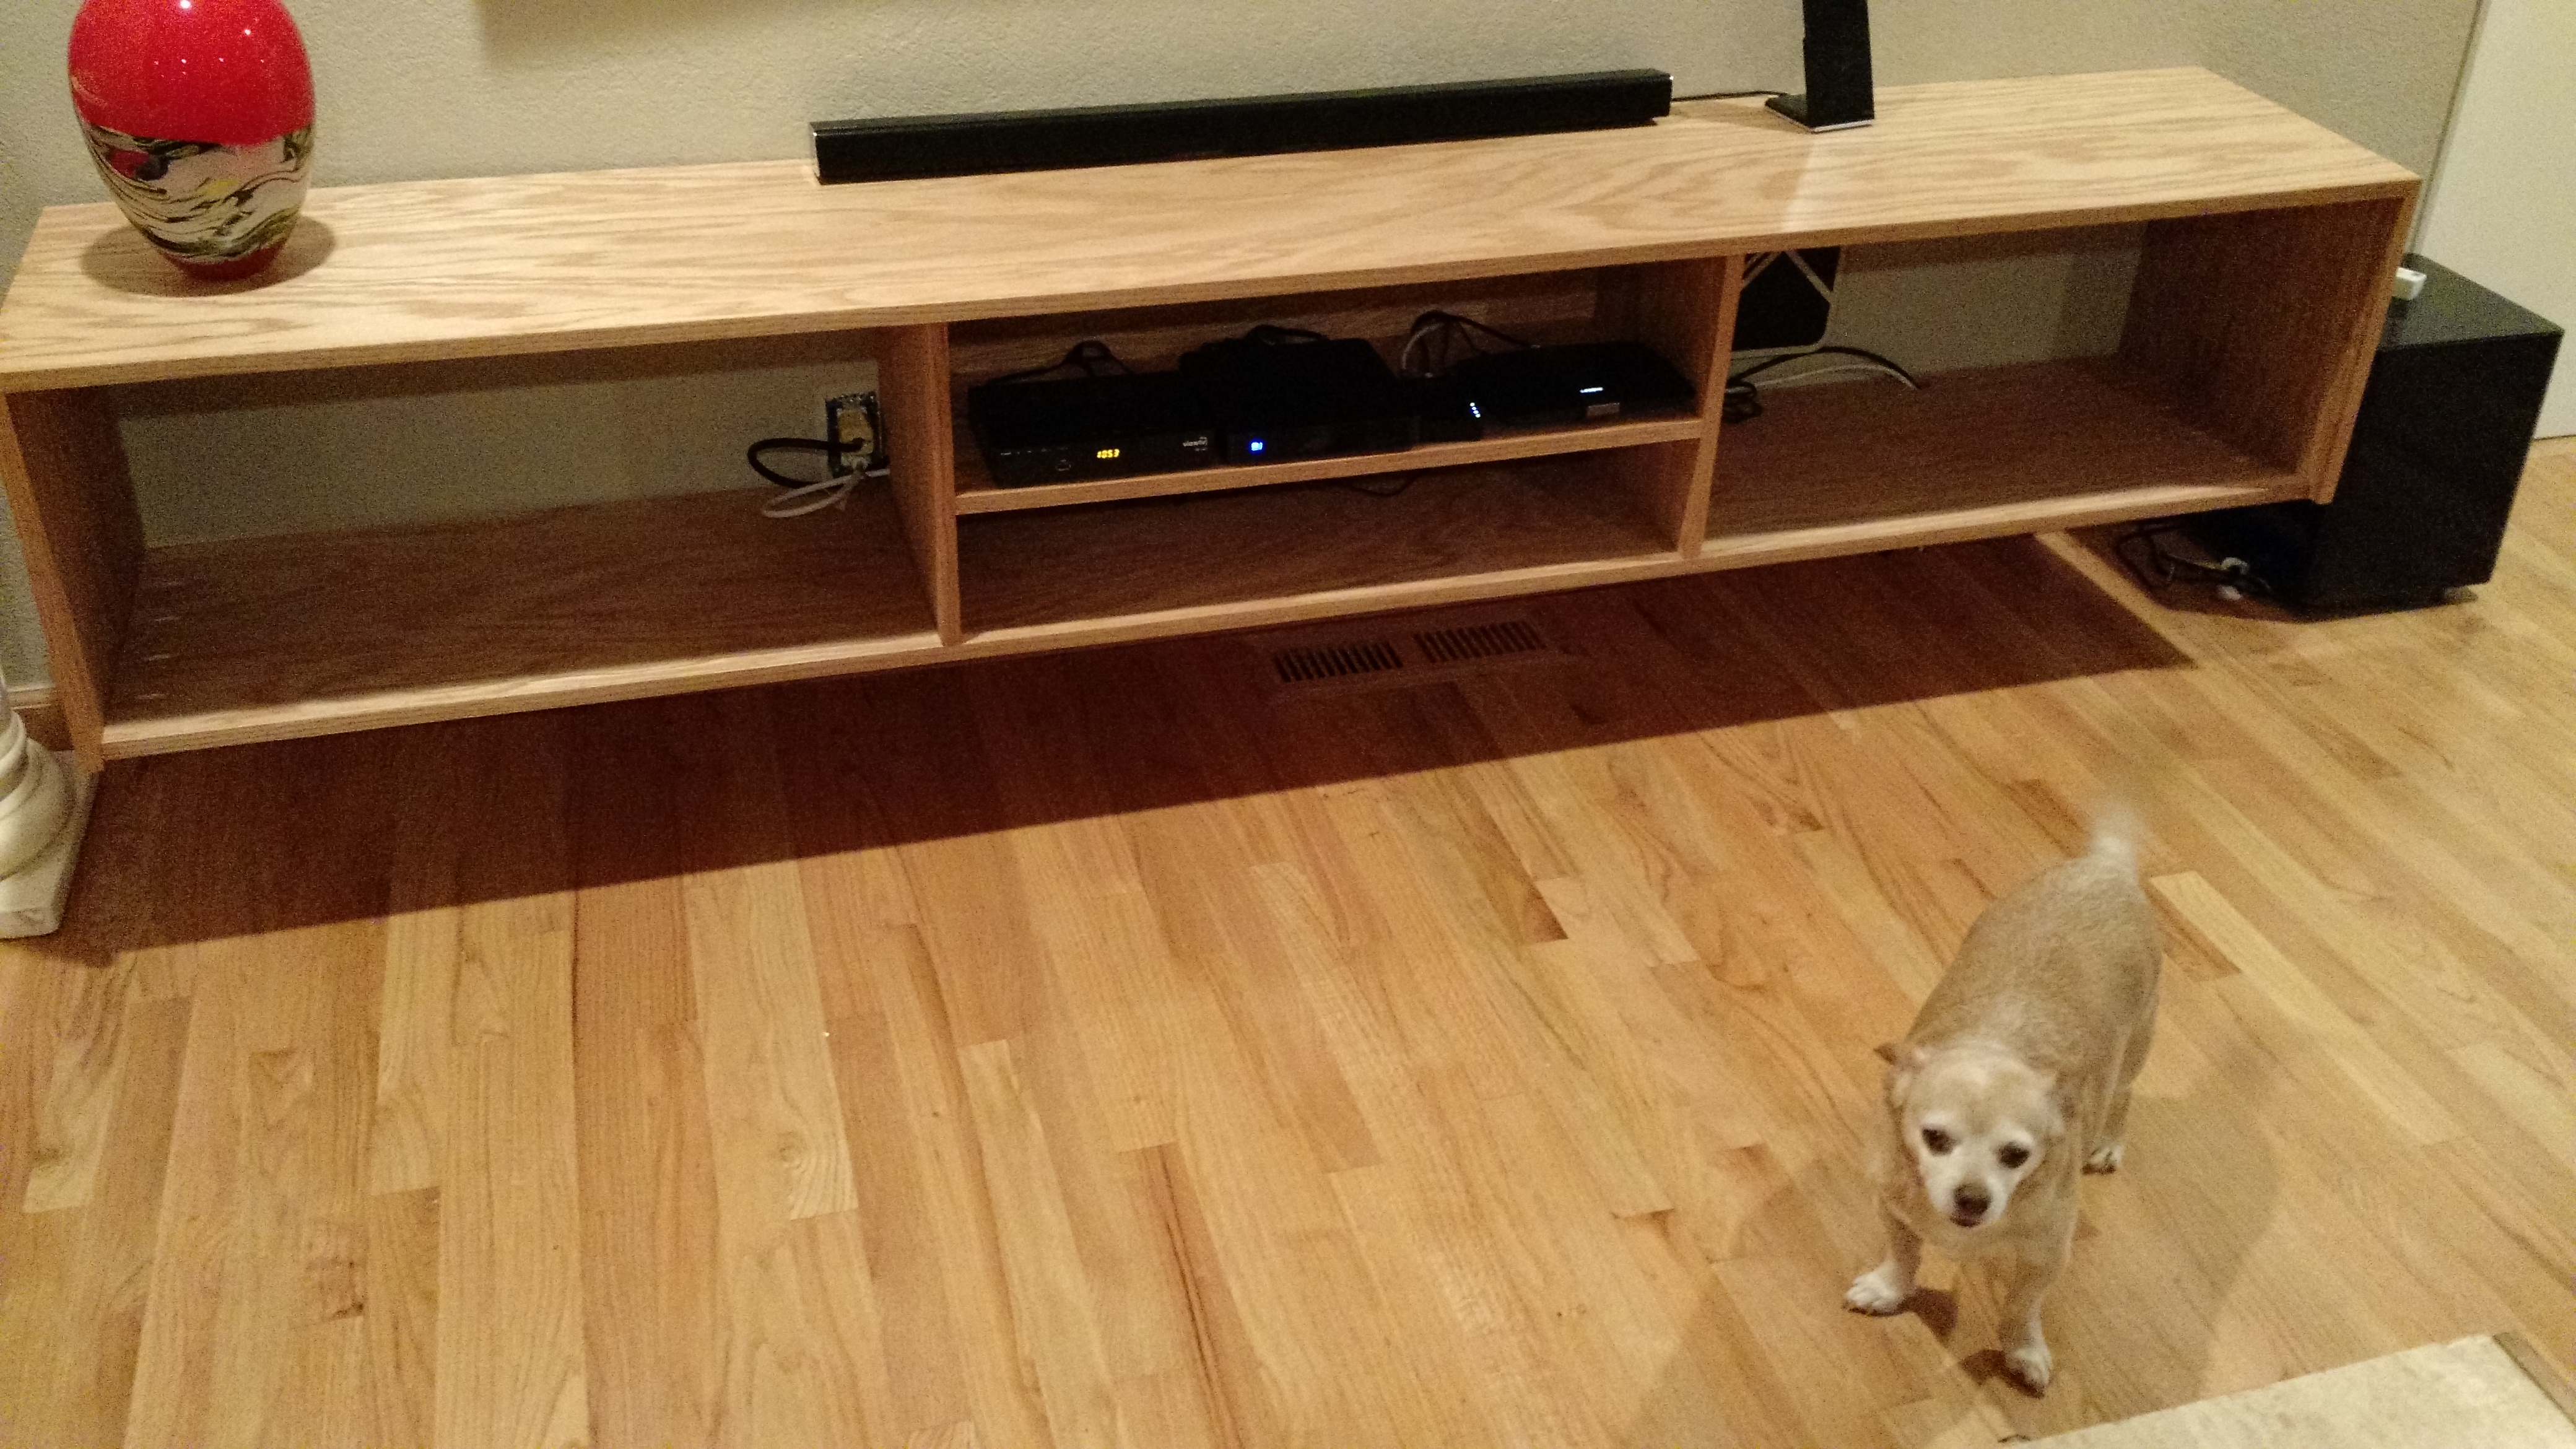
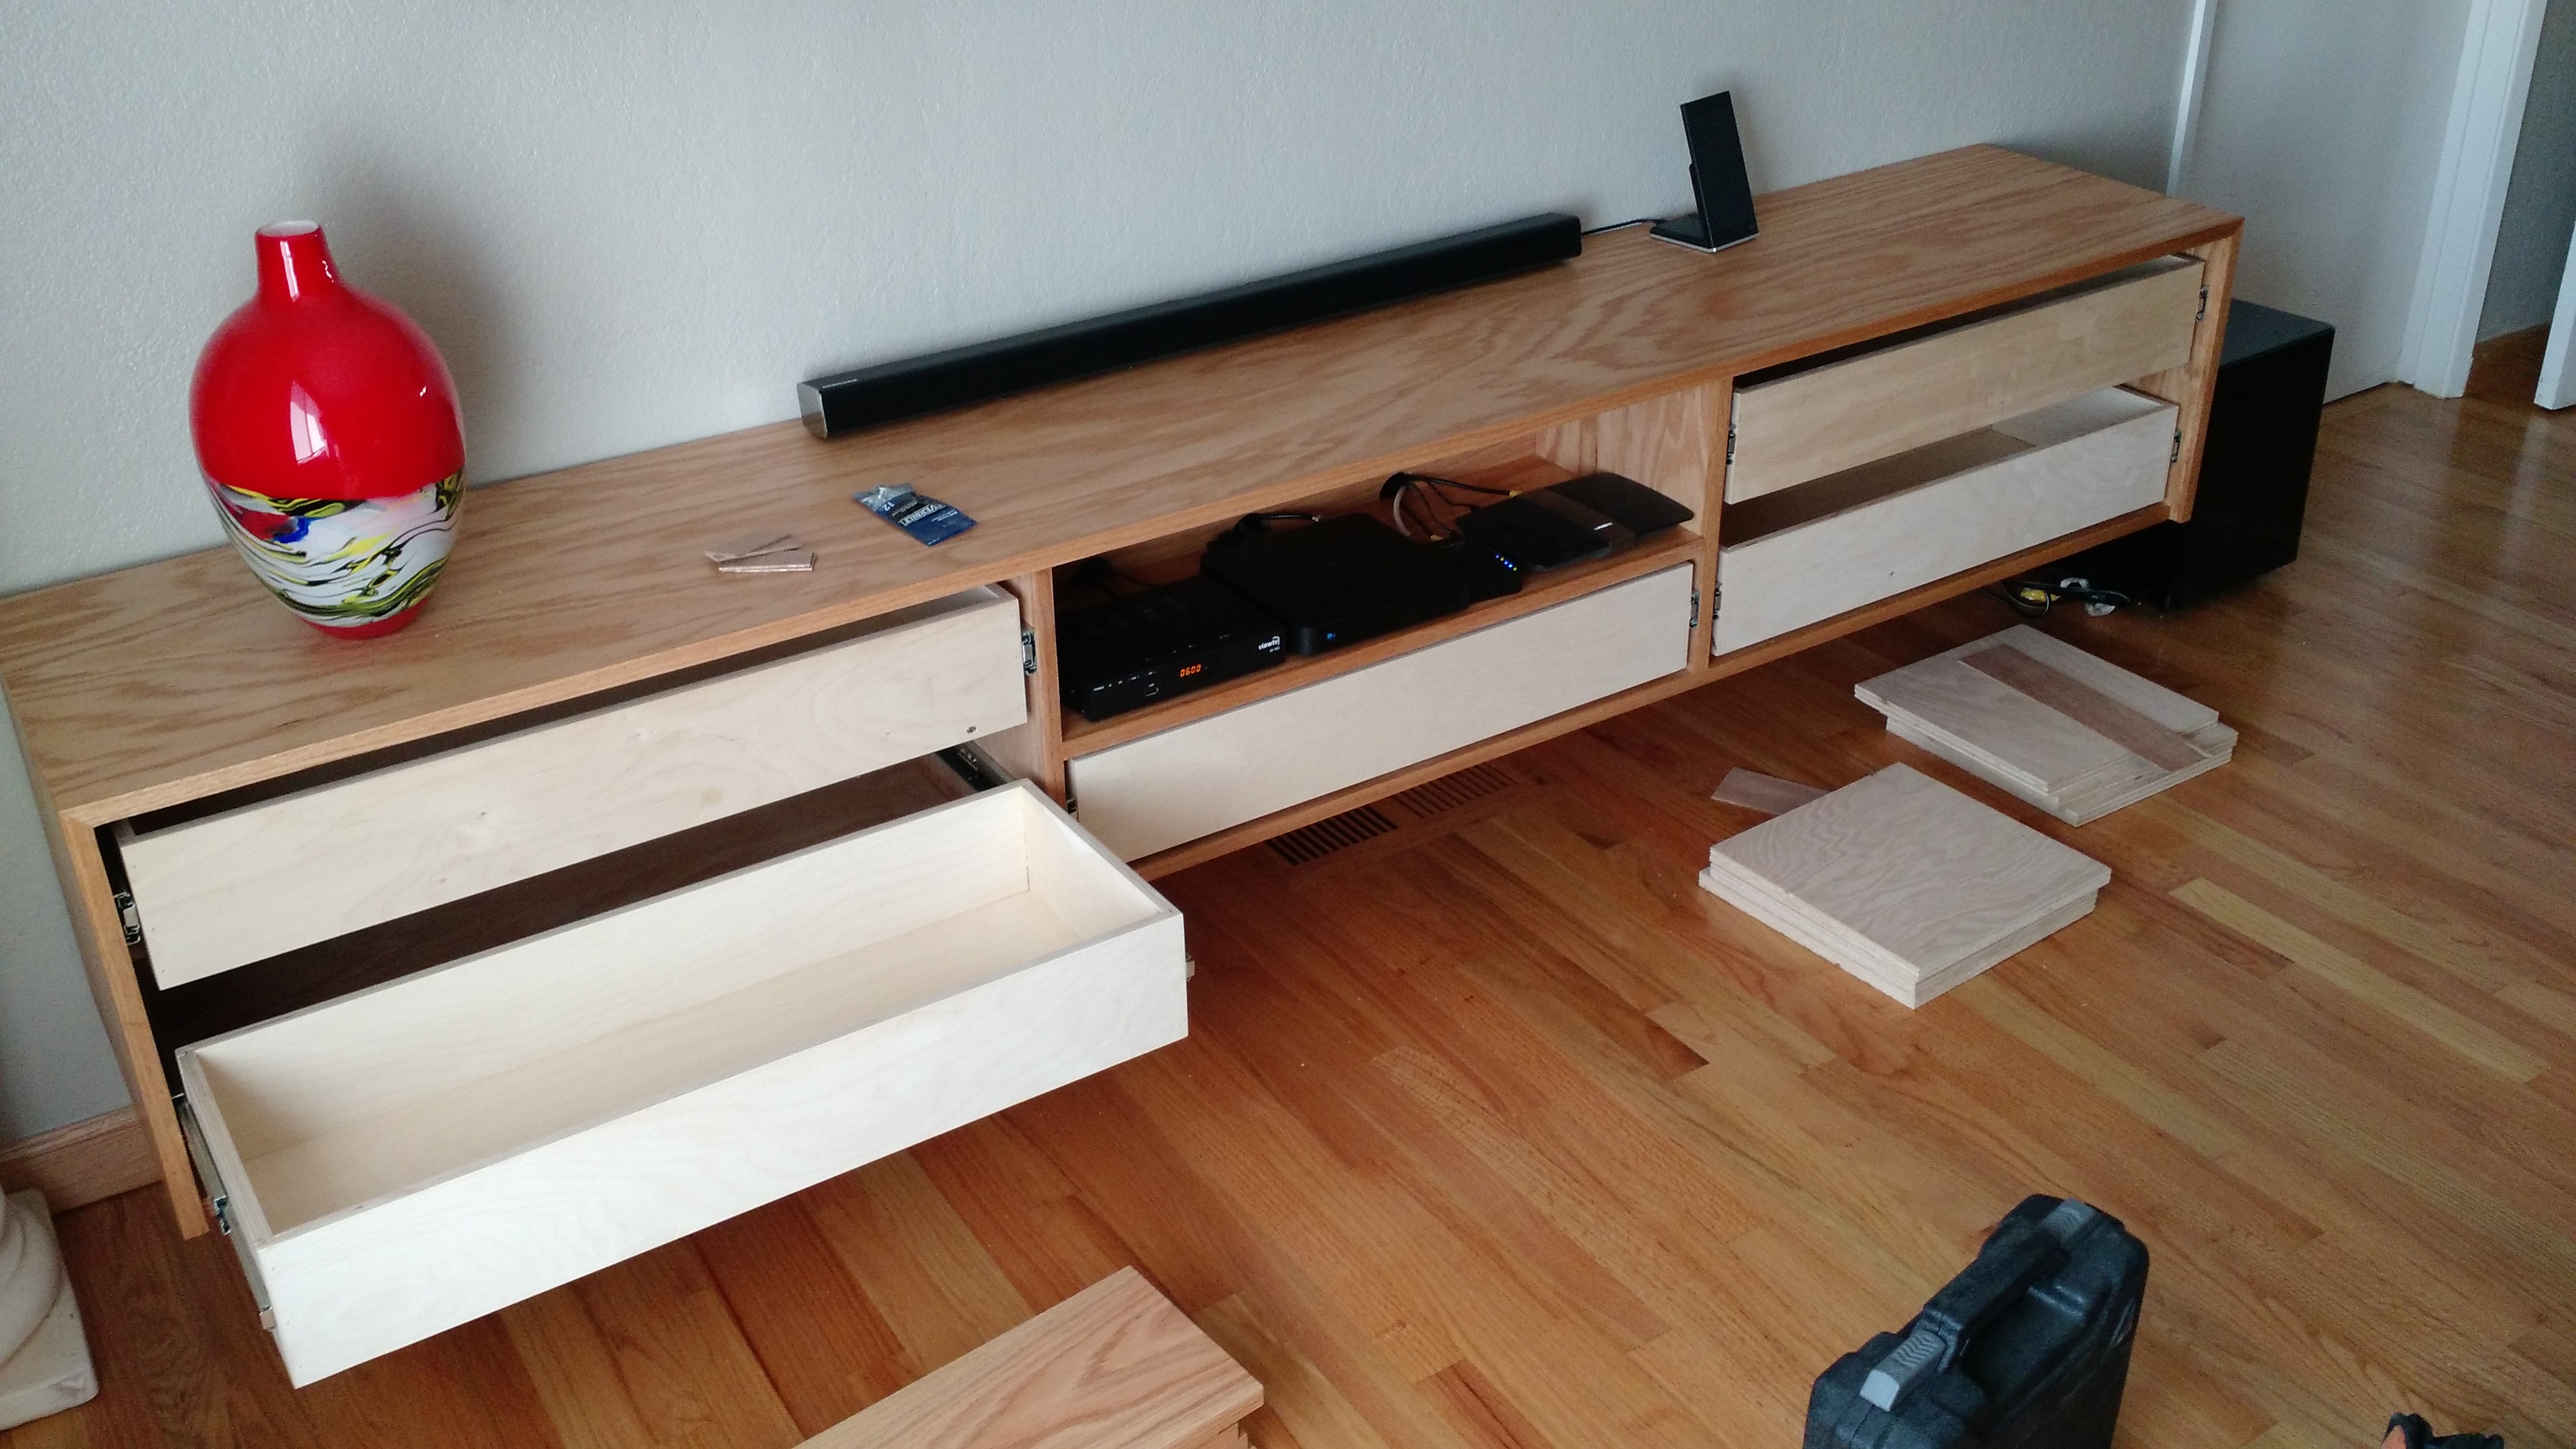
We needed a TV console in our new house. I designed this with Sketchup, so I’ve made the model available in their 3D warehouse. It’s called “Floating 8′ long TV Console“, if you have Sketchup you can just download it. The model includes cut-sheet layouts for the 8×4′ hardwood plywood sheet and the sheet and a bit of 5×5′ Baltic birch plywood. You can get everything out of one sheet of hardwood plywood – except the false back, I had an extra piece of scrap from another project that I used for that piece. Also the edging I used was left over from another project, but a good trick is ripping a 1×1 down the center to get two pieces of 5/16” edging, a single 8′ 1×1 is enough for the project or you could use heat bonded veneer tape which was my original plan (which is why the edging isn’t in the Sketchup model). There is also a spreadsheet on Google docs with just the cut-list.
Build Gallery
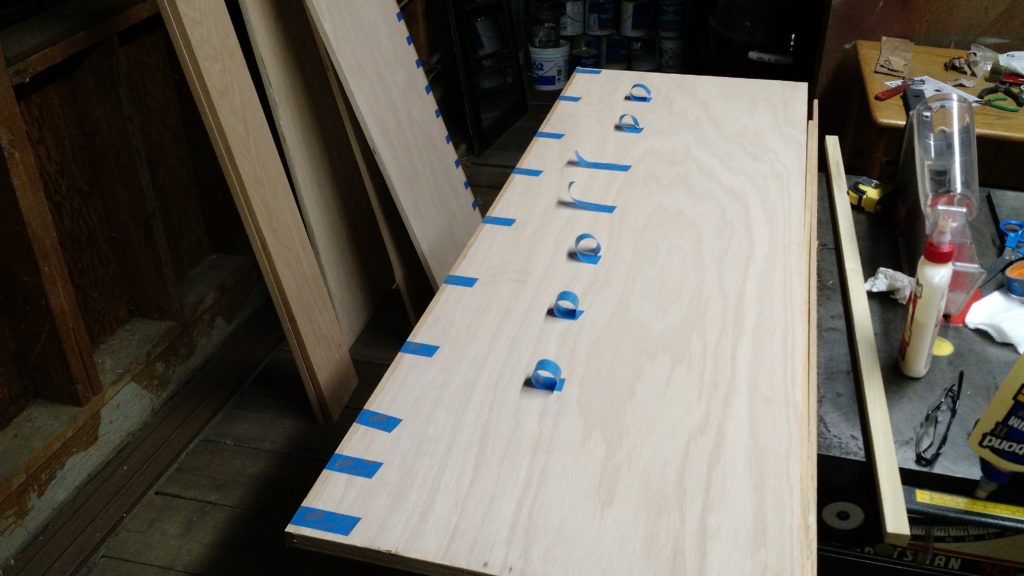
First step, gluing oak strips to the plywood edges with painters tape, the cheapest clamp available!
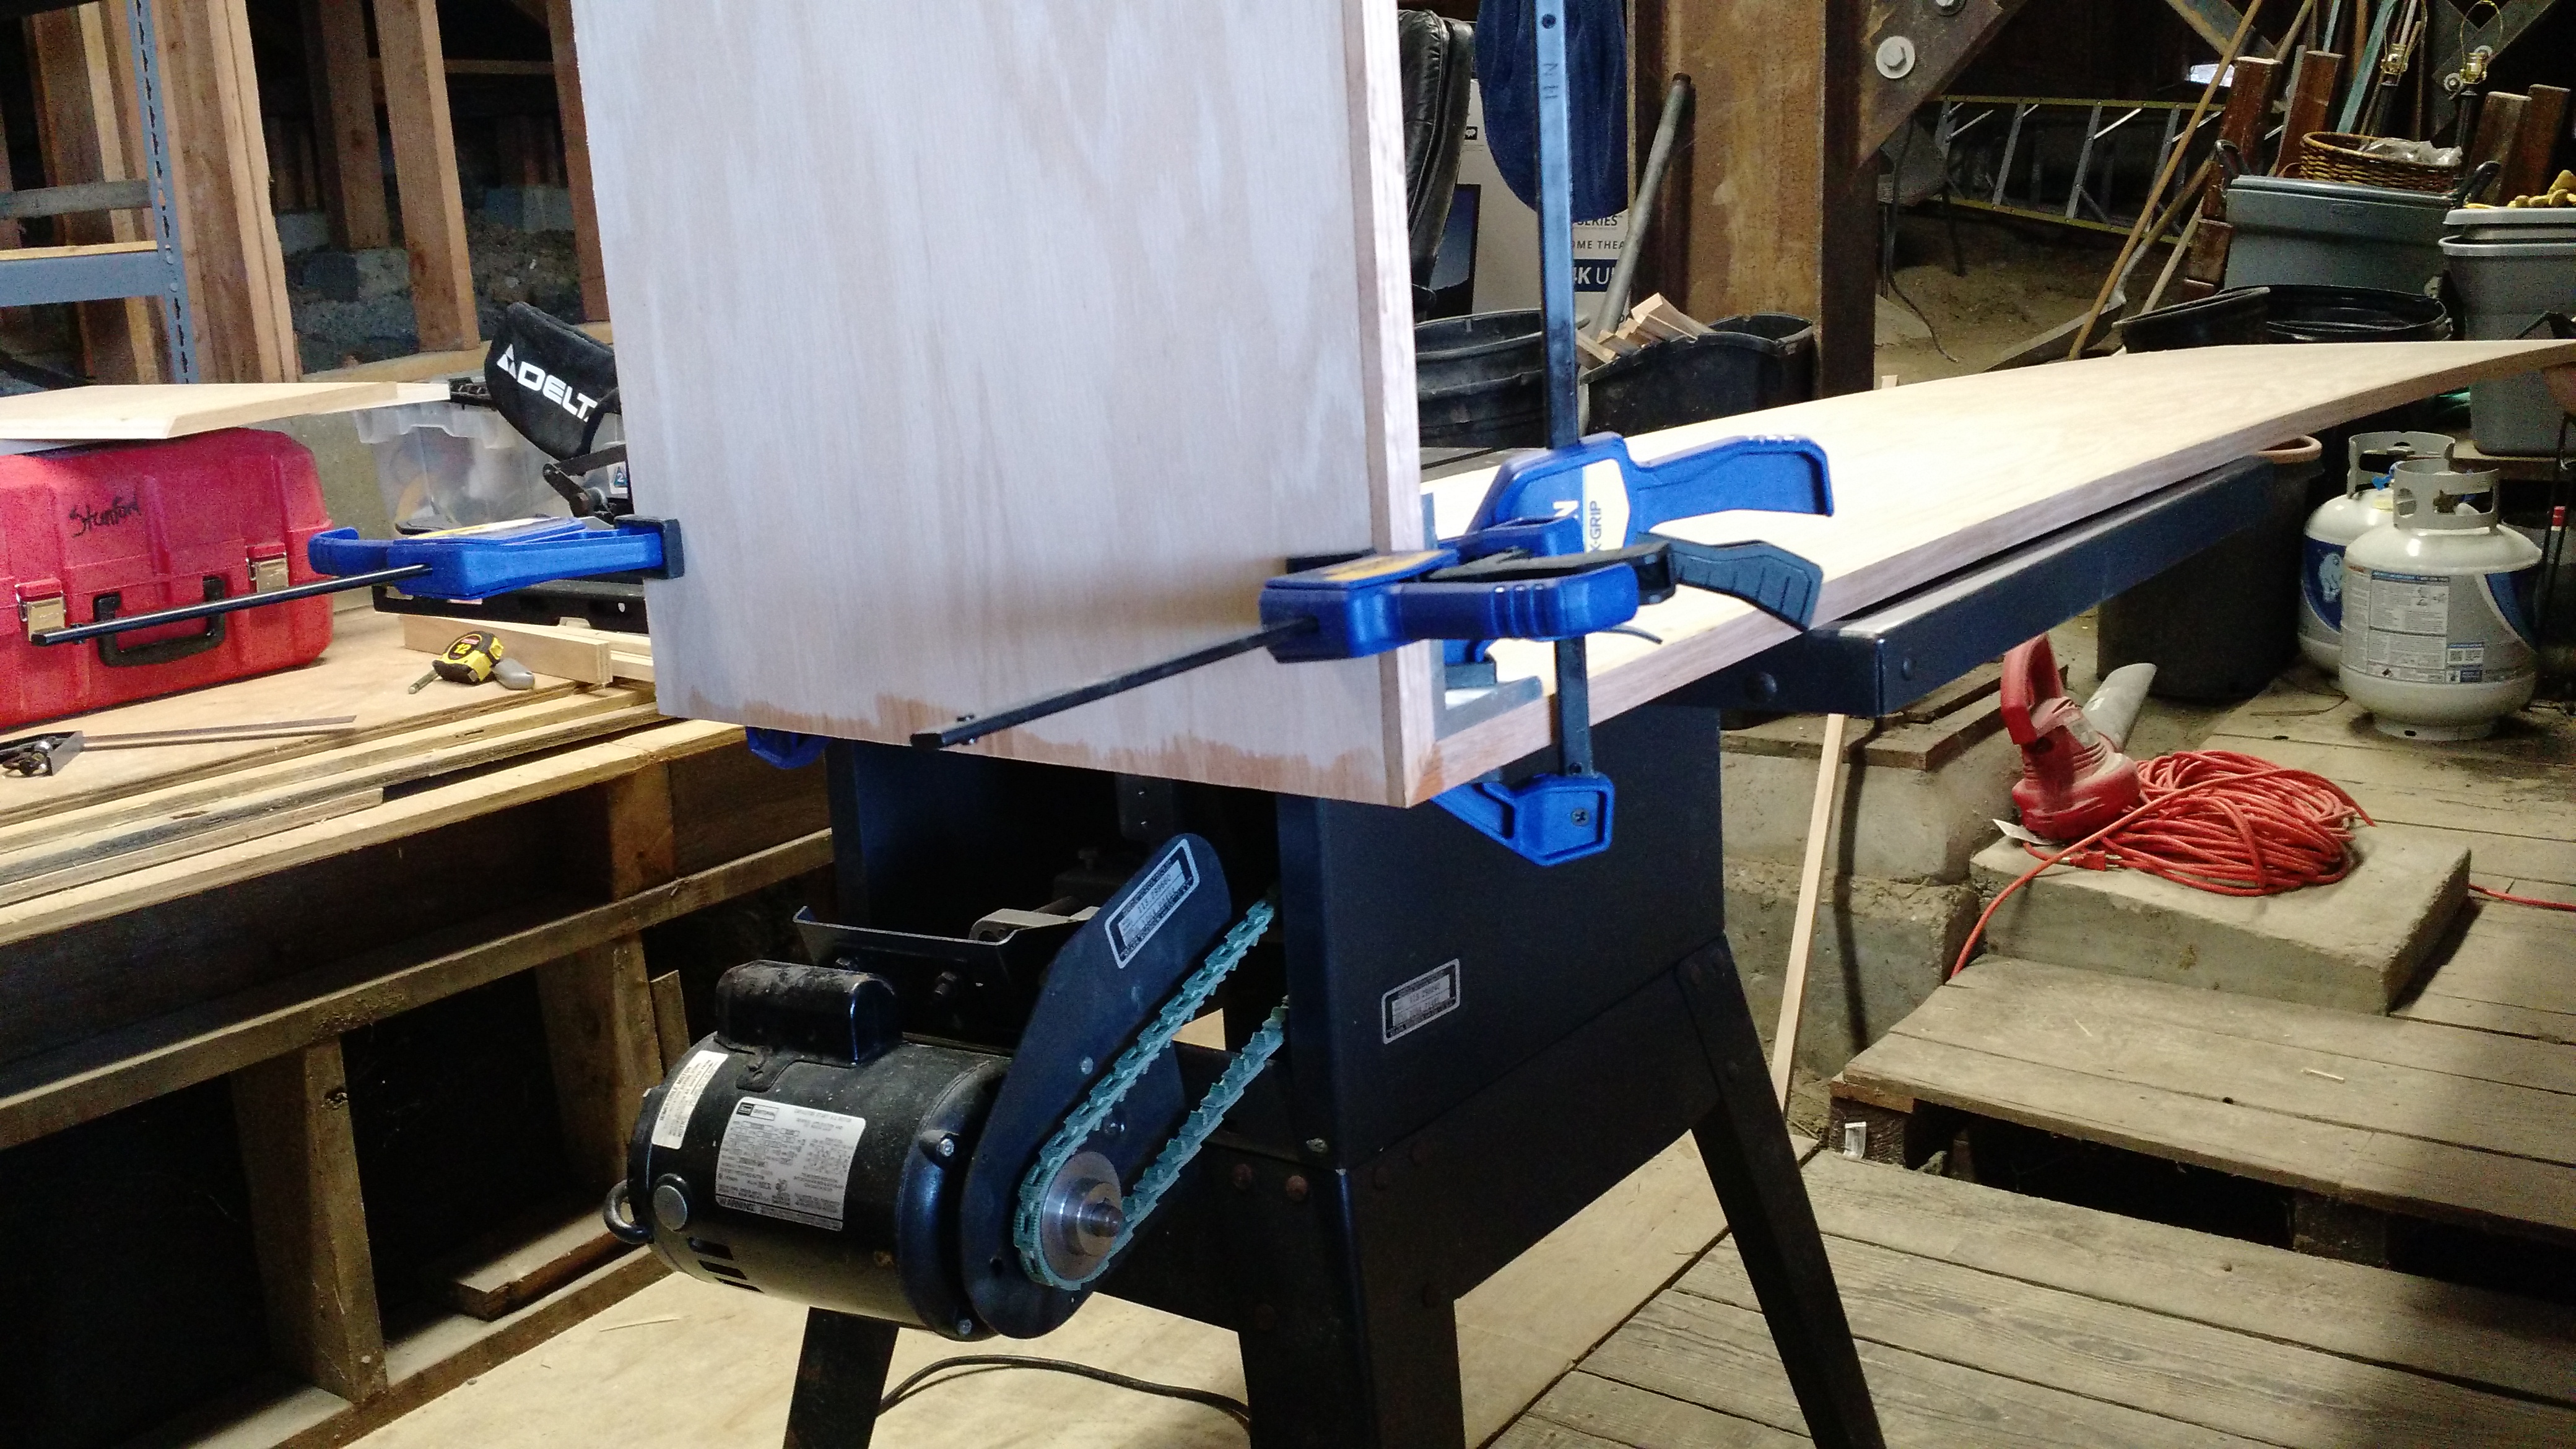
The scariest cut of the whole project, 14″ beveled crosscut on both end of an 8′ plywood board. As you can see, I don’t have a lot of room, or working surface in my basement.
End miter joints are just glued as I don’t have any fancy domino or biscuit cutters. They will be well supported when the rest of the piece comes together.
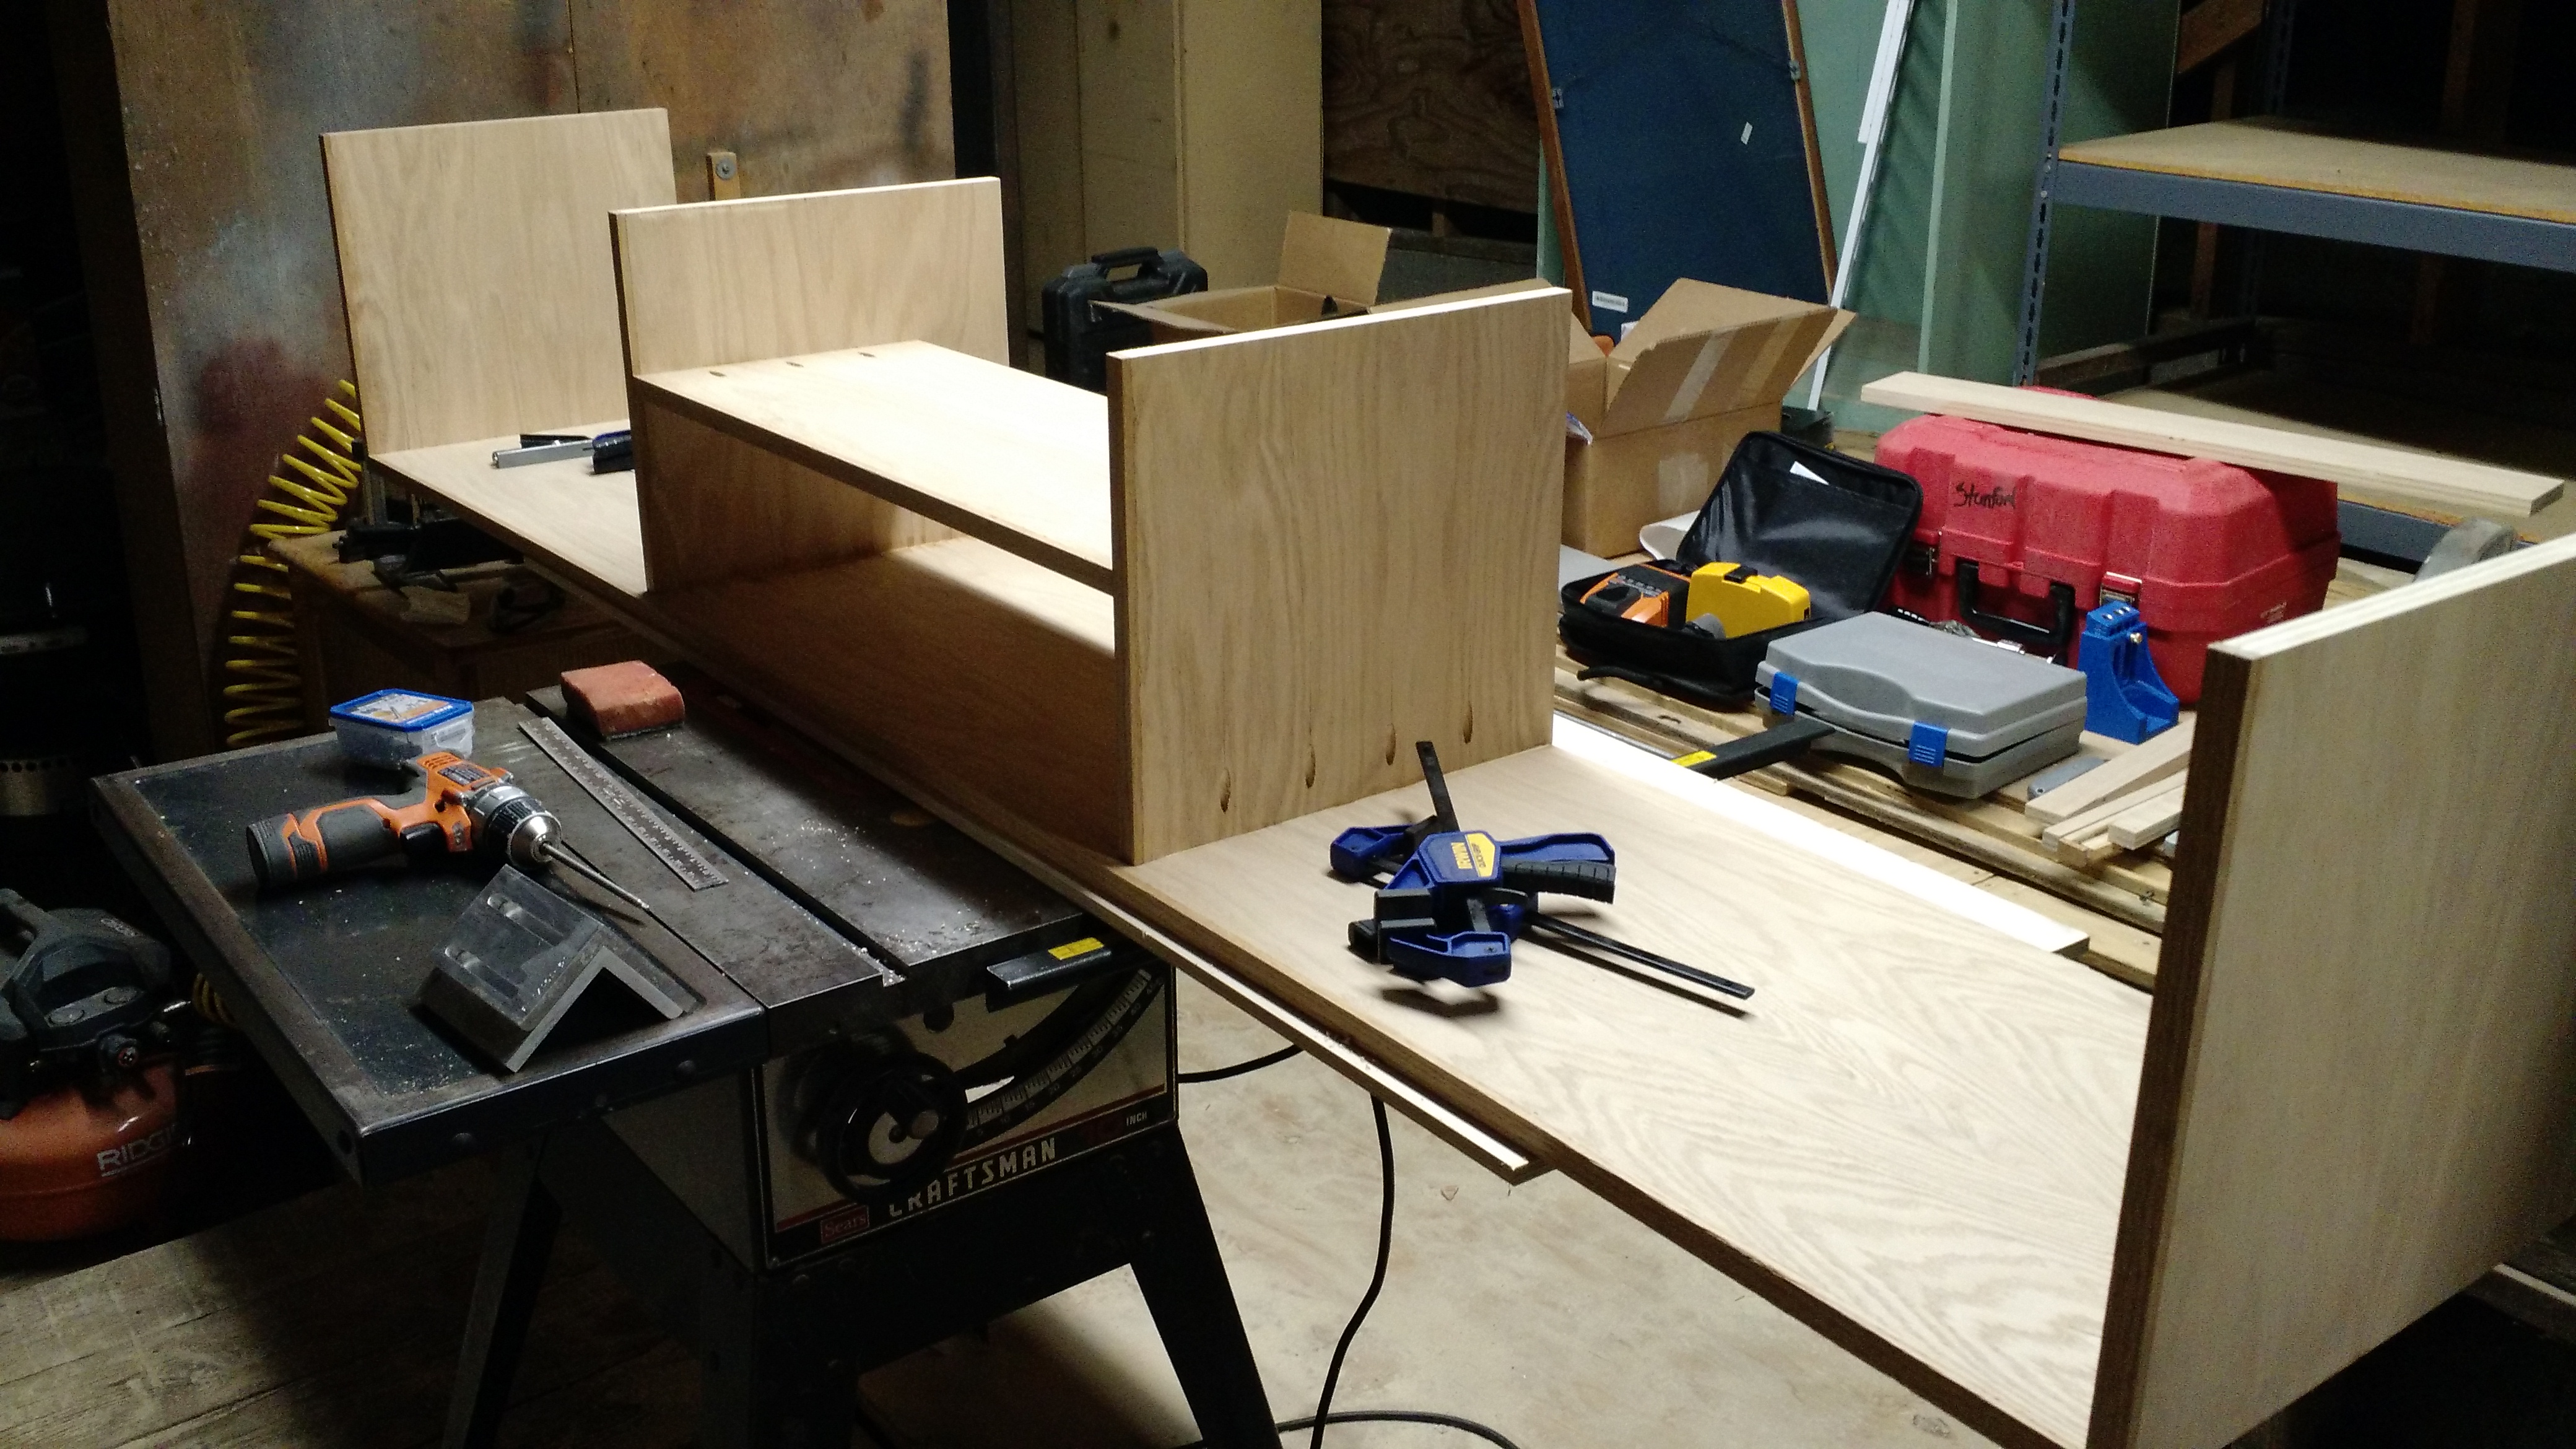
Center section assembled, I’m using pocket screws for most of the joints.
Bottom is on, and the piece is flipped over to be right side up. Finally the end of those miter joints aren’t hanging out in fresh air.
Two 8′ 1×8 oak boards crosscut into the five drawer fronts, and one piece ripped into three strips for the support cleats.
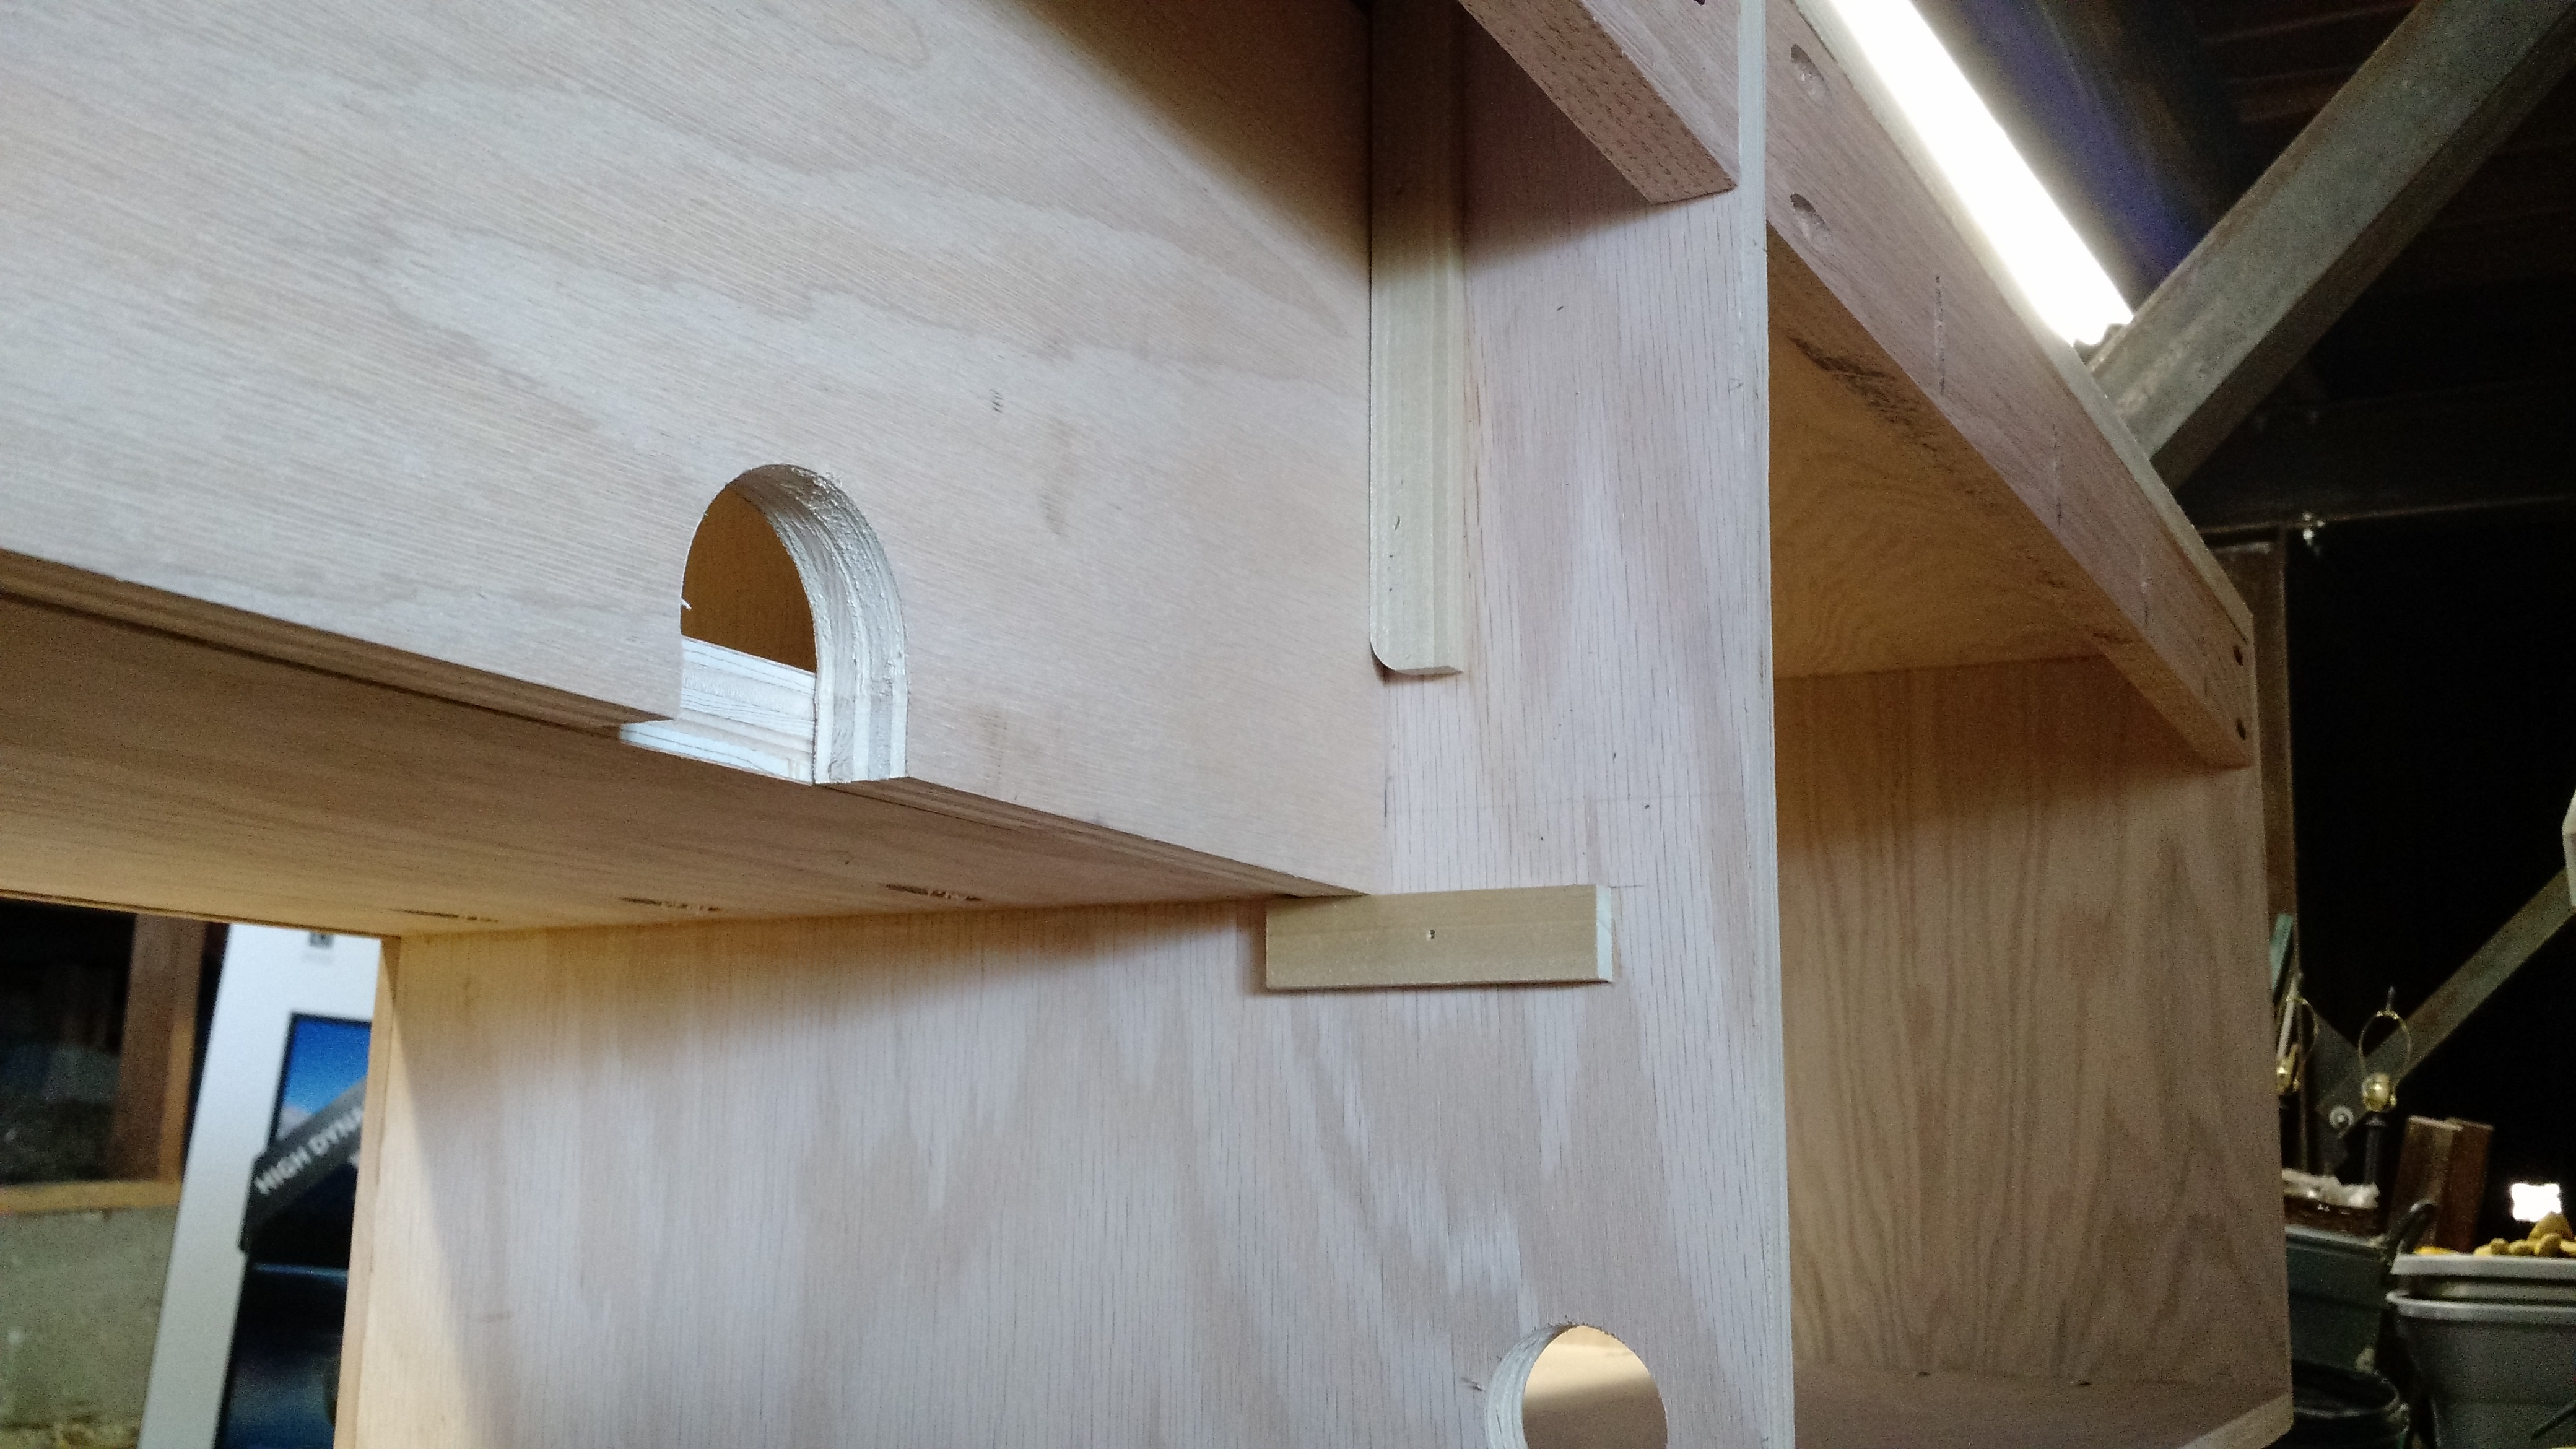
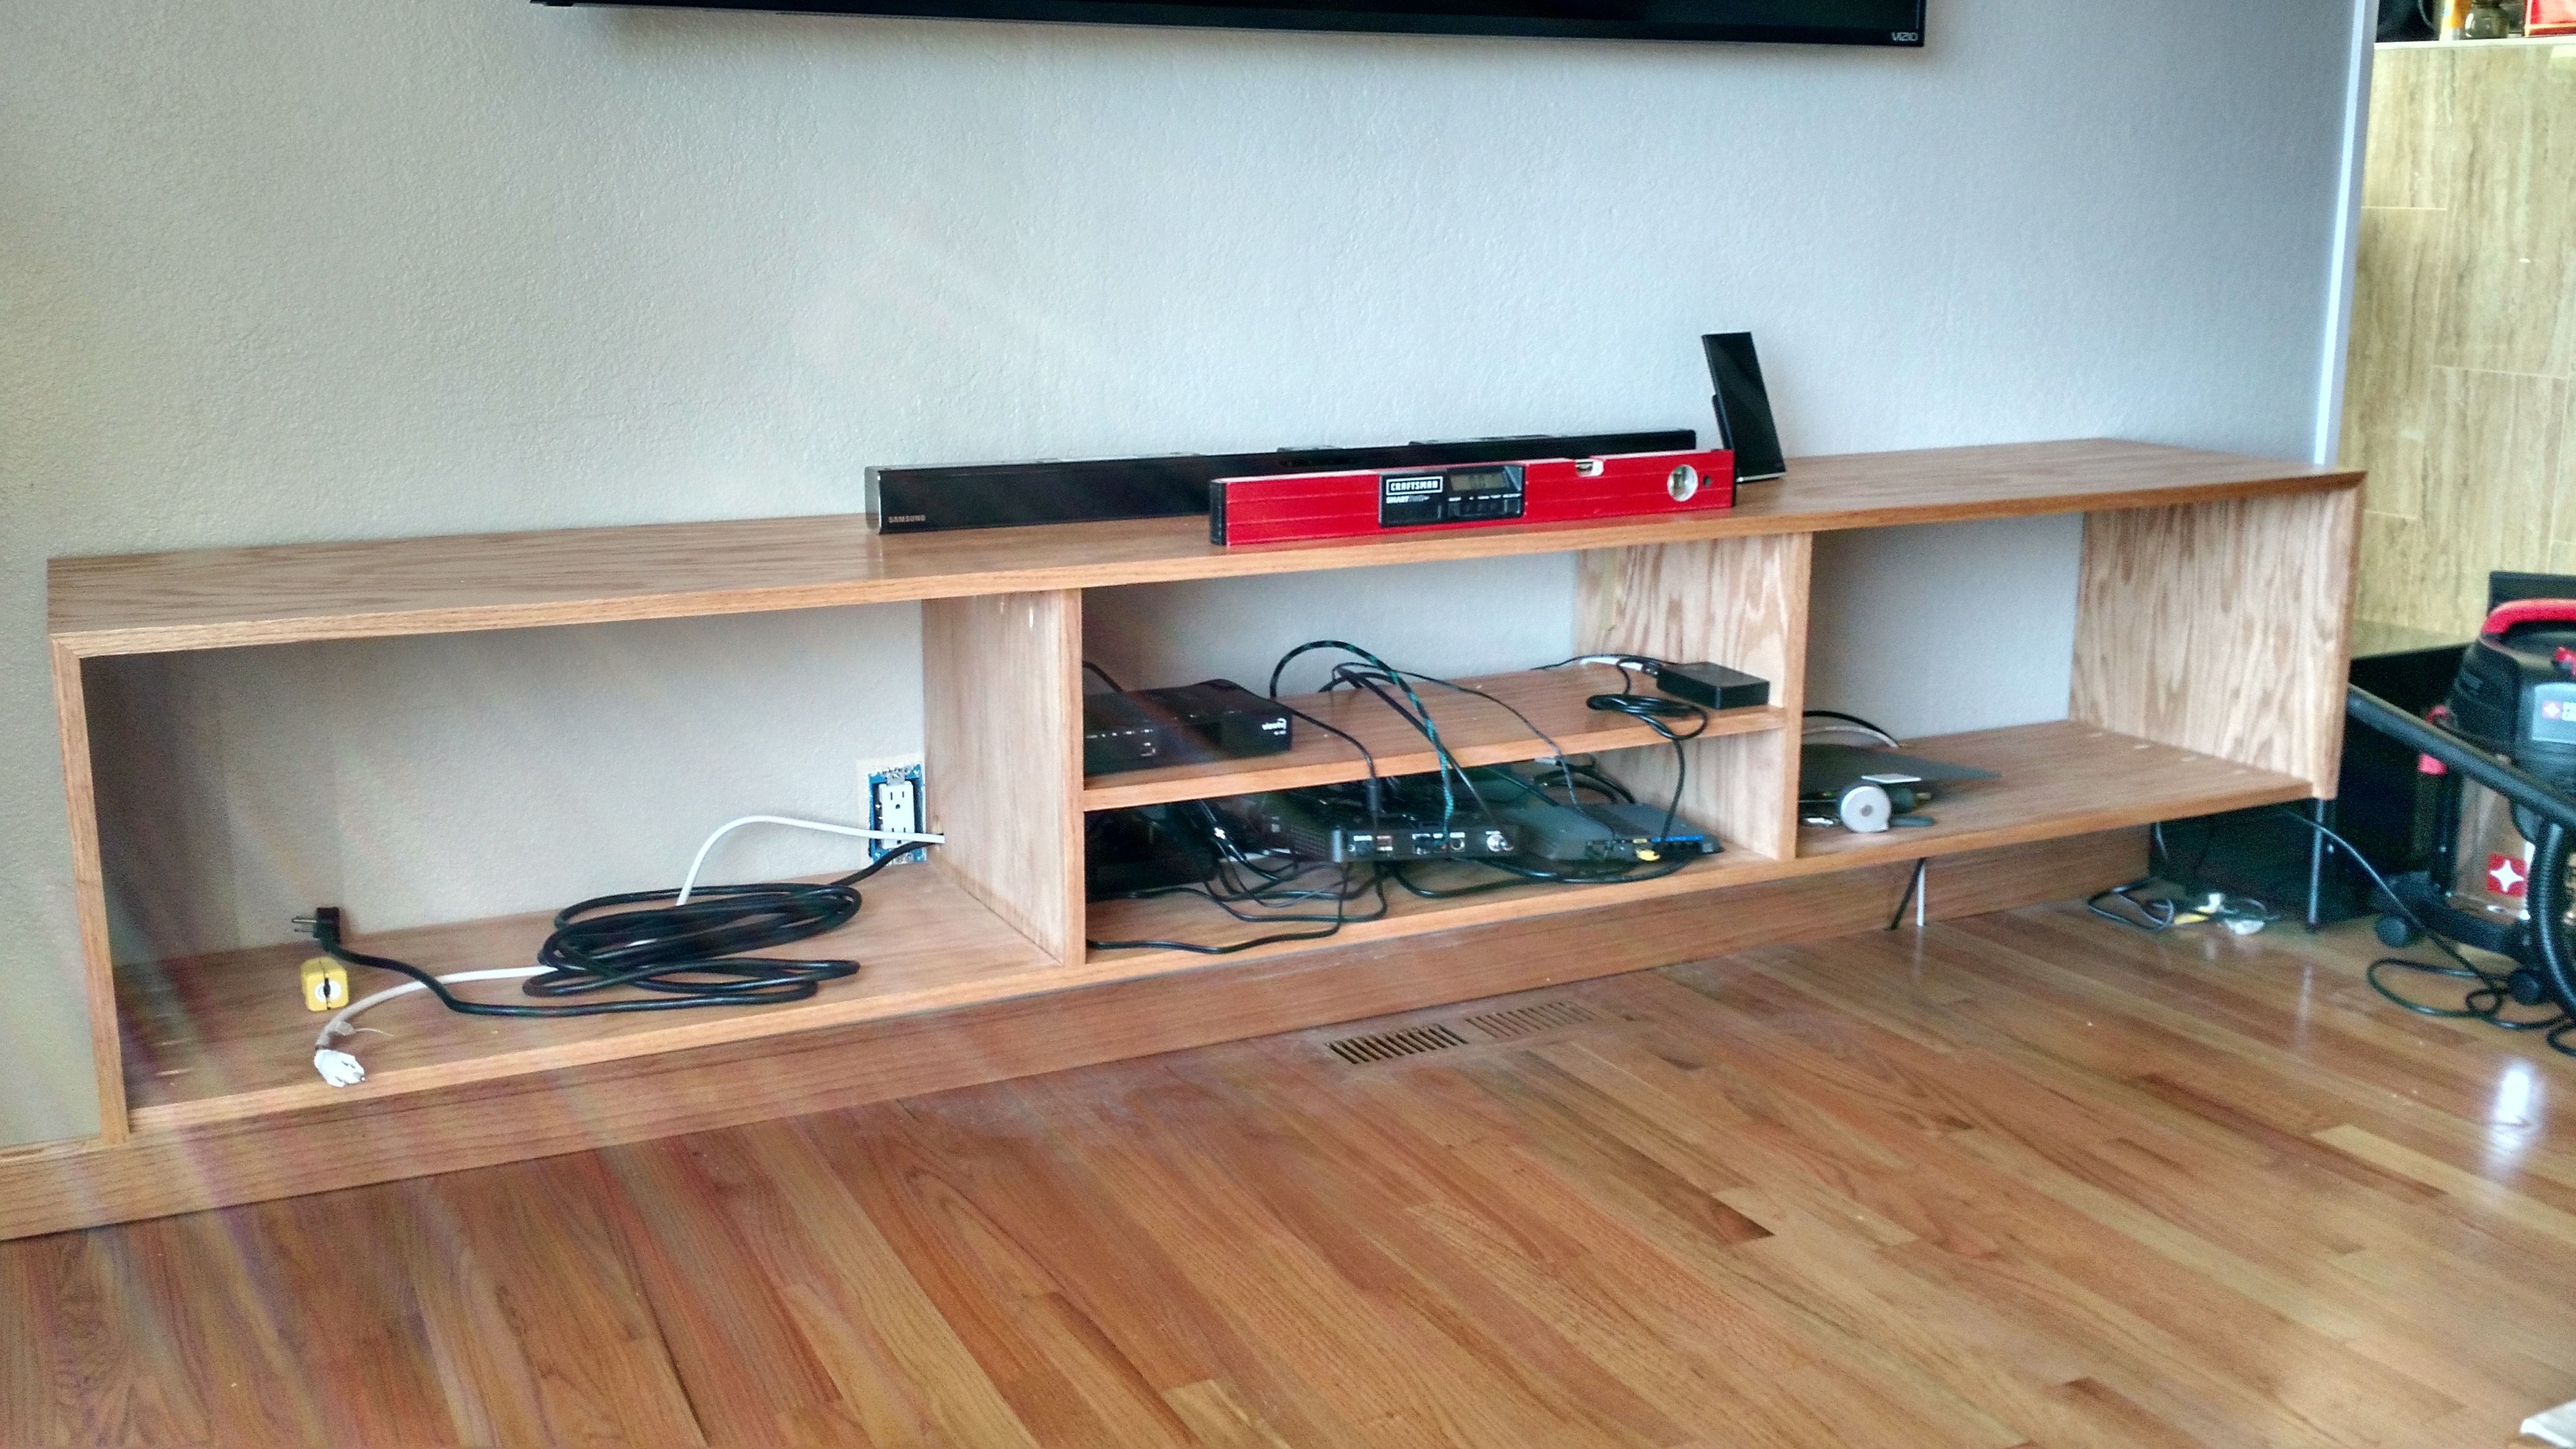
Support cleats installed with plenty of pocket screws and some holes cut for routing wires through the back of the piece.
Some detail on the cleats that hold the false-back of the center section. It’s just pushed into place, pushing on the top locks it, pushing on the bottom will release it.
More detail on the false back. The top edge is rounded over (towards the back-side) so that it can rotate into place.
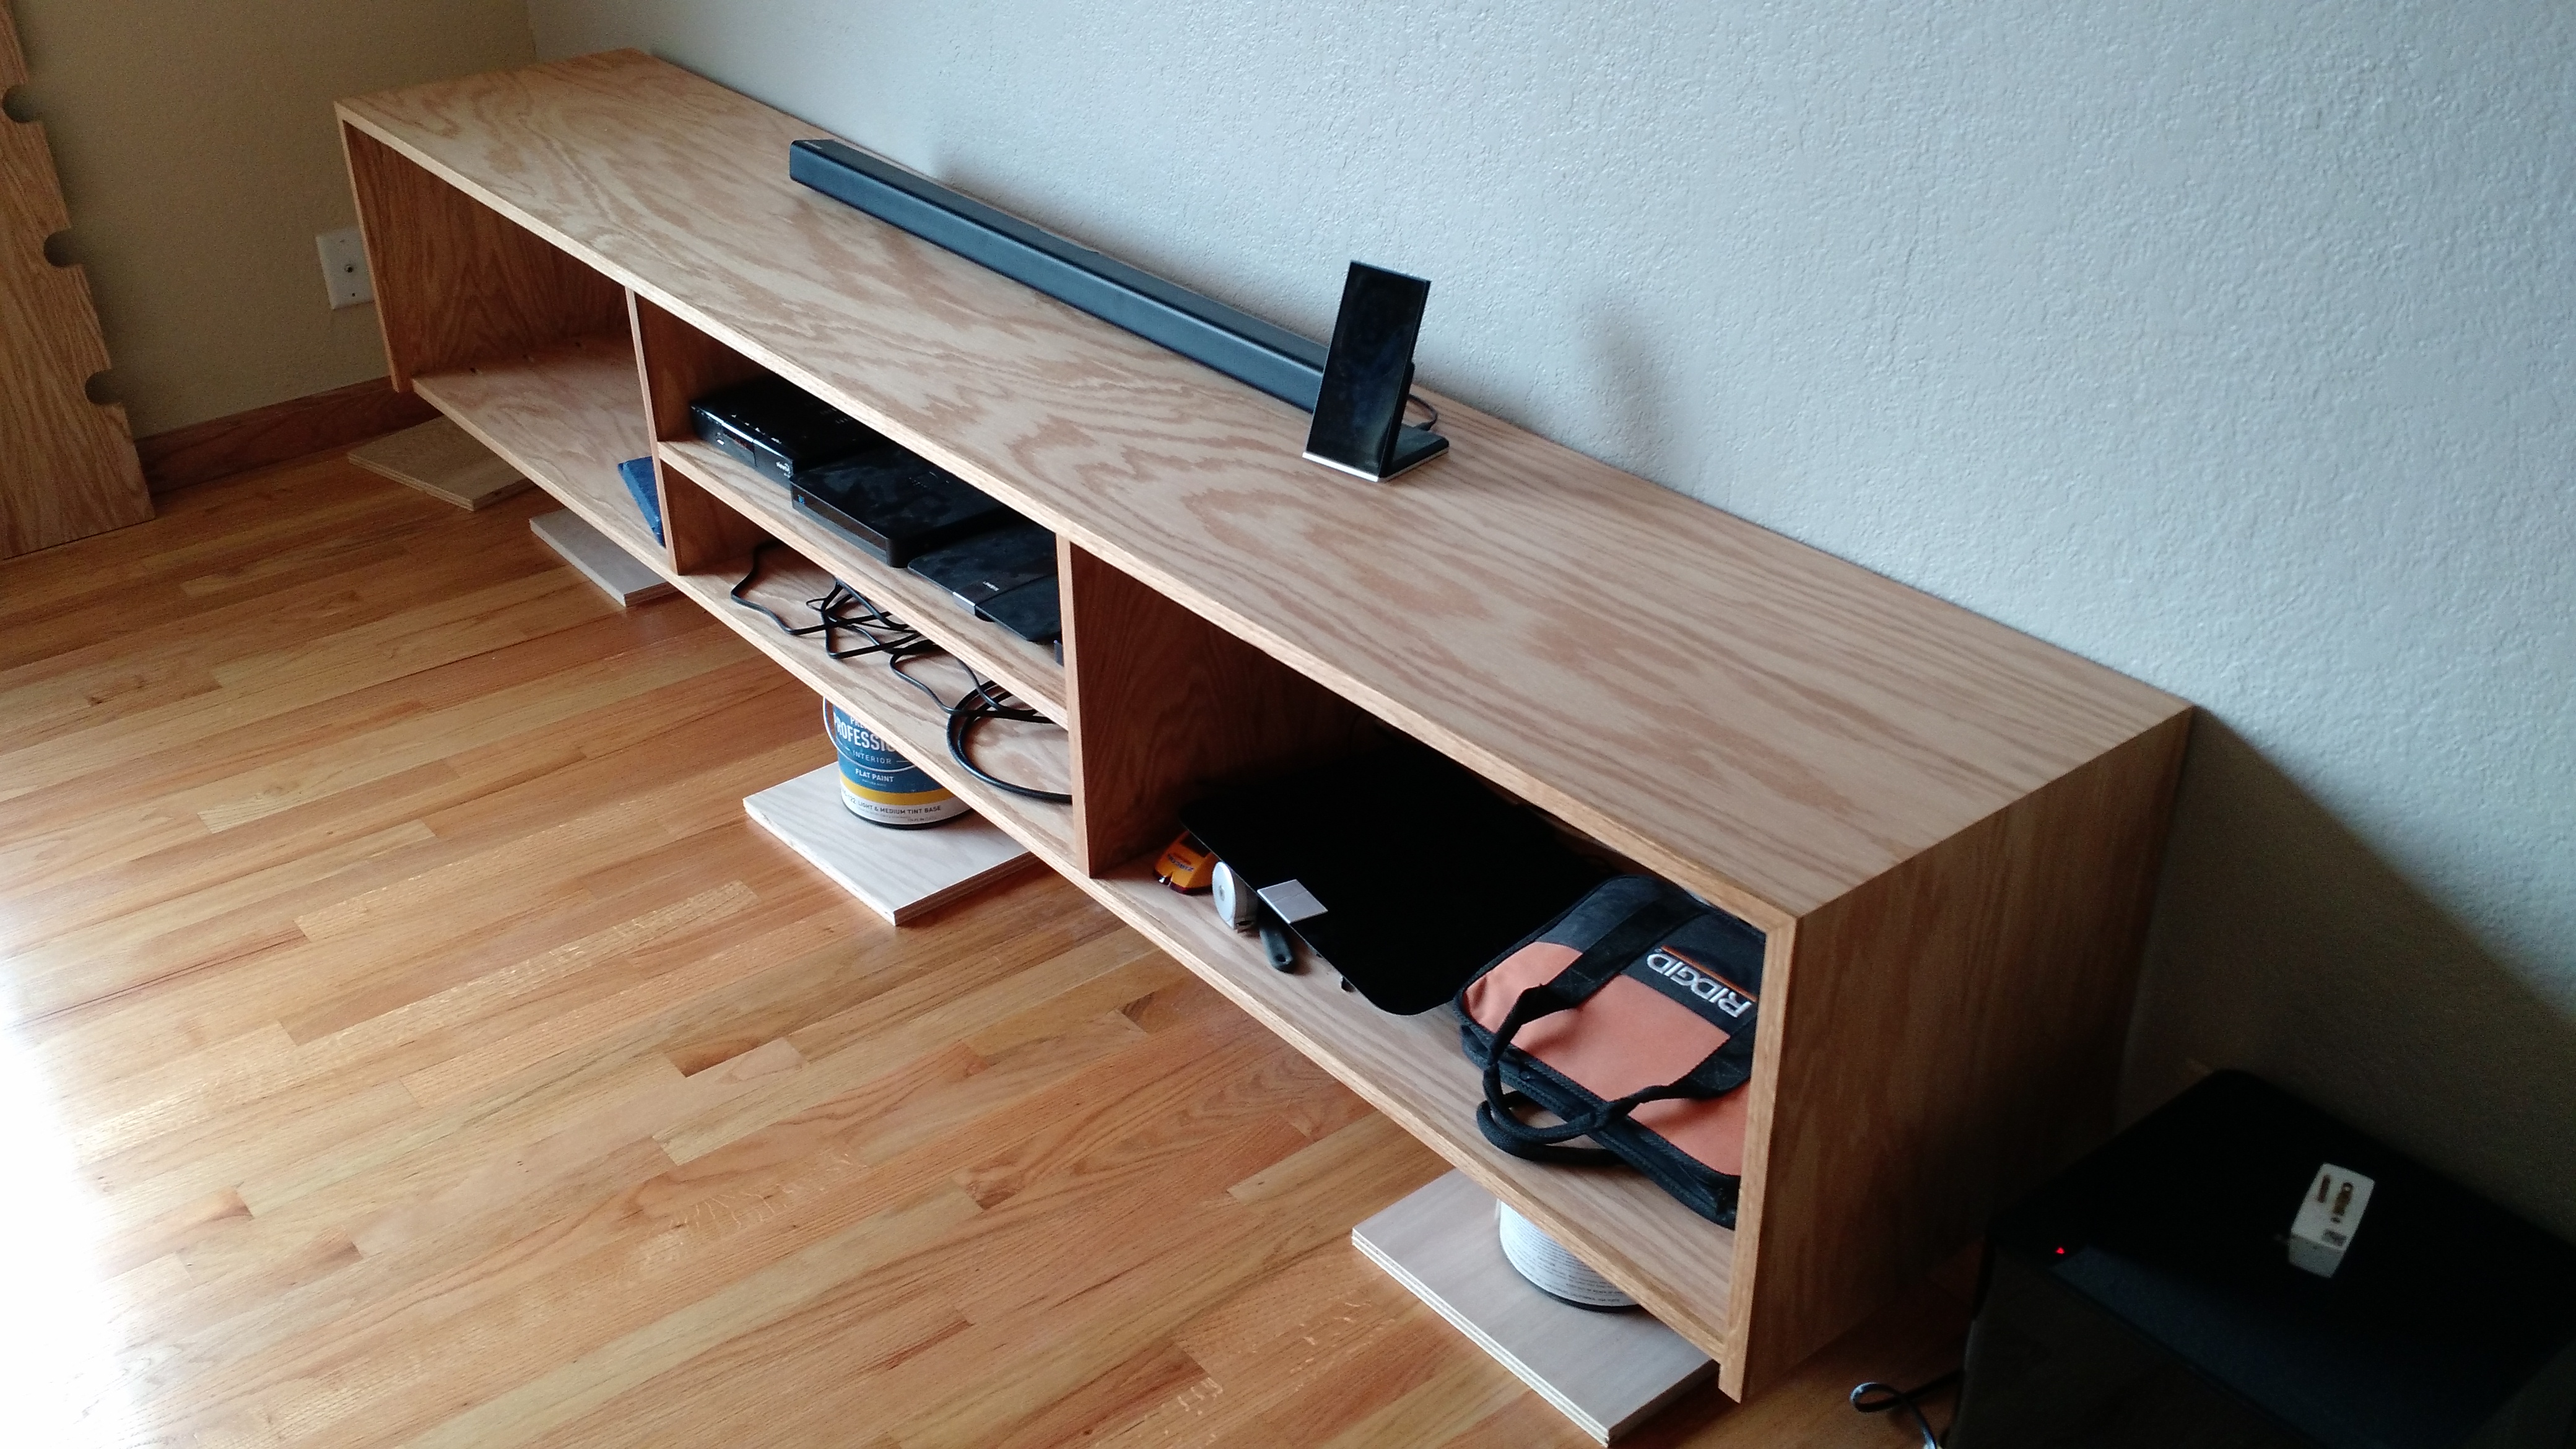
Sitting on paint cans more or less in position. But there’s a problem.
The wall is waaay off straight! There’s about a 0.5″ gap at on end.
The gap to the wall doesn’t look quite so bad once the piece is bolted to the with 3.5″ 5/16″ steel lag bolts. I’m going to hide it with a plant until I can get the energy up to patch it.
Wires all cleaned up with all the electronics installed. As you can see the finish matches my dog.
Sheet and a quarter of 1/2″ Baltic birch plywood all cut up and ready to make into drawers. I hate making drawers.
Since it has rained so much this winter and prevented me from flying I have had to find other hang-gliding related activities to occupy my time. One of those was studying for and gaining my Amateur Radio (HAM) Technician’s license. In fact it is ridiculously easy to get the license – a simple multiple choice test of 35 questions of which you need to get 26 or more correct. There is no morse code requirement for the Technician license and it is all you need to legally operate on the 144~148MHz (2M) radio band that is used by hang-gliders (you can do much more, but hang-gliding is what I’m interested in). I found a good set of training slides online which I studied over a couple of days (I’m already an Electronic Engineer so I have a bit of a built in advantage). Then I spent some time practicing with a free online test. I was lucky to find that a test session was scheduled not far from me for the very next weekend. It cost $14 to take the test and I scored 100%. Now I have call sign KI6DLU.
The ink was not yet dry on my new license when I went and purchased a Yaesu VX-150 2M Hand-held Transceiver (Schematic). This is a really nice little radio, it receives from 140~174MHz and transmits over 144~148MHz. It is almost exactly the same as my Vertex Standard ProV air band transceiver and in fact shares the same battery pack and recharger. It only cost about $130 which is less than half what I paid for the ProV. Its small and rugged and should fit nicely into my harness hip pocket.
To use a radio when hang gliding you need a headset that fits inside your helmet and you need to be able to operate the PTT (Push To Talk) switch while still flying. So people have developed hang/para-glider headset/PTT combo’s that plug into the radio. However, I found that such an item cost $75 at my local hang gliding emporium which seemed a bit steep considering the whole radio was only $130. As I’ve been known to man-handle a soldering iron from time to time (and it was still raining) I decided to build my own.
The directions below assume you have some basic electronics knowledge and you will need to be good with a soldering iron as the connectors are not the easiest to solder (especially the one that plugs into the VX-150).
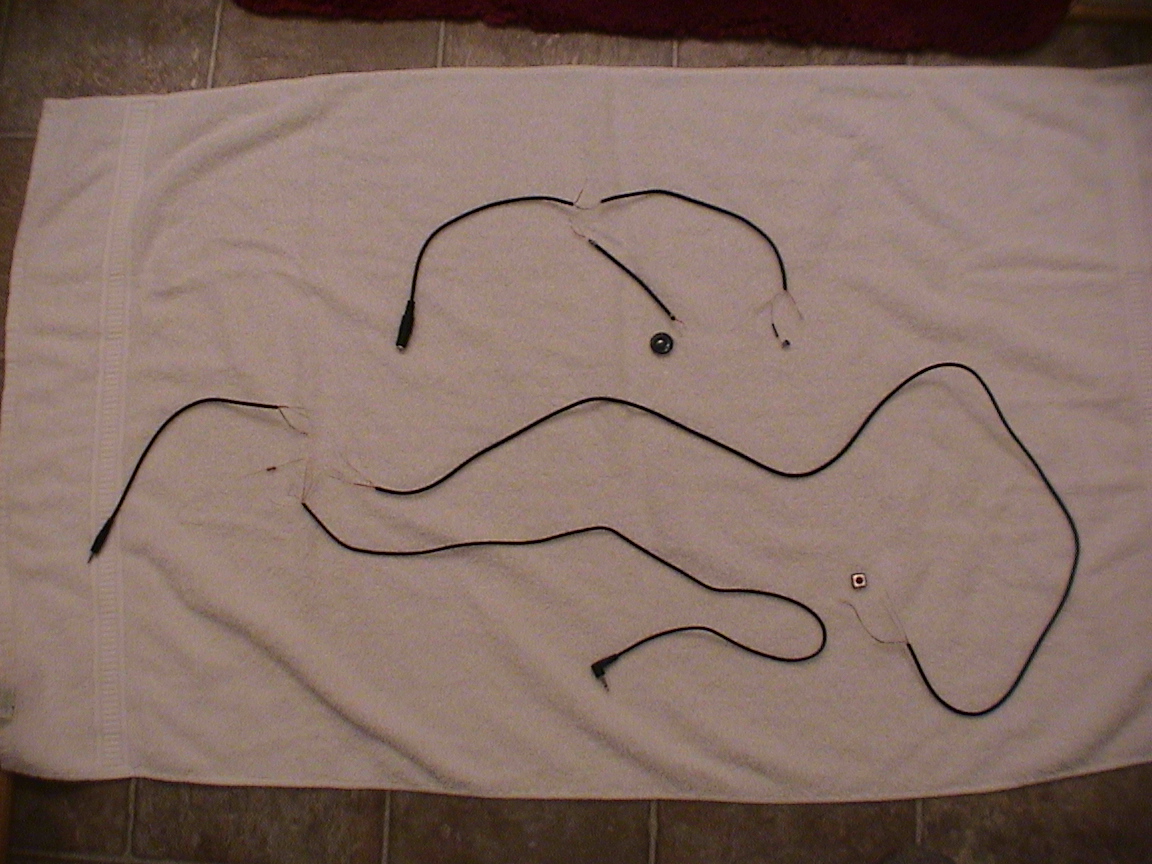
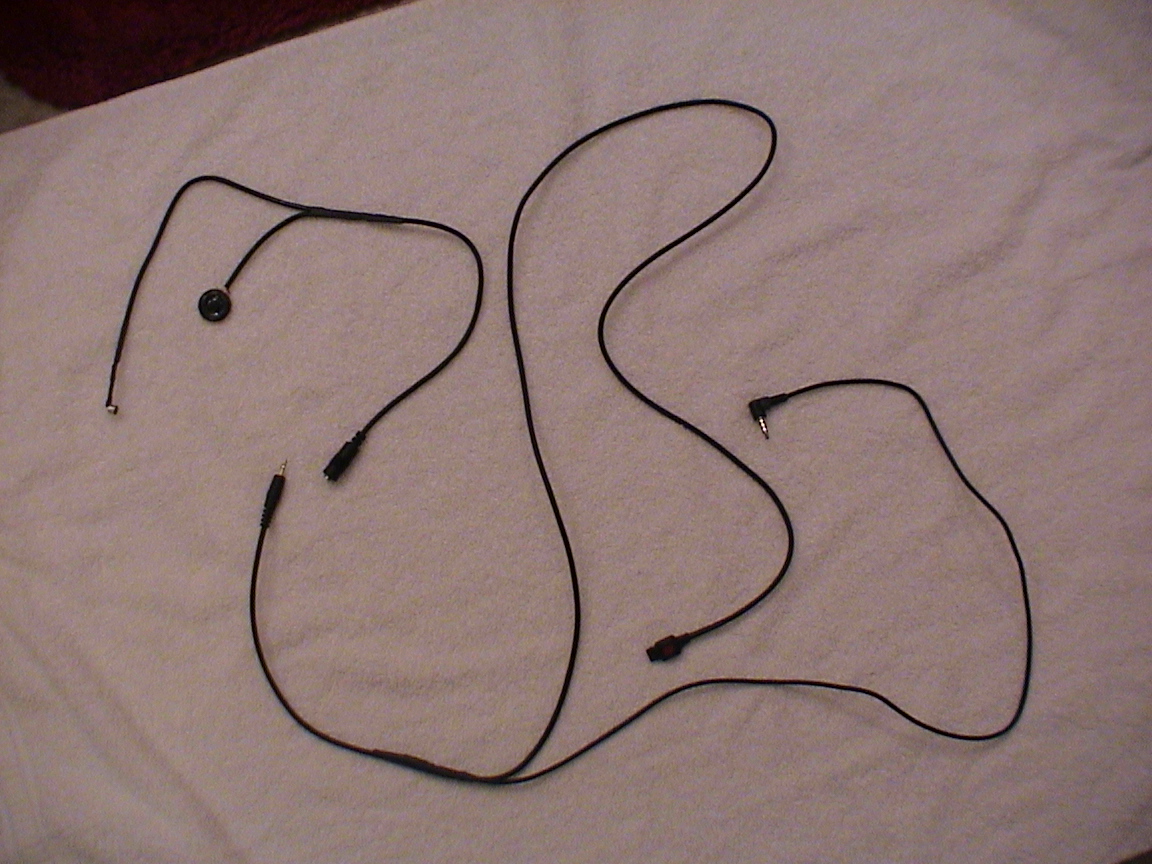
This project consists of three separate bits; the headset, the PTT switch and the radio connection. All three pieces are joined together at a head-phone splitter that is stuck (with velcro) to the side of your helmet. This design keeps the radio and PTT wires separate – so it doesn’t feel like you’re wrapping a wiring harness around yourself getting everything connected.
This design works with the Yaesu VX-150 radio and a full face helmet. It should also work with the Yaesu VX-170 radio and I’ve included some information at the end explaining the difference. It might work on other Yaesu HAM radios or it might not and it might cause them to explode, your head to explode or both at the same time. Also electronics is a dangerous pastime that involves red-hot soldering irons, corrosive toxic solder and flux fumes that contain lead which is known to the State of California to cause something bad. You may grow an extra head just thinking about all the bad stuff that could happen. So you have been warned, if you blow-up you radio, you head or anything else it is not my fault.
Headset Construction
The 120″ audio cord supplies all the dual core coax we need for the project and the nice molded 3.5mm inline jack (socket). Start by determining how much cable you need to reach from where your ear will be inside the helmet and the outside of the helmet where you will mount the inline jack. Remember it is far easier to cut wire then to add it so leave a little extra length, you can always push it inside the helmet lining, cut the length you need. Then measure out how much cable you need to reach from your ear around the inside of the helmet lining to your mouth, again cut to length but keep it on the long side.
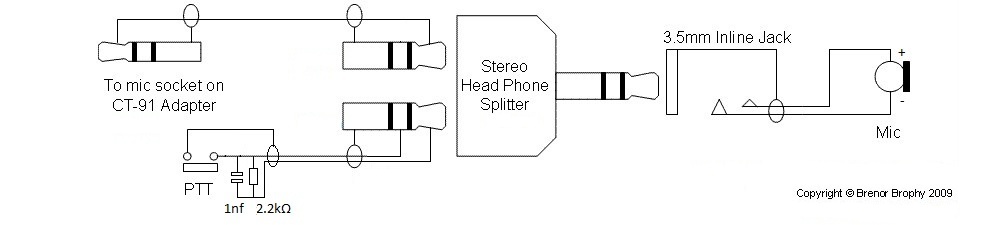
The cable will have two cores (because it is stereo cable), in the one I bought one was colored red and the other white, the white one was connected to the tip of the plug and the red was connected to the first collar. Refer to the electrical diagram above, the wire that connects to the tip is used for the speaker, and the wire that connects to the collar is for the mic. It is important to keep this all consistent – speaker wire (white) always goes to the tip and mic (red) always goes to the collar (and of course shield always goes to the common). Your colors may differ, so check it using a ohm meter or a multi-meter or some other continuity checker. The easiest way is to check the plug on the audio cord against the exposed wire (since you cut it) at the other end.
Detail of assembled microphone
Installed microphone
Using the construction diagram above, solder the microphone to one end of its cable, even though there are two core wires just use the mic wire (red) and the shield to connect to the two terminals of the microphone (Cut the speaker wire (white) off where it appears past the shield to avoid mistakes soldering the wrong wire). Cut a notch out of a piece of 3/8″ heatshrink tube as shown, slip it over the microphone and cable until the microphone pokes through the notch. Then heatshrink the tube to that it holds the microphone firmly and protects the solder joints on the bottom. It should look like the picture to the left. Now slip a 2″ long piece if heat shrink over the ends of the cable from the microphone and the inline jack (you won’t be able to get it on later). Then solder the shield of both cables to one terminal of the speaker. Solder the speaker wire (white) from the inline jack to the other speaker terminal. Then solder the mic wire (red) from the microphone to the mic wire (red) from the inline jack. Slip a short piece of 3/16″ heatshrink tube over this connection and shrink it so that it can’t short to anything. Then cover everything with the 2″ piece of 3/8″ heatshrink tube and shrink it to pull everything together and protect as much of the soldering as possible.
Installed speaker
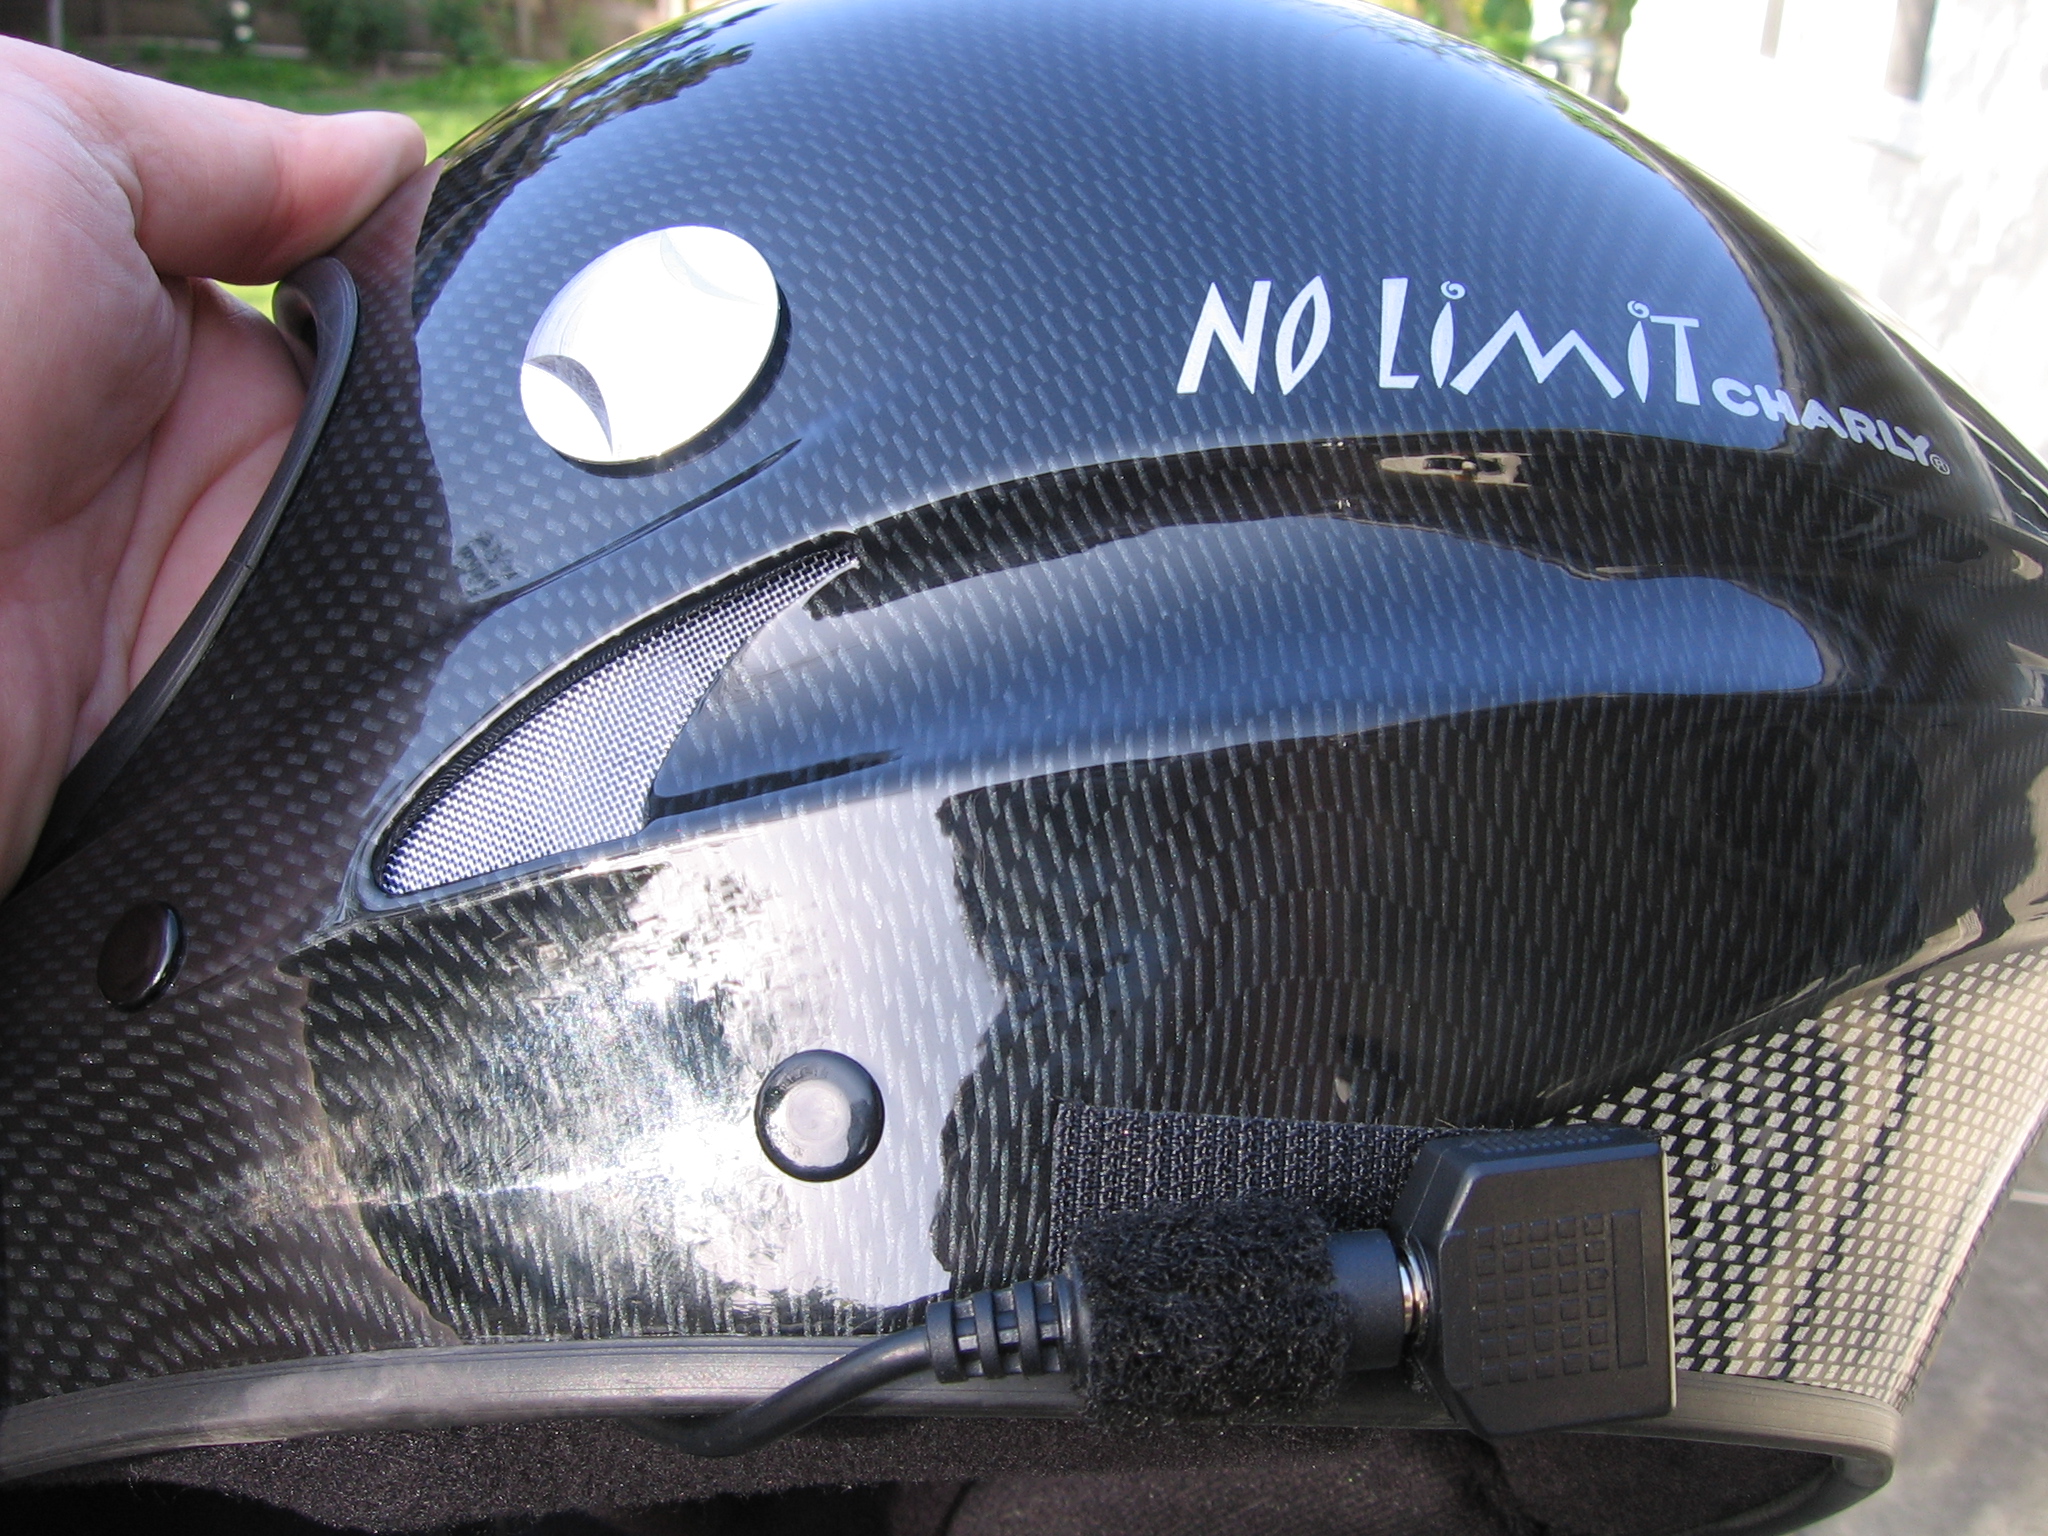
Splitter
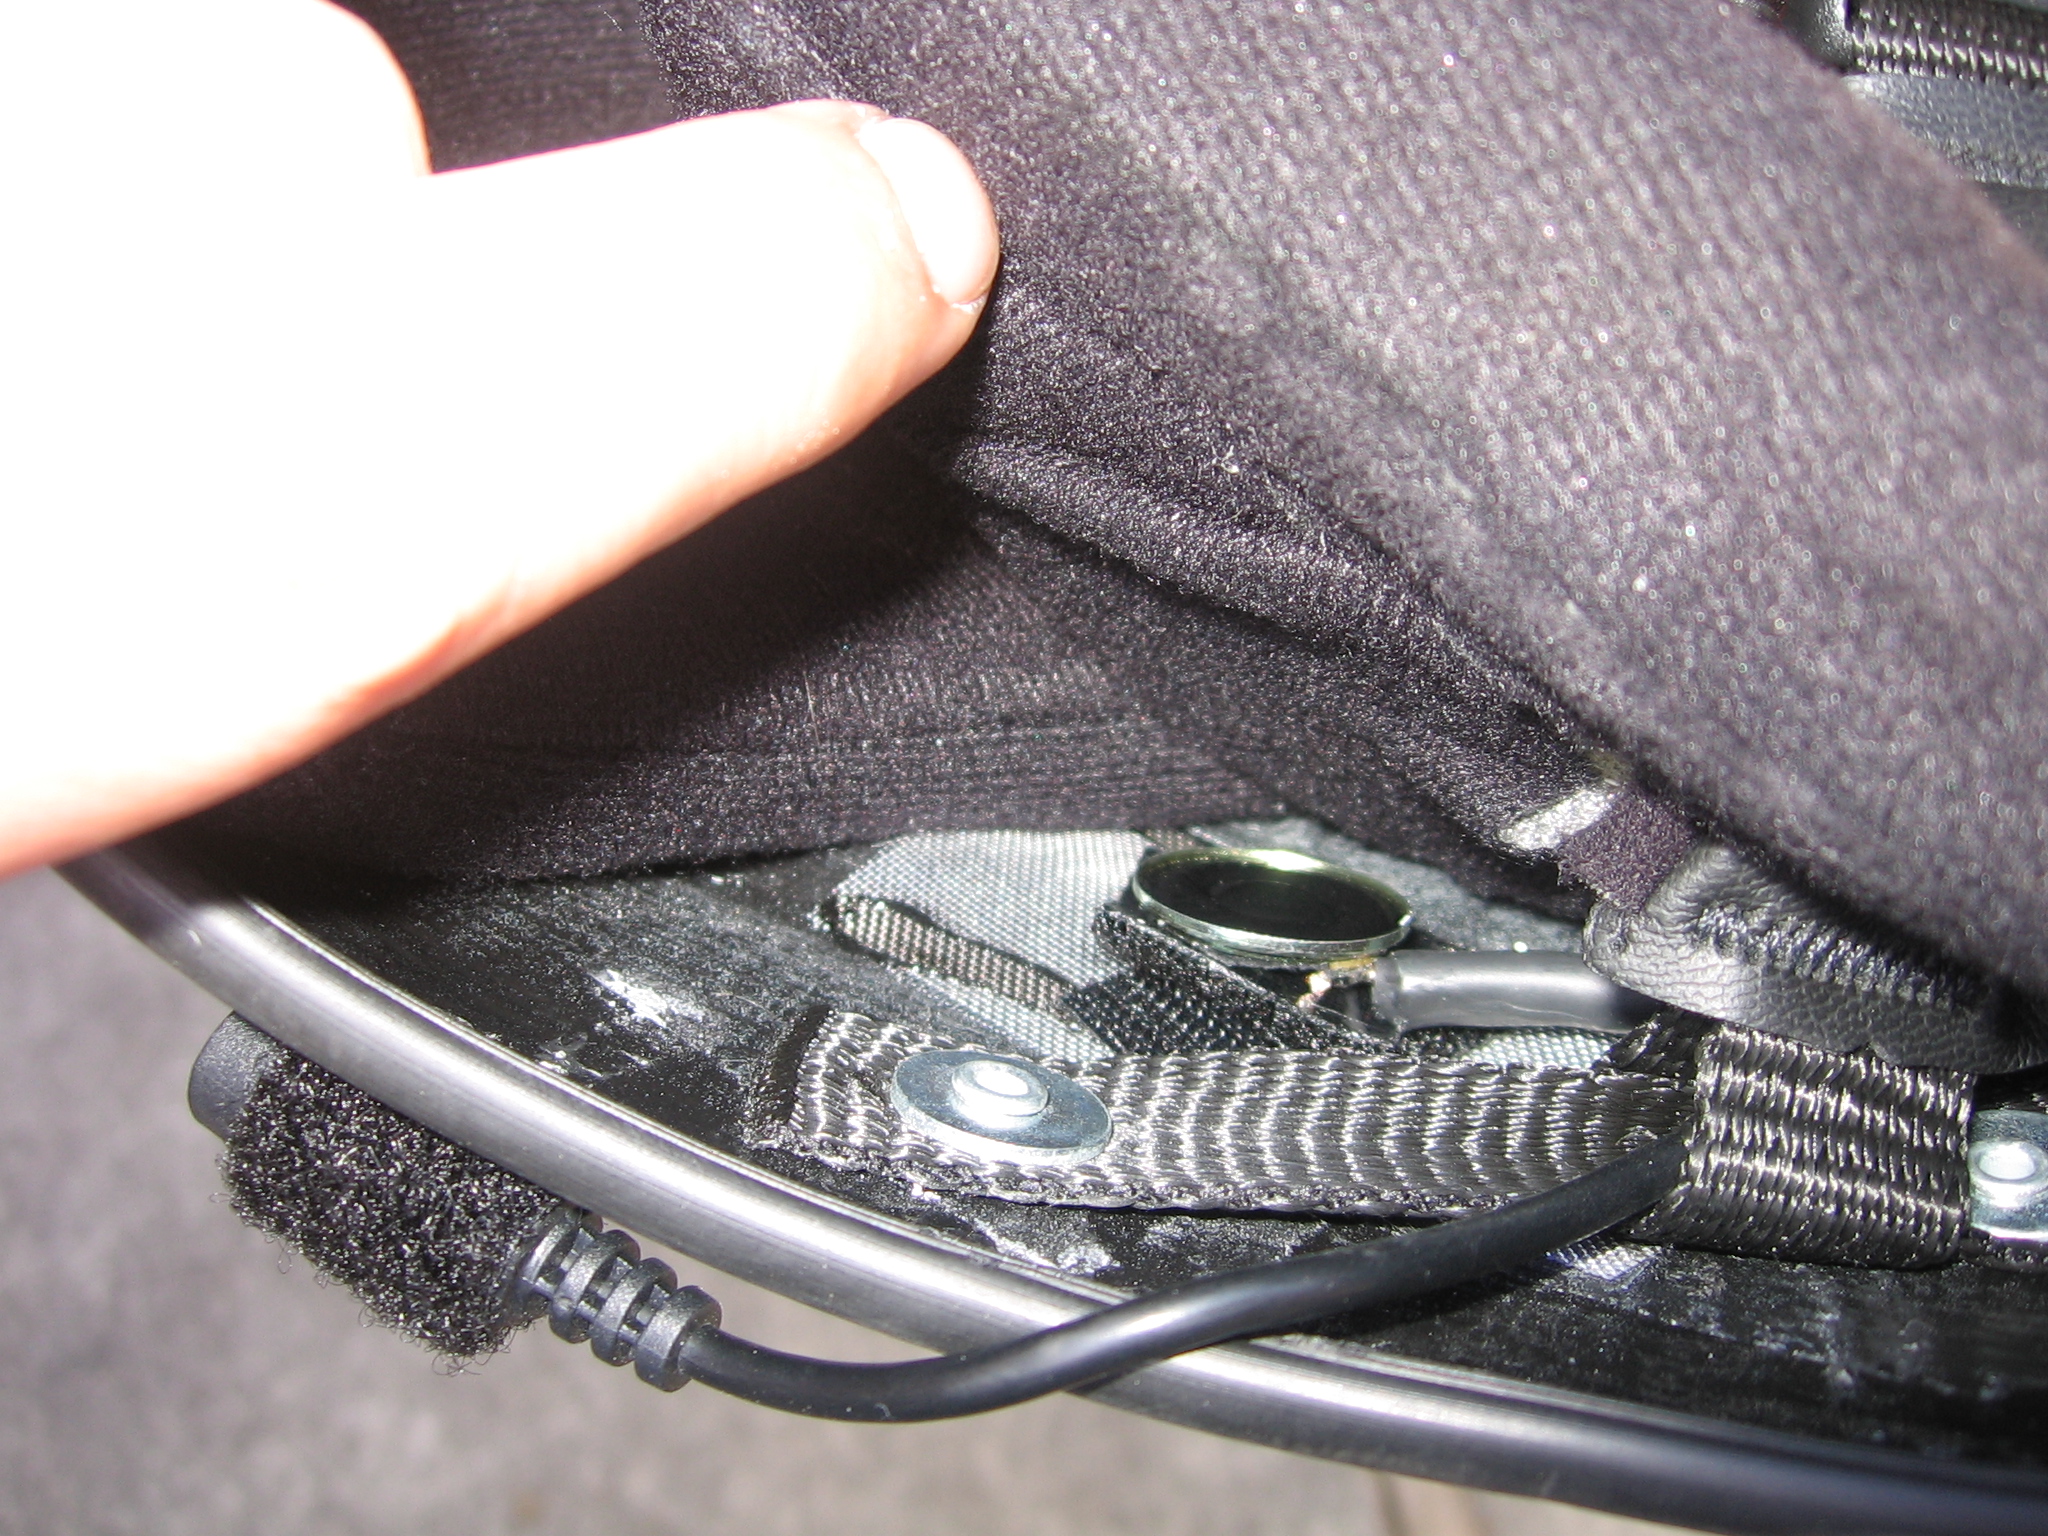
Using the adhesive backed velcro cut a small 1″ long piece of the felt side and stick it to the back of the speaker. You want it to cover all the exposed metal connections and also stick to the end of the heatshrink tube as this will provide some strain relief. Now cut a matching piece of the hook side and stick it to the inside of the helmet (inside the lining) in the location where you wish to mount the speaker. In my Charly No Limit helmet I was able to gently pull the lining away and lay the wires inside, there was even a cutout in the foam for the microphone in front of my mouth (top middle picture). I threaded the inline jack through one of the loops where the chin strap attaches to the shell (top left picture) so that it wouldn’t “wander” around. Finally, cut a length of the velcro felt and stick it around the inline jack and another piece onto the headphone splitter. Lastly mount a 2″ long piece of the velcro hook side to the outside of the helmet to attach the inline jack and the splitter as shown in the top right picture.
PTT resistor installed inside plug
The PTT operates by connecting a 2.2K Ohm resistor between the mic wire (red) and the shield. 2.2K Ohm is particular to the VX-150, other radios use different value resistors. As the PTT switch needs to be a thin as possible, I decided to mount the resistor inside the 3.5mm stereo plug that connects into the headphone splitter.The picture on the left shows the mic wire red connected in series with a 2.2K Ohm resistor to the collar of the stereo plug. I used a small piece of heatshrink tube to cover the resistor as much as possible to stop it shorting and I cut off the solder lug for the plug tip for the same reason. Once this plug is connected, put on the helmet, plug it into the splitter and then carefully measure out the length of cable you need to reach your index finger. You might want to do this with your harness on, just to be sure you leave enough length to route the cable just how you like. Remember, always leave a little extra length.
Assembled PTT switch
The construction diagram shows some detail on soldering on the PTT switch. Don’t forget to slip a 2″ long piece of 3/8″ heatshrink tube on first before you solder on the switch, you won’t be able to get it on later. Then strip enough of the insulation to be able to solder both the mic wire (red) and the shield to both sides of the switch.This is not essential, but it will make the connection stronger which is important because this joint will see a lot of pulling and strain. When the soldering is done, push the heatshrink up OVER the terminals as far as it will go. You want it to be stretched over the switch terminals after you shrink it.
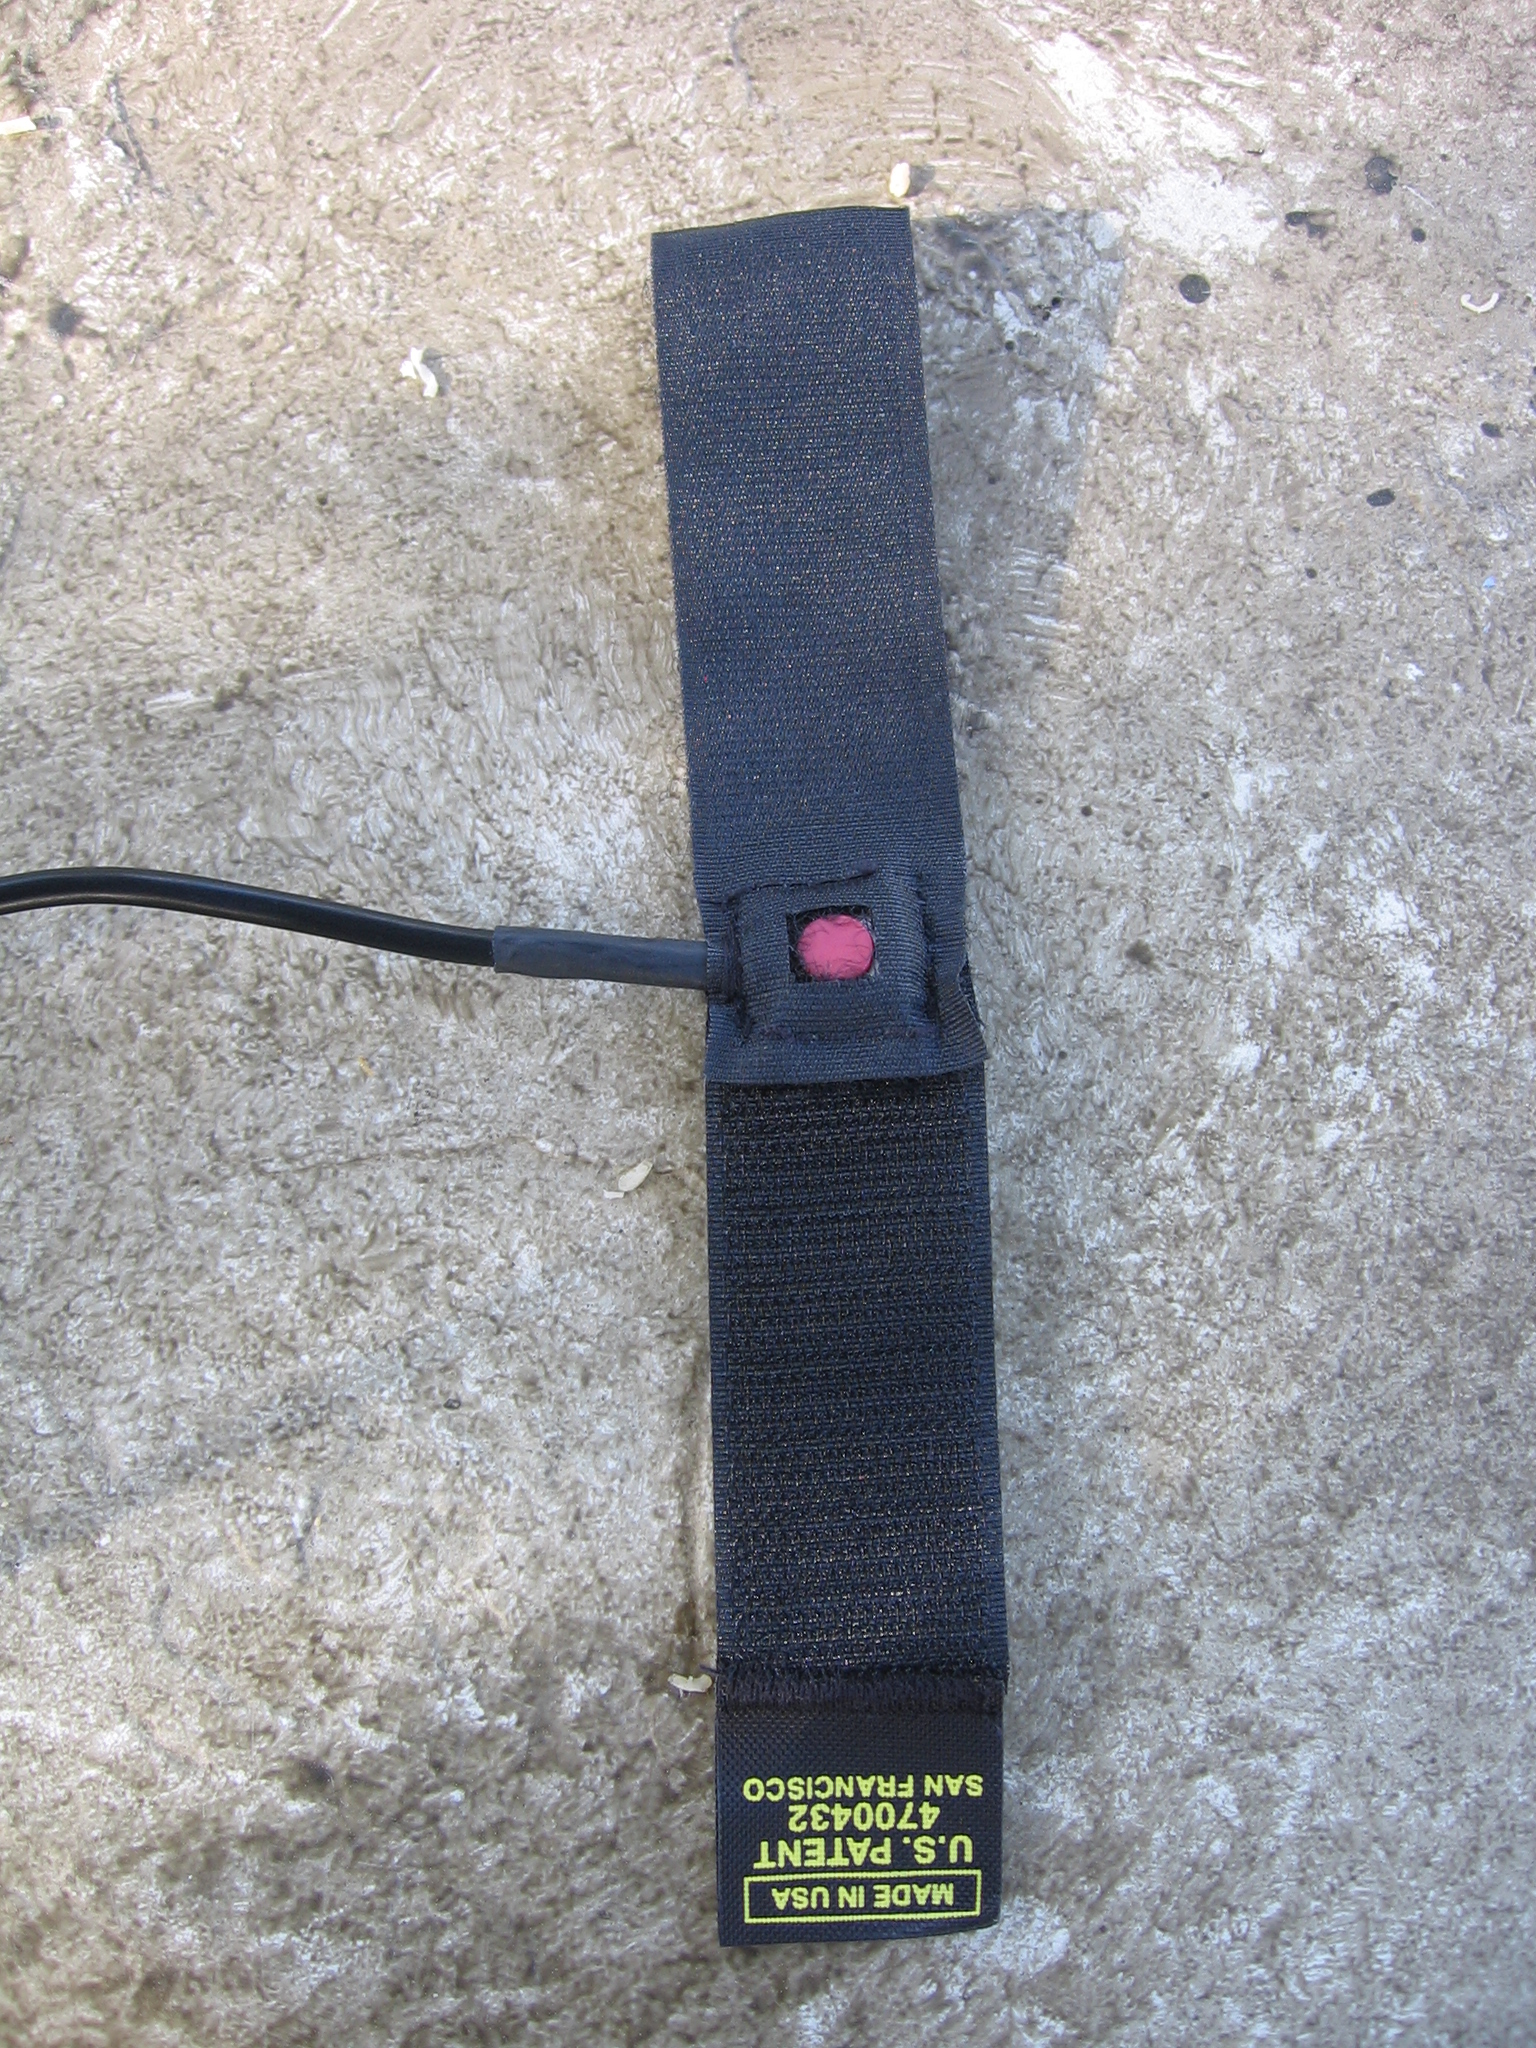
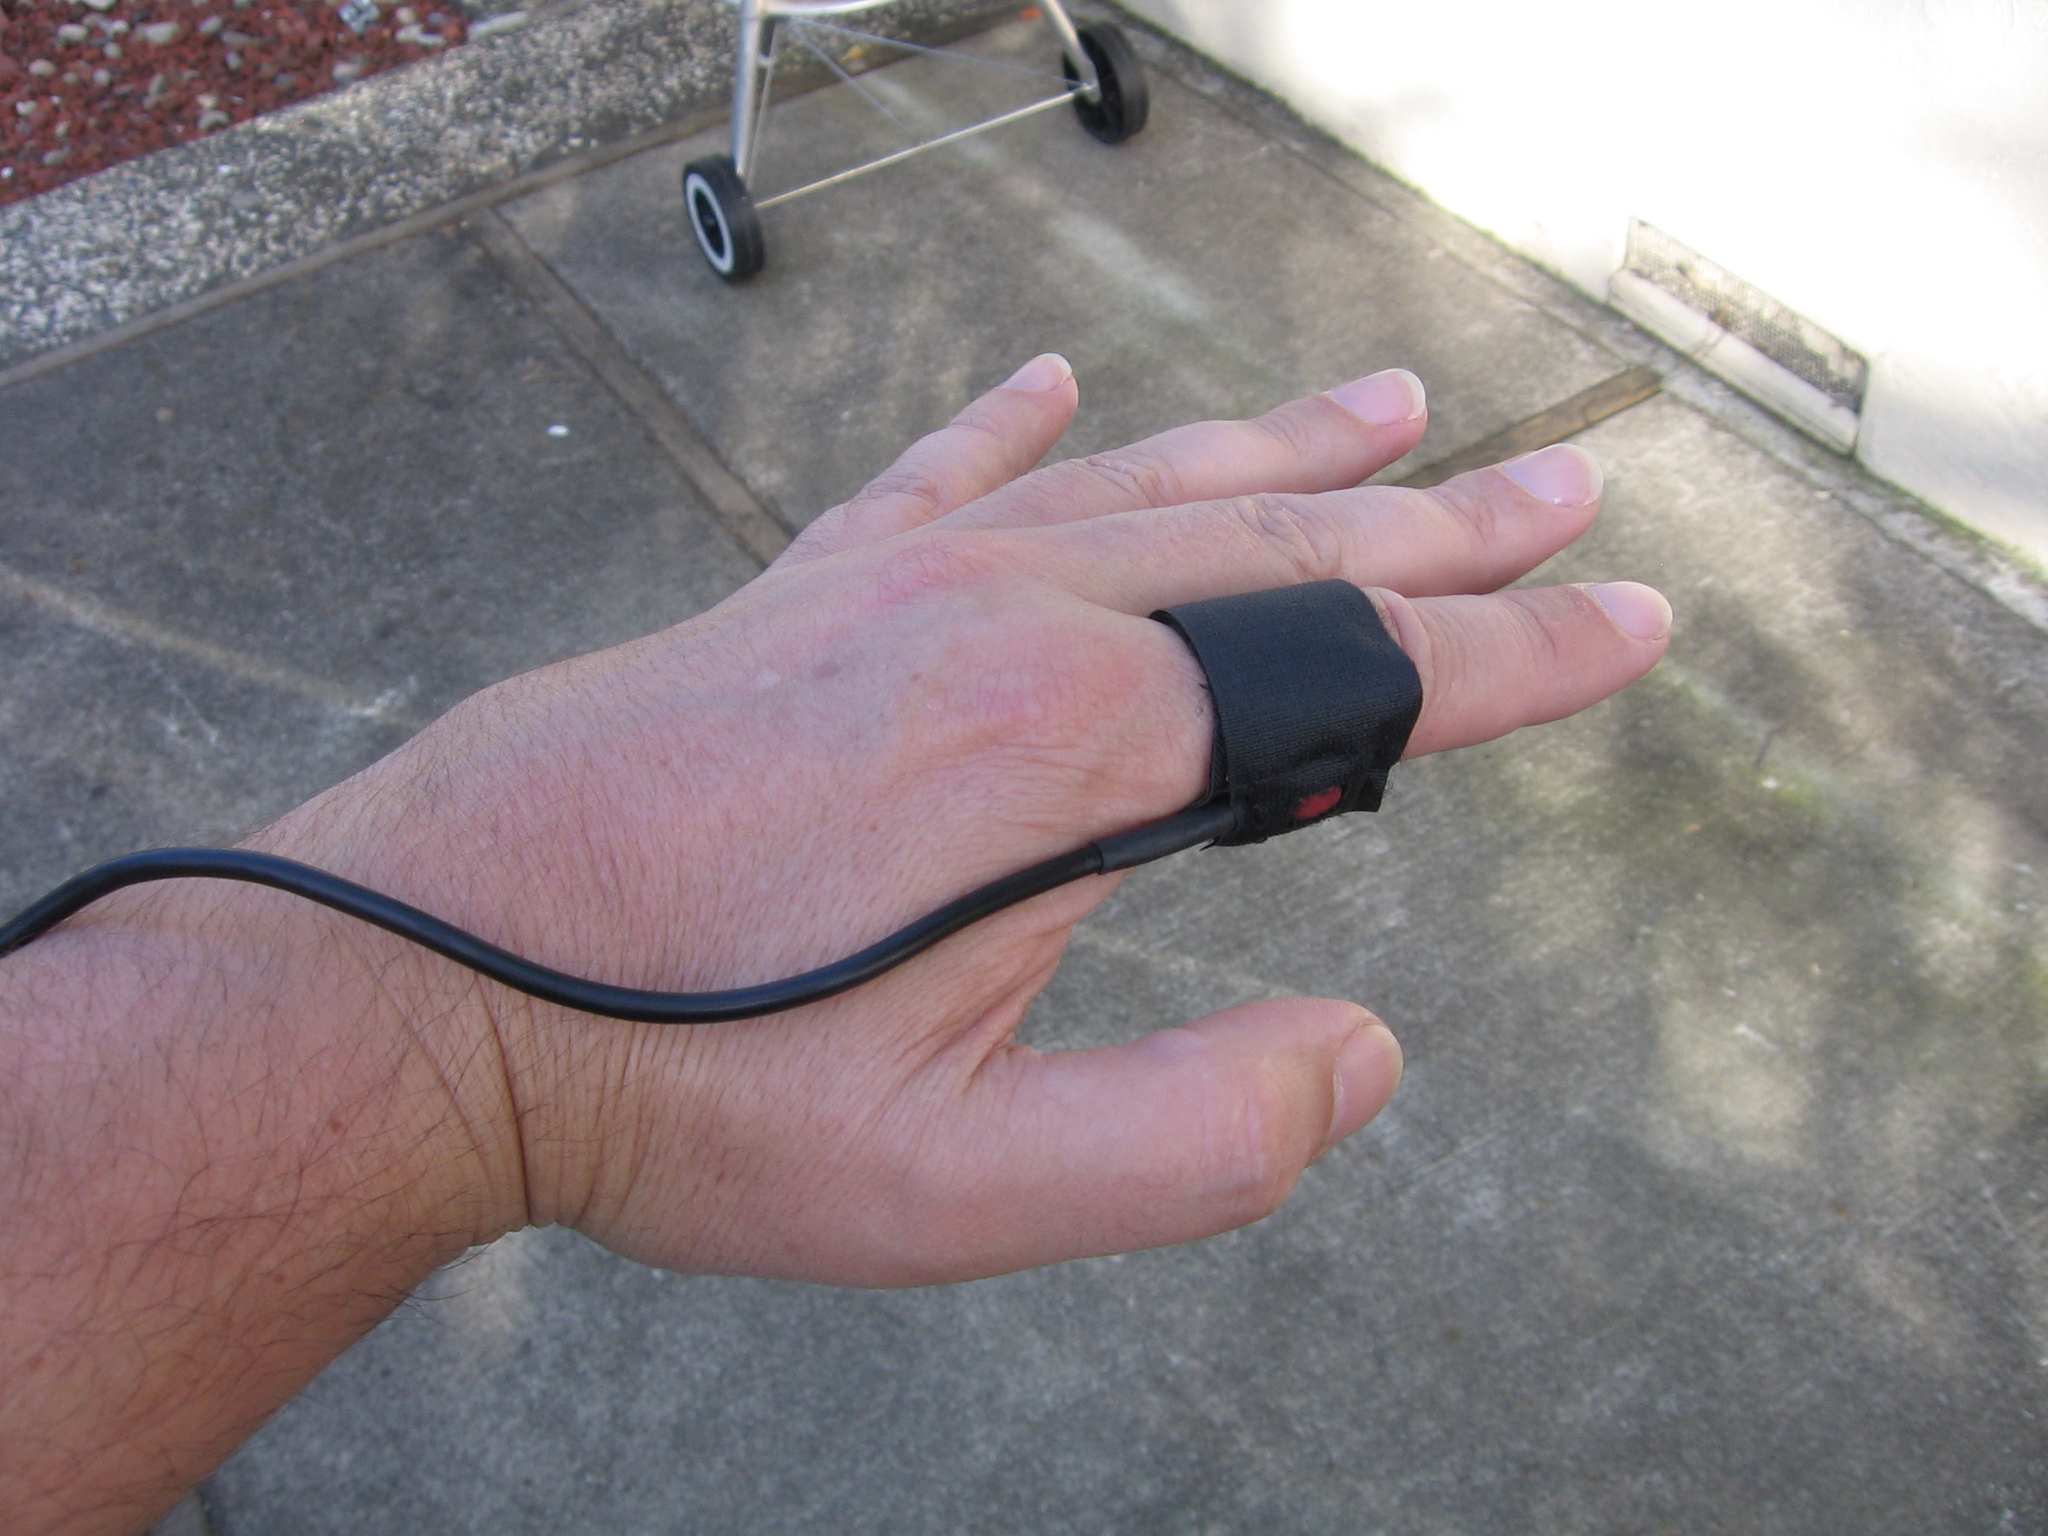
PTT working position
To make the velcro “ring” for your finger you just need 1″ x 3.5″ of velcro hooks and a 1″ x 3.5″ piece of velcro felt. I used a Rip-Tie because I had it laying around, but any piece of velcro will do. Overlap the pieces as shown in the middle picture hooks up, felt down, with enough overlap to sandwich the PTT switch between the two. Make a cutout in the felt piece for the actual PTT switch (red circle in the picture). Then sew the two pieces together around the edge of the PTT switch. Start sewing on the side where the cable emerges and make many loops of thread completely around the cable/heatshrink tube as tightly as you can to create a strain relief. It should end up looking like the picture on the right.
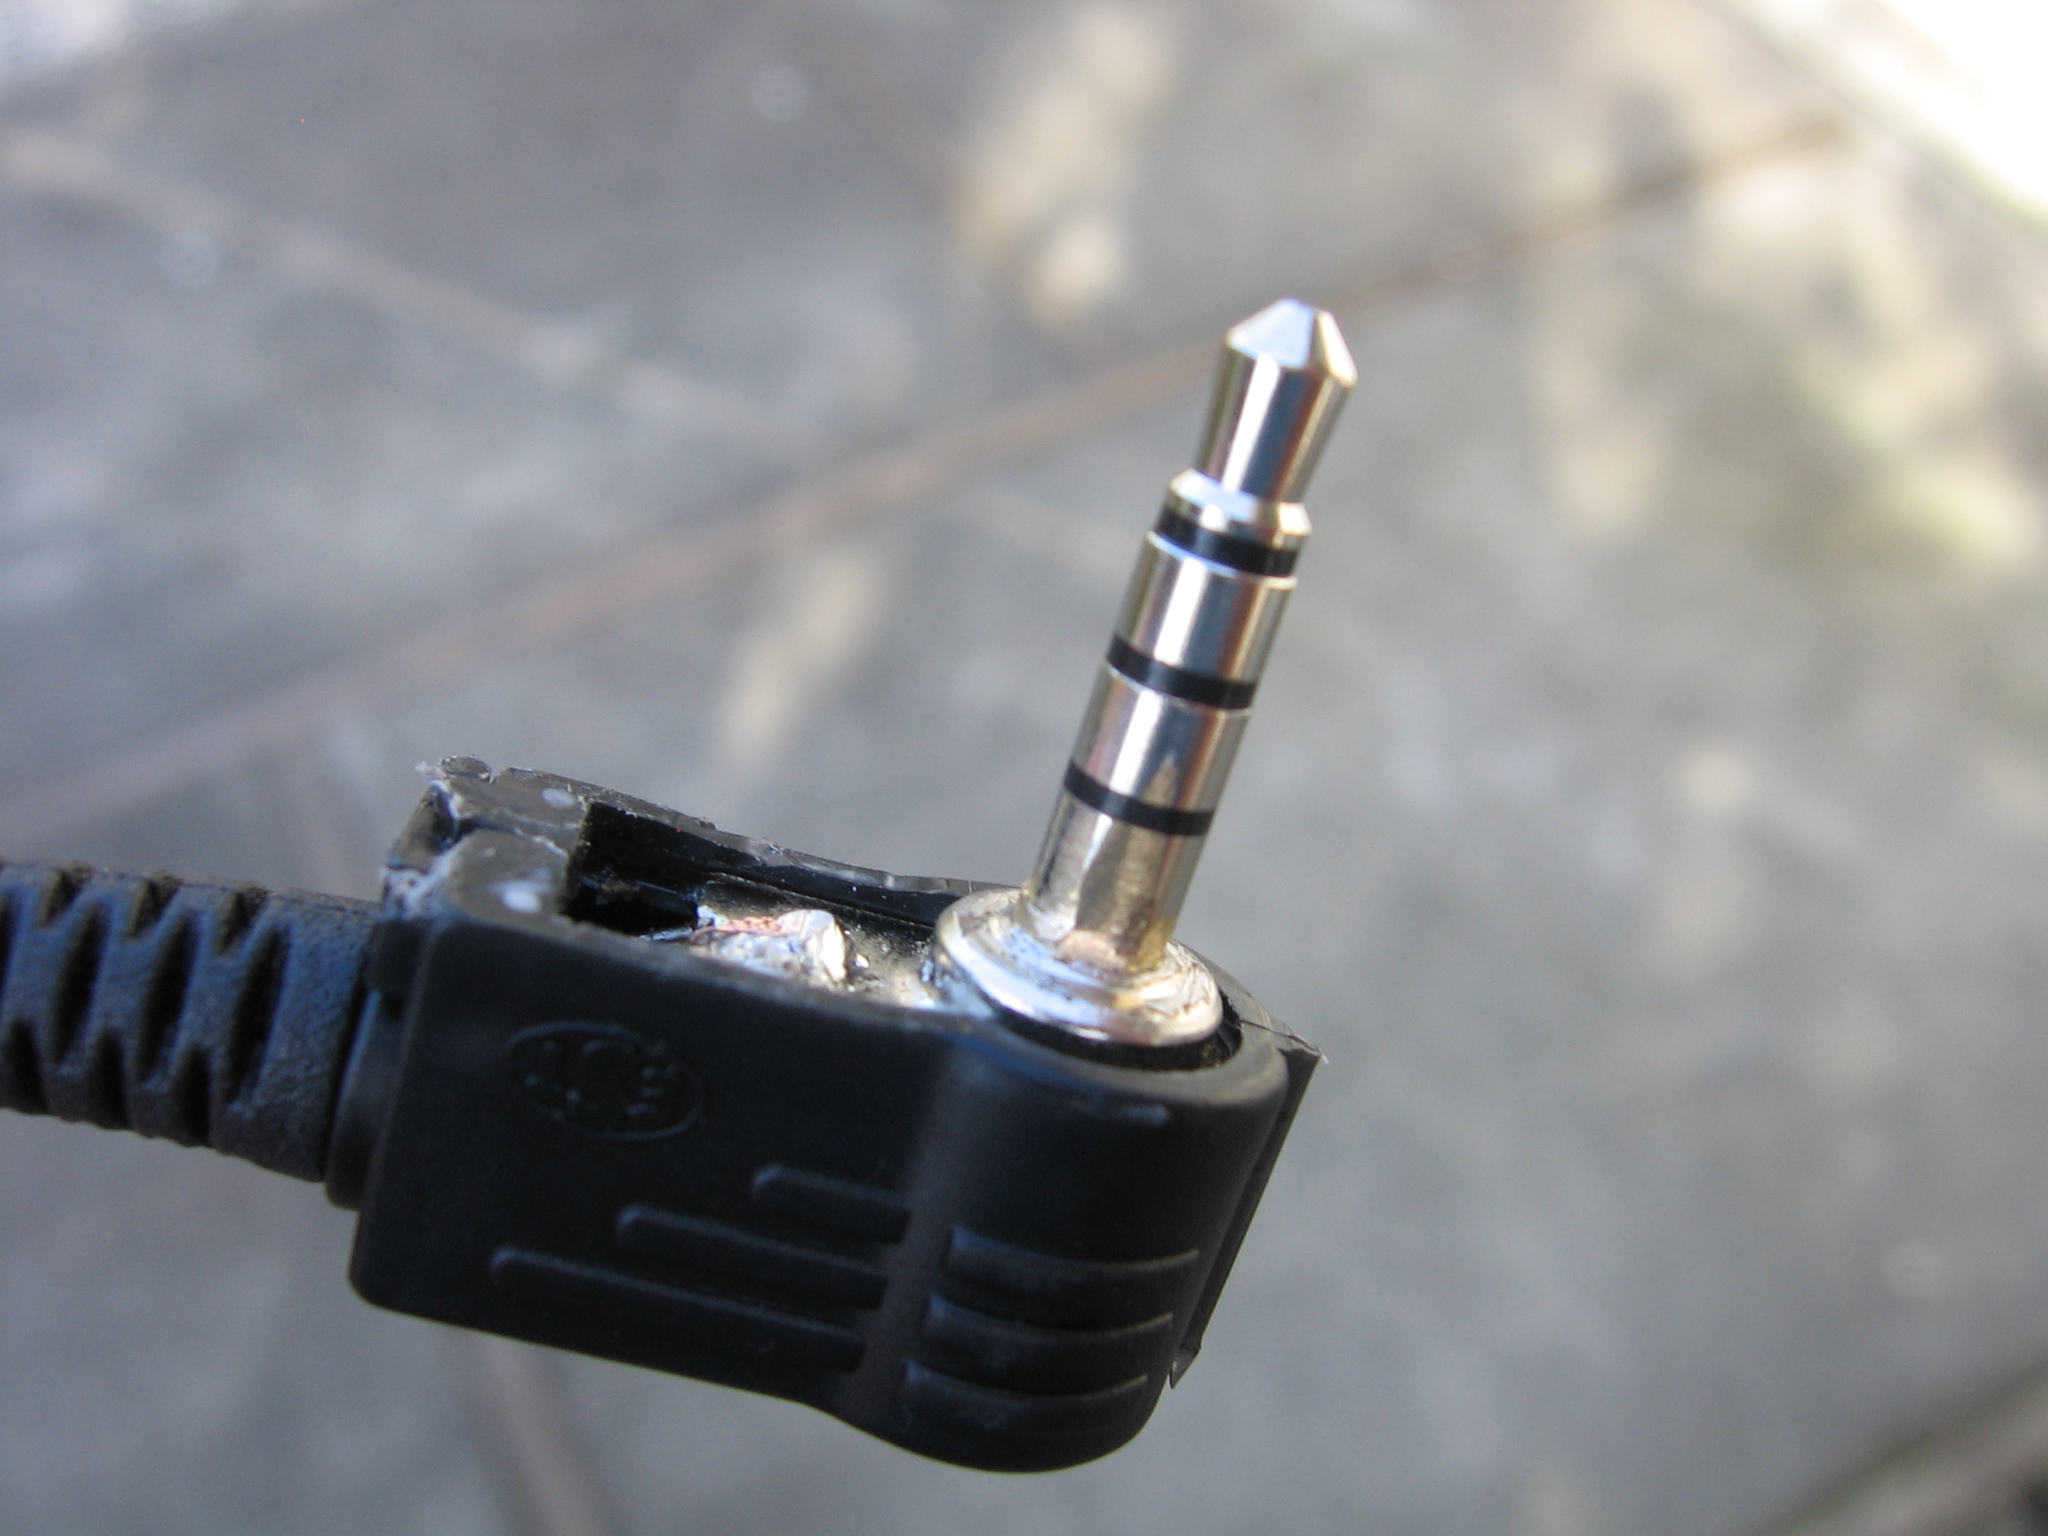
4-conductor plug
Radio Connection Construction
Update 9/14/2007: A better solution (Thanks Steve!) than the one I used below is to just buy the 4-conductor plug with an integrated cable attached from Mouser and then just solder a standard 3.5mm plug on the other end of the cable after cutting it to the right length. The mouser part number is 172-7436. According to Steve, the plug is a better fit for the radio and you don’t have the problems I talk about below.
Old Instructions: On one end solder on the standard 3.5mm plug. Both core wires must be connected, the speaker wire (white) to the tip and the mic wire (red) to the collar. Then put on your harness and helmet, plug in the radio connection to the splitter on the helmet and measure out the length of wire needed to reach the radio wherever you plan to put it in your harness. Remember to leave a little extra length as usual. Soldering on the 4-conductor right angled plug is finicky, refer to the electrical diagram above to make sure you connect it correctly. Lastly, it appears the the connector used by Yaesu on the VX-150 is not EXACTLY the same as the one purchased from Mouser. The Yaesu needs to be slightly longer. Look carefully at the picture on the left. You can see the marks where I filed away a small metal step at the base of the plug to allow the plug to reach further into the socket. I also carved away a little of the plastic to get the plug into the radio socket as far as possible. If you experience intermittent operation of the PTT that goes away when you push the plug into the radio, then the problem is the plug is not inserted far enough.
It seems like the VX-170 is the new radio of choice, I’ve seen a bunch of them around the LZ and recently a fellow pilot asked me for some help getting a headset to work with his new VX-170. That gave me a chance to check-out how its wired and determine how a headset should be wired to work with it. The VX-170 seems to be a next generation from the VX-150. Its a little bigger, has more memory, a better display, a much better battery pack offering 1400 mAh with NiMH batteries versus 700 mAh for the NiCd batteries in the VX-150. And its waterproof!
As it stands the VX-170 uses the same 4-connector 3.5mm socket for an external mic/speaker as the VX-150. The socket is wired the same in both. So you could use the headset/PTT described above WITHOUT modification.
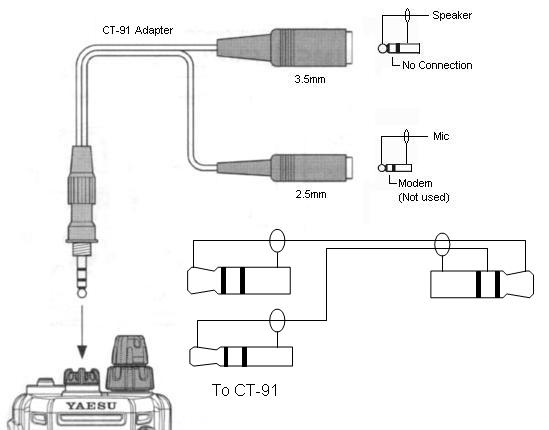
Using the CT-91 Adapter
However, the VX-170 uses a specialized socket that has a screw-in seal that keeps it waterproof. You could plug in the standard 4-conductor plug from Mouser and it may work but I’m concerned with the fact that the Yaesu plugs seem to be a little longer than standard. I recommend instead that you get the optional CT-91 mic adapter and then modify the Radio Connection cable as shown below and simply connect that to the CT-91. This diagram should be all you need to get a headset/PTT working with this radio.
Added 1/19/2008
Here are some pictures from Steve Prater in Arkansas on the PTT he built using the plans on this page.
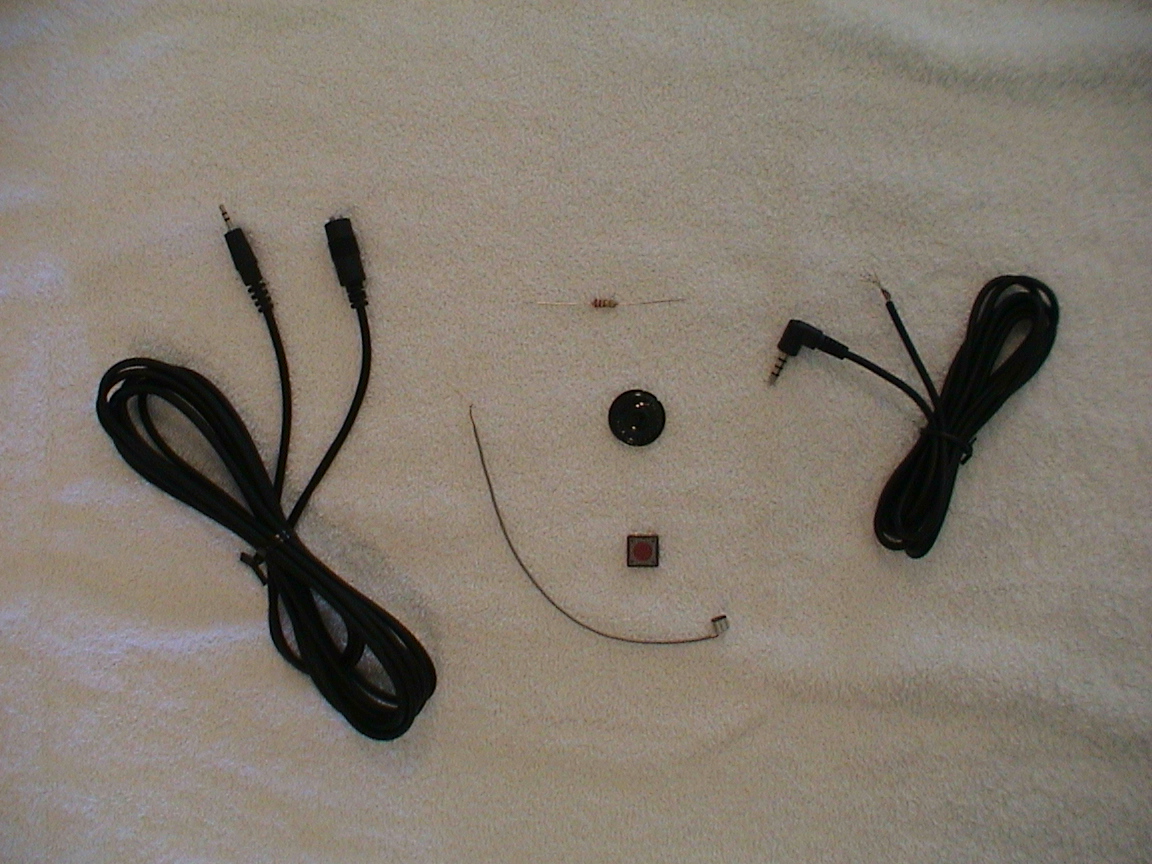
Parts
Cut and ready to assemble
Finished
Added 4/13/2009 – VX-170 Variant
VX-170 Microphone only
I had a request for a variant on the VX-170 radio where only the microphone and PTT were required. In this case the speaker would be a completely separate pair of molded earbuds. With the CT-91 adapter on the VX-170 radio this is pretty easy. The separate earbuds go directly to the 3.5mm speaker socket on the CT-91 adapter. I’m not sure if the CT-91 has a stereo or mono socket. If its stereo but one channel is unconnected then only one side of your earbuds will work (someone let me know if that’s the case). The diagram below shows how the microphone in the helmet and the PTT are constructed. Its very similar to everything shown above so I hope it’s self explanatory.
Added 8/29/2010 – VX-170 variant with battery saving feature
Modified for better battery life
This diagram is a modified version of the mic/PTT only circuit shown above. It was adapted from this circuit by Josh Widen. The condenser microphone I specified contains a small amplifier circuit (datasheet) that is powered from the radio. In my version, that amplifier is powered on all the time, it’s maximum current consumption is 0.5mA, so while it’s small it’s not insignificant. In the circuit below, the PTT switch actually connects the mic to the radio when it pressed, therefore the mic only receives power when you are talking.
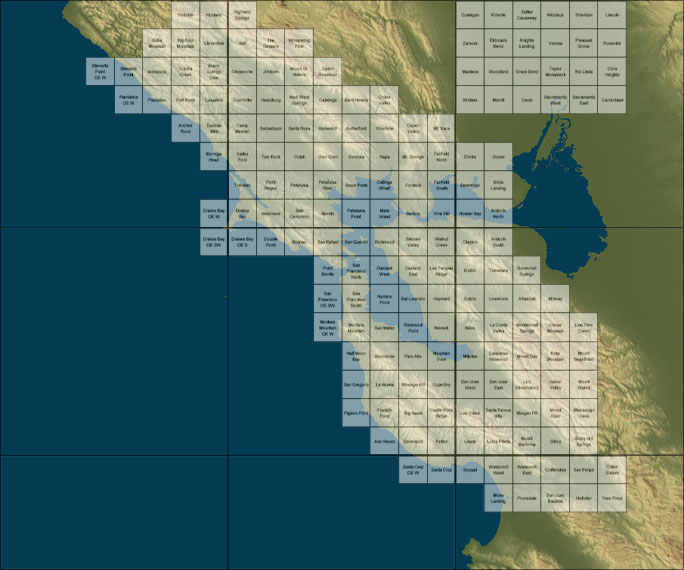
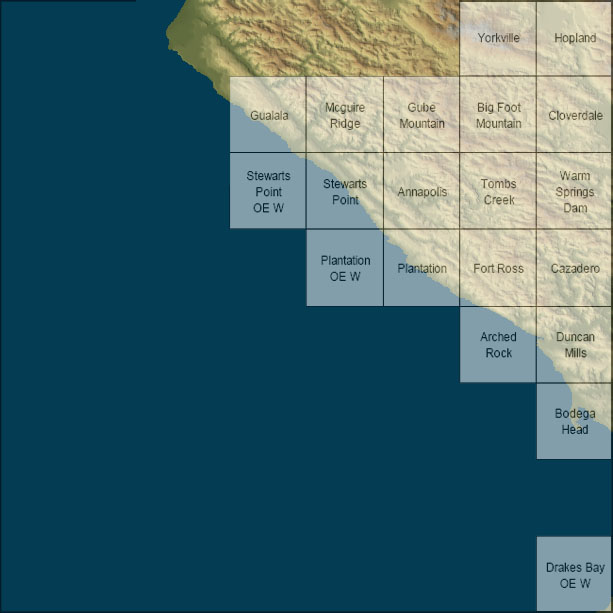
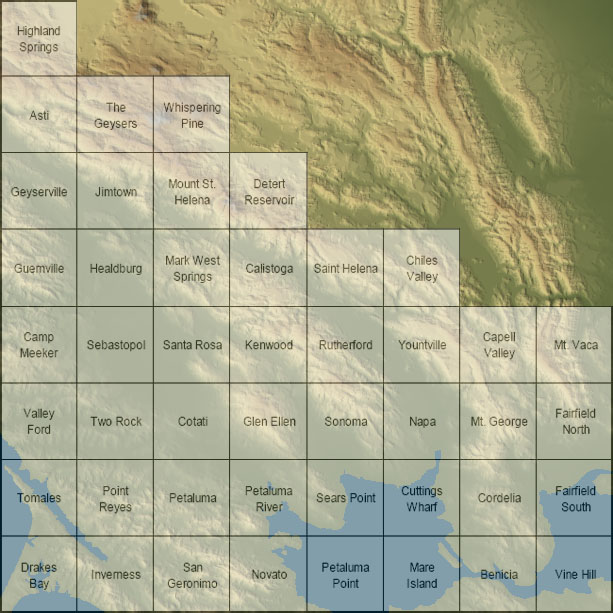
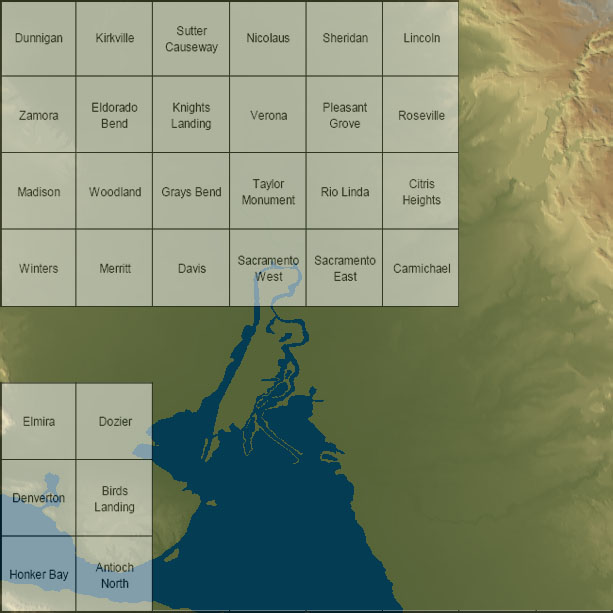
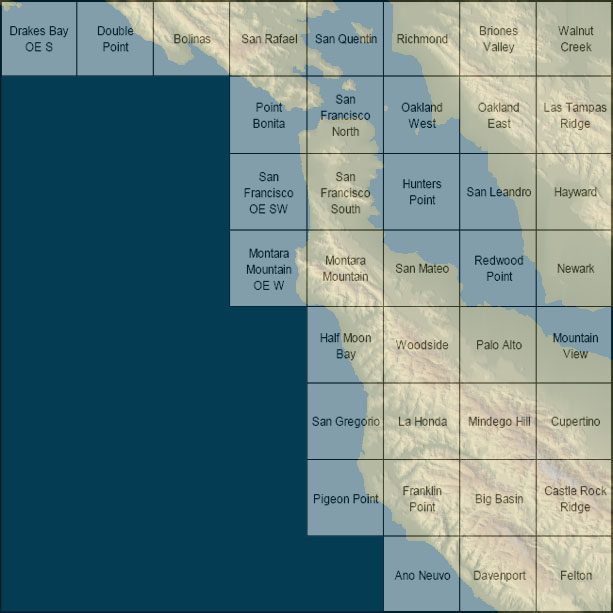
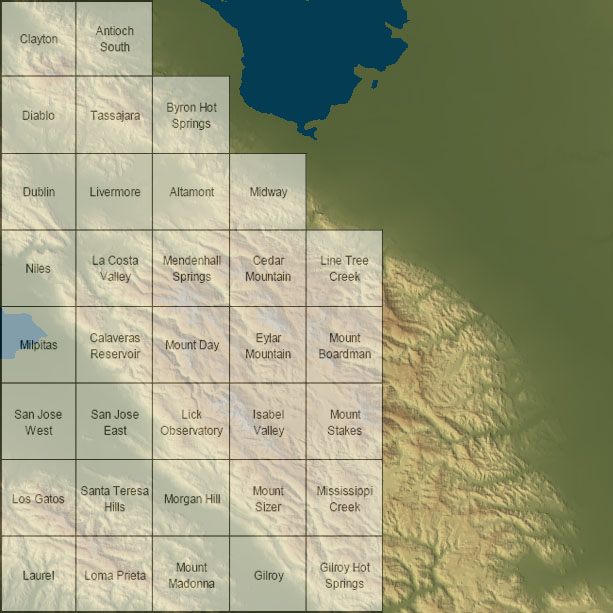
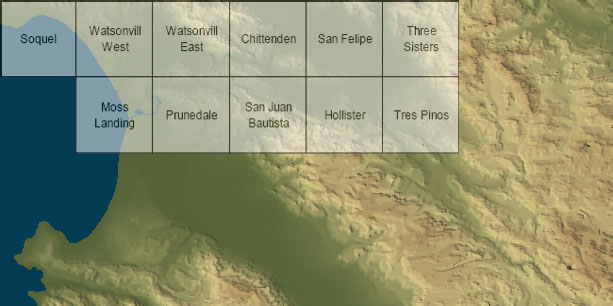
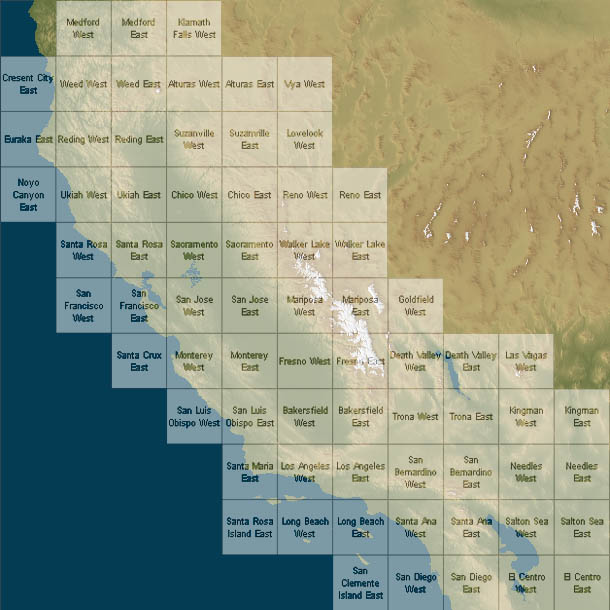
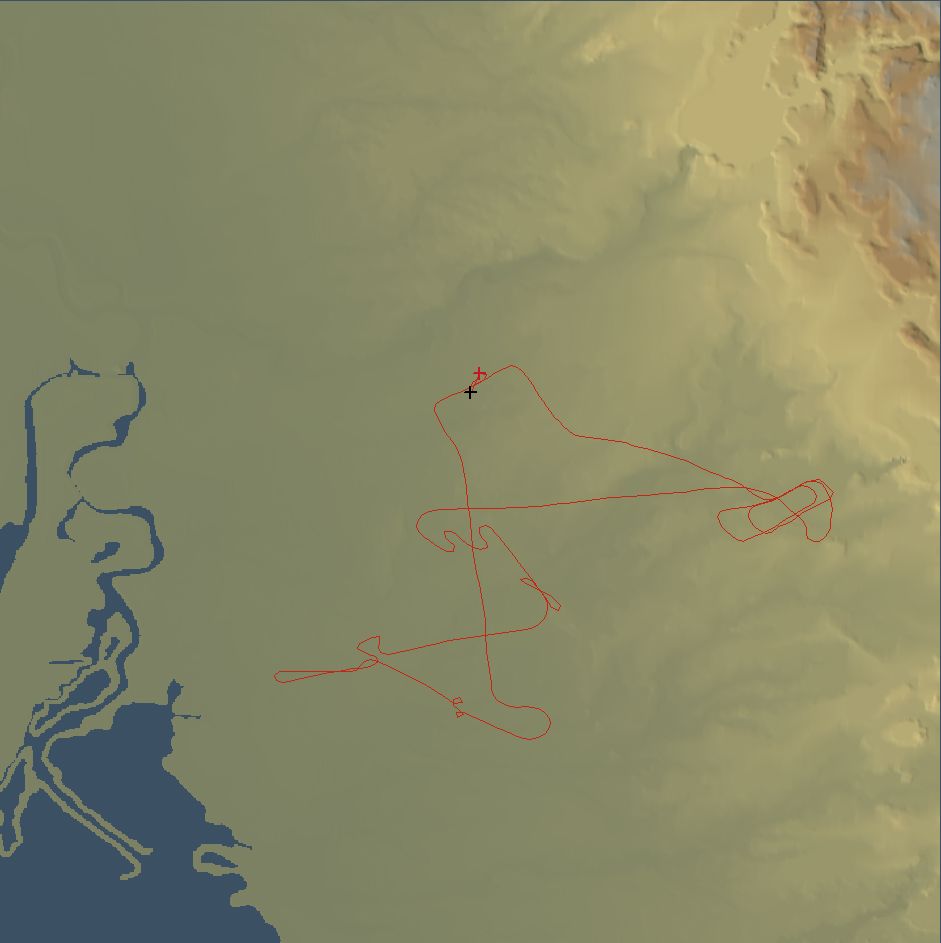
The DEMs listed here are in standard USGS format, They are 10 meter DEMs at a scale of 1:24,000. The files are zipped and are between 1~3 Megabytes in size. Each uncompressed DEM is around 10 megabytes in size.
Well today I passed my commercial checkride. Amazing, I can now be paid for this hobby. I doubt I’m going to get rich anytime soon. But it is sure nice to have it behind me.
The day started off about 7am, checking the weather. It has been really foggy in the San Francisco Bay Area and the California Central Valley for the last week. It has been zero/zero some mornings. The forecast was for more of the same today, but not that bad. My checkride was to be out of Mather Airport in Sacramento, about a 40 minute flight from Reid Hillview in San Jose where I’m based. I had agreed with the Examiner on Friday, that as long as it was likely to be above minimums for the ILS approach (200’ ceiling, 1/2 mile visibility) when I arrived and forecast to be VFR by midday we would be good to go. As it turned out the ceiling was at 1700’ with 2 miles visibility and forecast to be 4000’ scattered later in the morning. I got to Tradewinds at 8am, got a briefing, filed my IFR flight plan and called the Examiner to let him know I was on my way. I never even got into the clouds on the way up, the uncanny ability of ATC to vector me around what few clouds existed still amazes me. By the time I got to Mather the clouds layer was so broken up that it was a clear shot into the airport on the ILS with visibility around 3 miles.
The oral part of the exam began with a briefing from the examiner – usual stuff with a special emphasis on positive exchange of controls in the event of a traffic conflict (sounds like he had a bad experience with this at some point). We went over the paperwork – application form, logbook endorsements and written test result. I had scored a 98% on the written and the Examiner commented that “this must mean I already knew all this stuff” – seemed like a good start. Once he was happy the paperwork was fine and I paid him $350 we got into the questions. For the benefit of any aspiring commercial pilots studying for the checkride this is what he asked as best I can remember.
What paperwork needs to be on board the airplane ? …Airworthiness Certificate, Registration, Flight Manual and Weight & Balance.
What does an Airworthiness Certificate mean ? …That when the plane was originally certificated it meet all the specifications and requirements of the FAA to be airworthy.
Do Airworthiness Certificates expire ? …No, as long as the aircraft is maintained according to the regulations.
When is a 100 hour inspection required ? …When the airplane is “for hire”, as in carrying people or things for money, or for flight instruction.
If a planes annual inspection was completed today (Dec 13th) when is the next annual required ? …Before the end of December next year.
If the annual inspection has expired by one day what does this mean for the Airworthiness Certificate? …Nothing, but the plane is not airworthy to fly until the annual is completed.
If the annual inspection has expired what should be done with the Airworthiness Certificate ? …I didn’t know – but he told me it should be removed from the airplane.
Why should it be removed ? …So that a pilot will see it is missing and go back to find out why, and so hopefully discovering that the annual has expired and preventing him from flying an un-airworthy aircraft because he didn’t check the maintenance logs before he left.
What are you allowed to do as a Commercial Pilot ? …Part 119.1 has a list of activities allowed (at least that are excluded from the part), I was going to list them out but he stopped me.
If I was a photographer for the Sacramento Bee newspaper and I came to you and said “I’ll pay you $500 to fly me down to the scene of a forest fire to take pictures and then fly me back”, would you be able to do this legally ? …I said that aerial photography was one of the areas that was permitted, but I wasn’t sure I could also provide the plane. He said that what was important was the purpose of the flight, so in this case I could provide the airplane and charge for it. What you cannot do is engage in carriage of people or things for money which obviously means taking people or things from one place to another (not back to the place you started from).
If the same photographer asked you to drop the pictures down to Modesto could you charge ? …No, this would carriage and I don’t hold a commercial operators certificate.
If somebody asked you to fly them on a sight seeing trip around Folsom Lake in your airplane could you charge them ? …Yes, sightseeing within 25nm of the departure airport and returning to the same airport is allowed, but has to meet the drug testing requirements in part 135.
Then we pulled out he San Francisco Sectional chart and he pointed to a small uncontrolled airport. If you were doing real low pattern work at 600’ what airspace would you be in ? …Class G
What are the VFR minimums for this airspace ? …1 mile, clear of clouds.
If you are at 800’ what airspace and minimums would apply ? …Class E (it has a magenta fuzzy circle around it), 3 miles, 500 below, 1000 above, 2000 horizontal).
Then he pointed to the airspace around Beale Air Force Base, what class of airspace is this ? …Class C.
If you were flying from one side to the other at 4500’ what should you do? …Nothing, its top is 4100’.
What is the lower limit? …2600’ and 1600’
If you had to fly lower at 4000’ then what? …Establish two way radio communication with ATC.
What does that mean? …ATC uses you call sign when they reply.
What happens if they say “Aircraft calling, standby”? …Stay clear of the class C airspace, you haven’t established two way radio contact yet,
Do you need a mode C transponder to fly over Beale? …Yes.
Then he pointed to the words “7500 MSL” printed in blue in an area surrounded by a staggered blue line. What does this mean? …The base of class E airspace is 7500 in this area.
Then he pointed to the words “CHINA MOA” printed in magenta within an area bordered with a feathered magenta line. What does this mean? …Military Operations Area.
What should you do in this area? …Be alert for military traffic, call ATC to find out if its being used.
How would you know who controls the area? …It is listed on the boarder of the chart.
Do you need a clearance to enter? …No.
Then he pointed to another small uncontrolled airport with a star printed on top of the airport symbol. What does this mean? …There is an airport beacon.
Does this mean it has runway lights? …No, but you can find out if it has from the airport legend by looking for the letter L.
What do the tick marks around the symbol mean? …There is fuel available.
Then he pointed to the solid magenta 30nm circle centered on San Francisco Airport. What does this mean? …Mode C veil – you have to have an operating mode C transponder within this area.
What is the ceiling of the class bravo airspace? …10,000’.
Could you fly over it without a transponder? …No.
Is there any case when you can fly within the mode C veil without a transponder? …Yes, with prior permission of ATC to ferry the aircraft to a place where the transponder can be fixed.
If a guy has a private airport just inside the mode C veil and wanted to fly his Piper Cub at 25’ above the ground over his own property would he still need a transponder? …Yes.
What do you need to enter class B airspace? …A clearance from ATC.
What would this sound like? …“Cessna 7383X, cleared into class bravo”.
Then he told a long story about a guy flying a Bonanza from Sacramento to Palo Alto. The guy called ATC when he was over Concord Airport (just outside class bravo). ATC was really busy and said, “Bonanza 12345, fly heading 240, maintain 7000’” (which leads into class bravo), then continued issuing instructions to other aircraft without breaking. The guy kept going and got busted for entering class bravo without a clearance. At his license suspension hearing he successfully argued that the regulation stating you must always follow ATC instructions in controlled airspace trumped the regulation about needing a clearance. However, we agreed, he should have contacted ATC long before and at least tried to confirm “am I cleared into bravo”. Another moral of the story is if this happens to you – always ask for the ATC tapes straight away.
What is the service ceiling of you aircraft? …I said I thought it was 18,000’ as I pulled out the POH. Turns out its 18,000’ with a working EGT gauge otherwise its 14,300’.
Is that MSL, AGL or what? …It should be density altitude.
What is service ceiling? …The altitude at which you can sustain a 100fpm climb. He then went into quite a long rant about the single engine ceiling of twin engine aircraft. Basically to the effect that multi-engine pilots frequently don’t understand that when this is lower than the density altitude of the terrain over which they are flying this effectively means they are flying a single engine aircraft. That is, lose an engine and you are landing whether you want to or not. I could see this is a sore point with him and many multi-engine checkride candidates.
If the temperature at South Lake Tahoe Airport is 90F, assuming a pressure altitude of 6,000’, no wind and a clean dry runway, what is the ground roll and 50’ obstacle clearance distance for your airplane? …Answered this to his satisfaction using the performance chart in the POH.
How much does the distances reduce if you have a 15 knot headwind? …Answer straight out of the POH.
Then he asked my what was the fuel capacity of my plane? …80 gallons, 75 usable.
What does usable fuel mean? …The fuel available in any normal flight attitude.
He talked briefly about running a tank down beyond its usable fuel limits and how, when you pitch up on a go around at your destination the fuel would slosh to the back of the tank and the engine would quit.
What positions are available on the fuel selector switch? …Both, Left, Right and Off.
Are any specific positions required for any phases of flight? …I said I thought Both was required for takeoff and landing, but I couldn’t remember a placard to this effect. While talking I pulled open the POH section on limitations and found the fuel placard which does indeed say that Both is required for takeoff and landing, which I showed him. He said he hadn’t been sure what was in my plane, but he had been planning on checking when we went out to the plane.
Given his weight of 162lbs, calculate the weight and CG for the flight we were about to make. …I did the calculation, including the weight reduction for fuel I burned on the way to Mather. He asked me to show him the result on the POH Weight & Balance envelope.
Noting that our CG would be quite far forward he asked, what would be the effect of forward CG on cruise speed for any given power setting? …I thought about this for a while, looked at the cruise performance tables in the POH, but they didn’t mention CG. I finally guessed it would increase cruise speed – wrong answer. He explained that with a forward CG we would need to add nose up trim, which is essentially asking the horizontal stabilizer to product more “down” force – which is exactly the same as if we had added weight to the tail of the aircraft. Added weight means higher load factor, higher angle of attack so more drag and slower cruise speed. He said that this is a big deal for the airlines and they always try to load to an aft CG (still within limits).
Given what you just learned what is the effect of CG on stall speed? …Forward CG increases load factor and so stall speed also increases.
Is you aircraft airworthy? …Yes – He didn’t check any of the aircraft logs.
When was the annual completed? …October.
Prior to flying we had some discussion on exactly how the take-off climb out should be executed with regards to flaps. Basically, Vy on this plane is 88 KIAS (which is fast for a Skylane – my 1980 fixed gear Skylane has a Vy of only 78 KIAS). If you take-off with 20 degrees of flaps it takes a long time to accelerate to Vy and you need to pitch the nose down almost horizontal. This feels quite clumsy in the plane, but the PTS requires that you accelerate to Vy before retracting any flaps. One of my CFI’s had specifically checked this point with the Examiner before the checkride (mainly because, I was objecting to the technique), the Examiner had been pretty emphatic about getting to Vy before the flaps are touched. Thankfully, a careful reading of the POH over the weekend had shown that for a normal take-off you “should retract flaps slowly after reaching 75 KIAS”. It is reasonable to treat a short or soft field take off the same as a normal take-off once you are into the climb phase (having cleared the obstacle or accelerated out of ground effect). I asked the Examiner what speed I should use (75 or 88 KIAS) and he agreed that we should follow the POH. Moral of the story – always carefully read the POH. We also discussed how gear should be retracted on the short field take-off. Again having read the POH – I said only after the obstacle was cleared – which is the right answer. Then the Examiner stumped me by asking why was this the case. After some thought I guessed that as the gear retracts on a Skylane (which is a high wing plane that tucks its gear into the main body a bit like how a bird tucks it legs in), it causes some drag. Basically the wheels turn sideways as they swing into their up position. You don’t want any drag when you are trying to get over the pine tree at the end of the runway so don’t touch the gear until you are clear.
After a quick break it was off to the flying portion. The weather had cleared even more with just a few clouds at about 2,000’. The plan was to take-off to the southeast, climb to 4,500’ run through the commercial maneuvers and then head to Franklin (F72) for the landings. I did a good job of following all the checklists and remembering to do a break check as soon as I started moving. The first take-off he asked for was a soft field. He said to imagine I was taking off with 6” of snow on the ground. We had some discussion about doing this in a retractable gear airplane, basically leave the gear down for a while so the wind can blow off any snow you may have accumulated. I demonstrated a picture perfect soft field take-off, got into ground effect early, pitched to keep the plane there and smoothly let her fly out of ground effect, bring the gear up, then flaps in increments, climb out right at Vy. We turned to a heading of 150 and climbed up to 4,500’. I remembered my climb and then cruise checklists and leveled off right on altitude.
We started with steep turns. He said I could do them one at a time or not (PTS says one should lead straight into the other). I slowed up to about 100 KIAS mentioning that that was the correct maneuvering speed for our weight on the flight, did some clearing turns and completed the maneuvering checklist – we had some discussion about the fact we were now on top of a broken cloud layer so an it was a good thing we were surrounded by hundreds of square miles of flat farm land in the case of an emergency landing. The steep turns were almost perfect (they are usually my nemesis in a checkride – I can only do them right when I’m on my own in the plane). Then we did slow flight, it was a bit unusual. First slow to 90 KIAS, maintain 4,500’, maintain heading. Then 10 degrees of flaps and slow to 80 KIAS. Then turn to a heading (90 degree turn) while slowing to 70, descend 200‘ maintain 70 KIAS. Then 20 degrees of flaps and slow to 65 KIAS, climb back to 4,500’ and turn another 90 degrees. This all went really well – its just like an attitude flying exercise in IFR training and I managed to spend enough time looking at the instruments to fly it pretty well. Then the Examiner asked me to demonstrate a stall and normal recovery from he current configuration (20 degrees of flaps, level 65 KIAS, gear up). This went well. Then a full power-off stall, 40 degrees of flaps, gear down with a full recovery, again this went well. Then an approach to landing stall, I don’t recall the exact configuration I was in, but I think it was clean (no flaps or gear). Basically it was a stall in a descending left turn. It worked ok, but not great (I haven’t practiced turning stalls enough), I over banked a little. Then a power-on stall in a climbing right turn. Basically, clean configuration, full climb power. I screwed it up – let the plane bank way too much and got pretty uncoordinated in the process. He had me repeat it to the right, this one went much better, though it is pretty hard to get a clean stall break on a power-on stall in this aircraft with the gear up. Next up was Chandelles. I did some clearing turns trying to find some good visual references for the maneuver. Basically there wasn’t much to use, we were over a broken layer of cloud in the middle of the Central Valley – so any convenient mountains were a 100 miles away. I ended up using some small cumulous clouds that were poking up from the flat layer as a reference. I did one Chandelle to the left and one to the right. They were acceptable, but I got dinged for not being really smooth on the roll-out, I actually rolled out a bit off heading. I said this was due to the lack of a good visual reference which was pretty true. Then we setup for lazy eights. The first one didn’t go great, same problem being a little impatient with the rollout and so not ending up right on the exit heading with the wings level. He had me repeat the maneuver and the second one was better – basically I just slowed down a bit which always helps in a lazy eight. There really wasn’t much wind so the examiner decided that we would skip the eights on pylons and as the cloud was pretty solid over Franklin we headed to Rancho Murieta (RIU) which is closer to the mountains and over which the layer was still scattered. Thank goodness for GPS, I’d have never found the airport otherwise.
I got the CTAF and airport elevation from the sectional chart. There was a helicopter and a Warrior in the pattern using runway 22. So after dropping down through a hole in the cloud , was passed over mid field at about 300’ above pattern altitude (which was a little low, we passed right over the Warrior on downwind). I didn’t make a great entry to the pattern (fatigue was setting in), basically, made a left turn and came in on left base instead of a right turn to come in on the left 45. Still, the Warrior was on final when I joined base so no harm done. I suffered a moment of panic as I came out of the turn (I was still expecting to be somewhat close to a 45 entry) so I lost sight of the airport – I asked the Examiner to point it out – which he did (CRM right). The first landing was to be a Short Field landing. I came in steep and made a left side slip to lose some altitude. This worked well, but considering the wind was light but 90 degrees across the runway from the right I should of made the slip to the right. We touched down just about within the 100’ spec (he said use the start of the tarmac as he aiming point – which is actually somewhat ambiguous as to the required touch down point from which the 100’ should be measured). However, having neglected the crosswind, we landed somewhat hard was a side force to the left – rather a big no-no for a commercial checkride. I was admonished on the taxi back to runway about crosswind correction. However, obviously not enough as you will see on the next landing. Before that however, the examiner asked for a short field take-off. The field elevation is 140’, he set the altimeter to 100’ and told me the obstacle was 100’ tall so he wanted to see Vx held until we were passed 200’ indicated. The take-off went well, I held in position right at the start of the runway, full power with the breaks held, release, rotate at 50 KIAS, hold 65 KIAS to 200’, then pitch for 90 KIAS, gear up and flaps up slowly after 75 KIAS. This time around he asked me to repeat the short field landing because the last one was poor. Everything went well and at about 20’ above touch down he said “go around”. The go around was pretty good, everything came up at the right time in the right sequence. With the go around we were pretty close to the Warrior, so we extended upwind to get some space. This next landing was again to be a short field landing, but then he pulled the power abeam the numbers to make it an emergency landing. He didn’t specify any particular touch down point so I didn’t volunteer one (so just a plain vanilla emergency landing – not a precision 180 power-off landing). I managed to say the right words about quickly checking the obvious (carb heat and mixture) but as we were next to an airport we would just land. On base I mentioned about securing the aircraft (fuel off, doors open etc.). I also mentioned that I’d turn early into the field as I had a long runway and it fine to use all of it to land. Again I used a left slip to get down – forgot about the cross wind in all the excitement and landed with some side force to the left. The Examiner didn’t say much but wasn’t happy – he told me later he was strongly considering failing me at this point – not sure why he didn’t. Last we did a normal take-off and headed back to Mather (which is very close by), we stayed under the clouds at about 1,200’ and made a left base entry for 22L. At this point the Examiner asked for a no-flap landing with extra added crosswind correction. This actually went OK. But it was really hard in the flare with the nose way up in the air (because of no flaps) and the right wing down. I couldn’t see any of the runway to keep the nose straight. Right at the last moment I felt that sudden sink that tells you that you are about one foot above the ground instead of 1 inch and you are about to hit hard. I gave the engine a burst of power which just about softened the landing to acceptable – with no side force – which frankly was luck because I couldn’t see the runway to keep the plane lined up with it.
And that was it. 22L is over 11,000’ long and all the taxi ways except the last one are currently closed so its a very long drive back to parking. Other than further advice to practice crosswind landings especially with a wind from the right and the paperwork was filled out. My shiny plastic Private Pilots License was taken away and replaced with a temporary paper Commercial Pilots License. I’m just glad its over.
By the time I got a briefing and got out of the FBO (and called my CFI to give Her the good news) the sky was pretty much overcast. So I asked for a Tower IFR clearance to VFR on top and promised I’d cancel when I got there. A nice climb up through about 1,500’ of cloud got me into the sunshine. I cancelled, climbed to 6,500’ and headed for home. Even though the METAR for RHV had promised FEW at 4,500’ the Bay Area looked socked in, so I dropped down near Livermore to about 3,000’, the visibility was really bad . Some more IFR, in this case I Follow Roads, I found 680 and tracked it over the Sunol Grade and down through Fremont until I had RHV in sight. A nice non-eventful landing and for the second year in a row I complete my years flying in the USA with a successful checkride. Next week I’m off to Ireland to spend Christmas with my family. Back in the New Year I’ll start to work on that CFI for next year’s Christmas checkride.
When I saw the press release from Scaled Composites inviting the public to the first private manned space launch I just knew I had to be there. The FAQ on their web page said private planes wouldn’t be allowed to land, but the Mojave Airport web page said aircraft with prior permission could in fact land. I called them up two weeks ahead of time and got permission to arrive on Sunday afternoon, it was painless. I had PPR (Prior Permission Required) number 12. In the event I think about 50 PPR numbers were issued.
My own plane was in the shop for her annual inspection and between one thing and another couldn’t be finished in time for the trip. This was a great excuse to get checked out on the brand new 2003 Skylane (N119AZ) for rent at Tradewinds. After more than 150hrs flying Skylanes, the checkout went smoothly. It mainly focused on the fantastic avionics package in the plane, Auto-Pilot, IFR GPS, Multifunction Display and great Radios. The leather seats and new plane smell were a bonus. On the other hand, the Lycoming fuel injected engine is a pain in the butt. 5 less horsepower than my Continental and a finicky to start. The short 3-bladed prop had pretty crappy climb performance compared to my 1980 Skylane with its big noisy 2-bladed prop. Cruise performance was about the same, but the new plane burned about 2 gallons more per hour. They call this progress ?
A friend from work and fellow pilot/space nut came with me. We filed IFR and took off right on-time at 3pm on Sunday. The flight down was beautiful, I had my whole flight plan programmed into the GPS and from 1000′ I flew using the Auto-Pilot. What a difference! how can I live without these things. The plane basically flew herself all the way until the descent into Mojave. This has made me really hungry to get a new avionics package into my own plane – right now my Auto-Pilot is broken and my 1980 vintage radio’s are on their last legs. The wind was 270 at 30 knots, which is about standard for a Mojave afternoon. The landing was pretty good on runway 26 right on-time at 5pm. The tower had me follow a truck to a parking spot right in front of the terminal building. There was nobody around to sign in with so we didn’t have any special ID to show we had a plane on the ramp. I was worried that maybe security wouldn’t let us get back to the plane the following day, but in the event this was no issue.
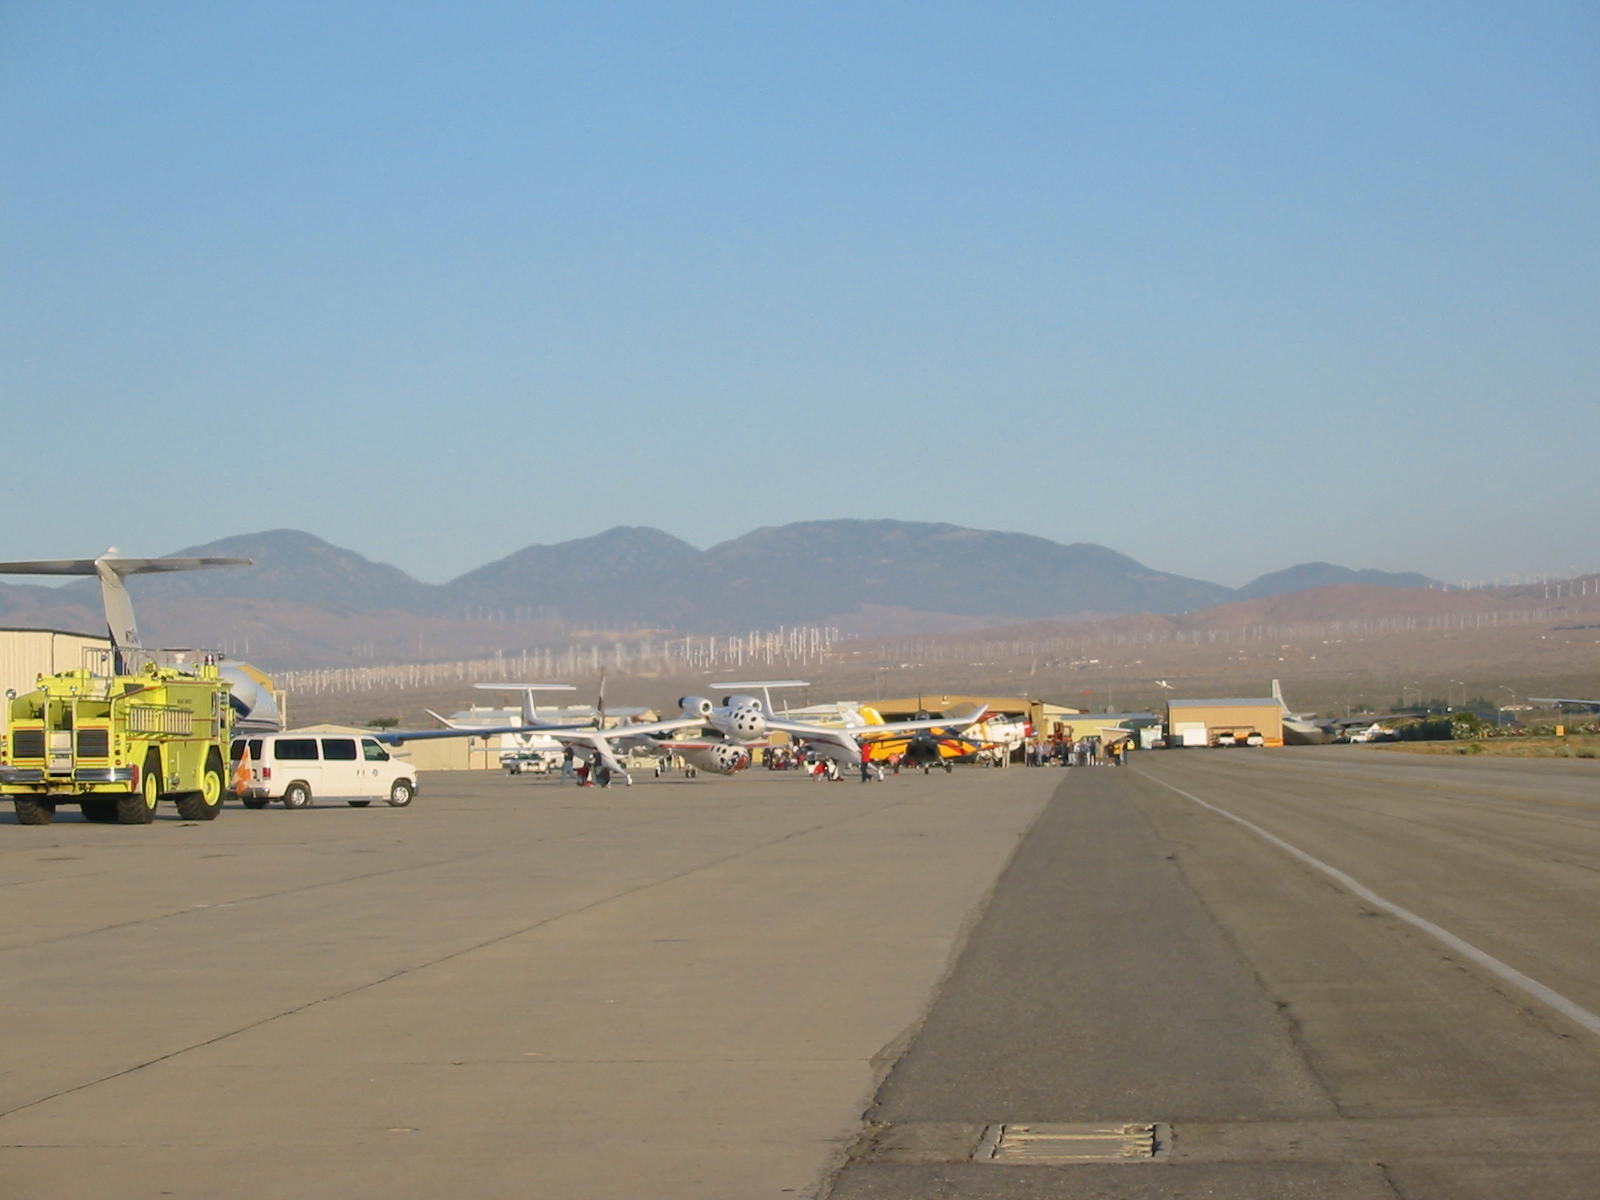
Thanks to the foresight of my friend’s son, we had a hotel room booked for the night. We had dinner at Jerry’s which we were informed was the best (only?) restaurant in town. Food was good, service was friendly and they were all a bit bemused by the whole space launch thing. There wasn’t many people around, we got the impression that the town had been expecting a busy weekend, but in the event only the hotels saw much extra business – we were told they were booked solid. After dinner we headed back to the airport to wander around. There are plenty of cool planes to see at Mojave. My friend’s son had arrived from San Diego earlier in the day and actually called into the Scaled Composits building. They showed him White Knight but he couldn’t see SpaceShipOne because she was fueled up and stored separately for safety. He also got an invitation to the after-launch party – this turned out to be very cool indeed.
We got up at 2:30am and were out of the hotel and across the road in the 24Hr gas station buying coffee by 3am. There was already a huge back-up of cars to get into the airport. It took us 30 minutes to drive the couple of miles to the airport, pay our $10 entrance fee and get parked. We setup in the public viewing area and watched some planes come in just before the Temporary Flight Restriction took effect at 6am. I had my handheld aviation radio and we listed to the tower traffic. Later on the radio turned out to be a great idea because we were able to listen to the ground control / SpaceShipOne communications real time (on 123.375Mhz).
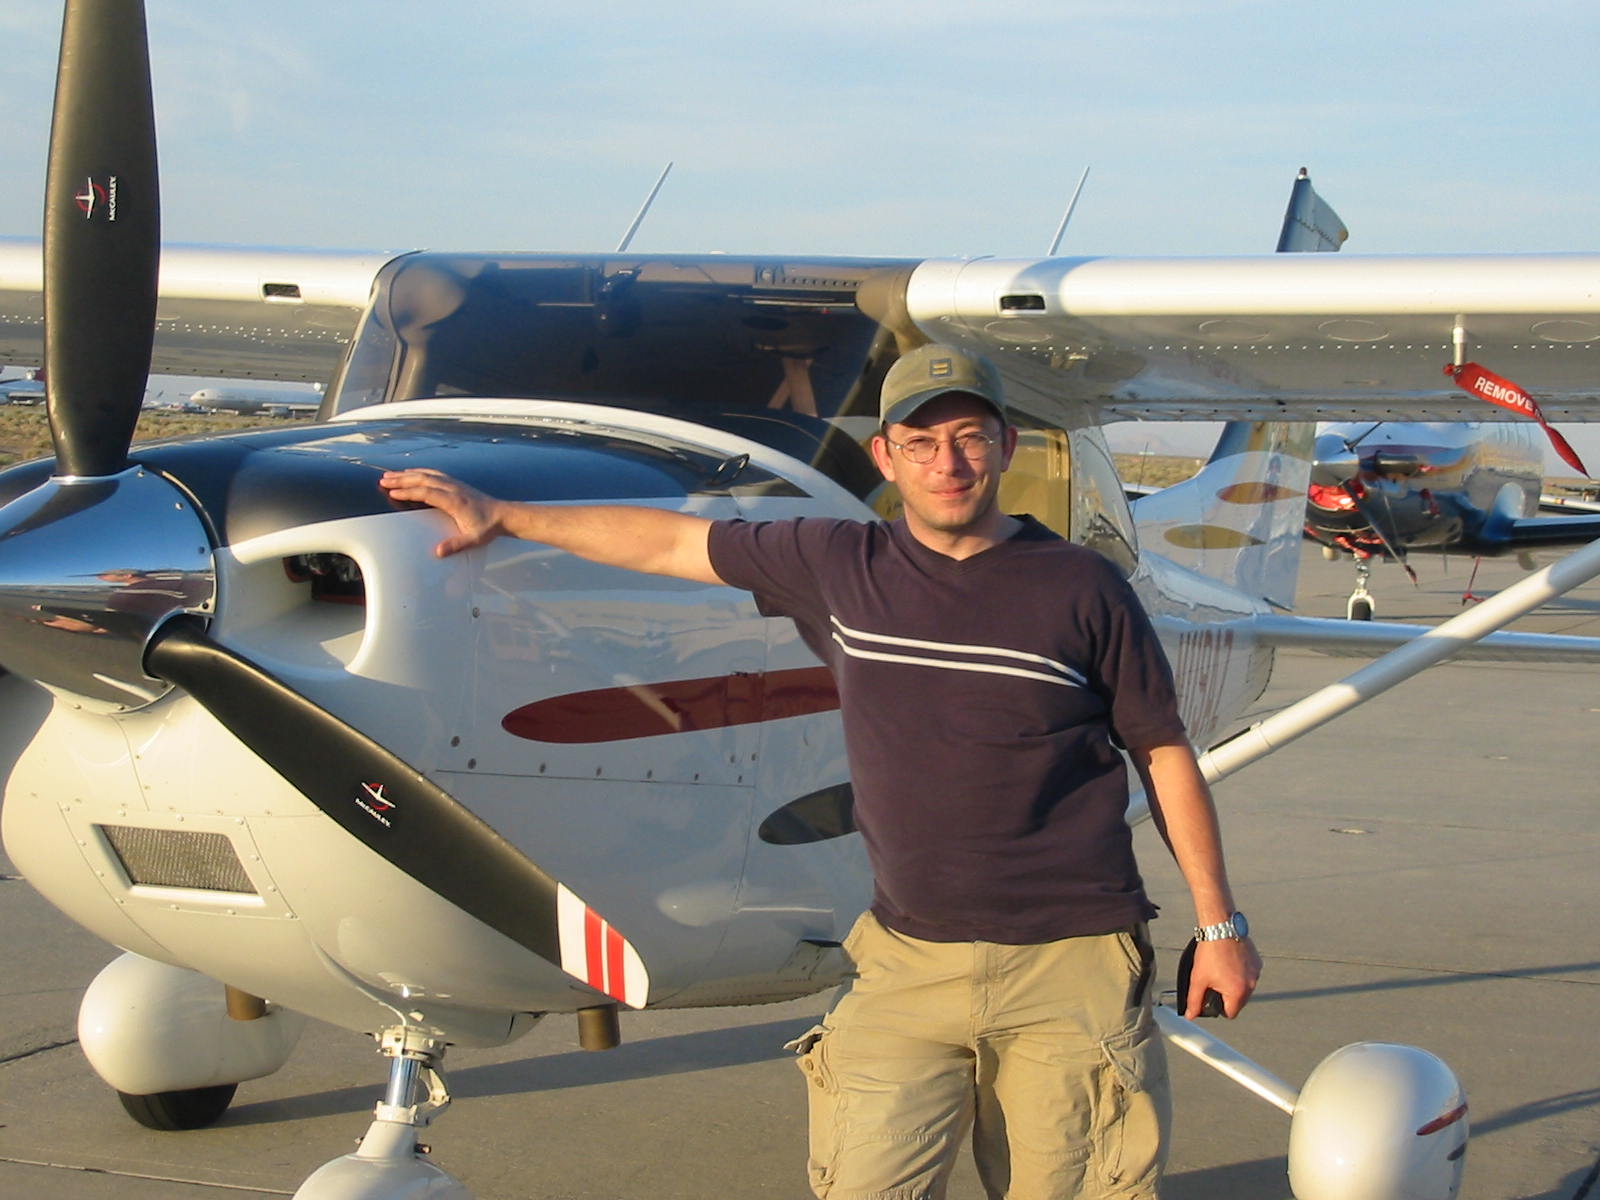
A tired Skylane gets a pat on the nose and a sugar lump after the flight down from San Jose.
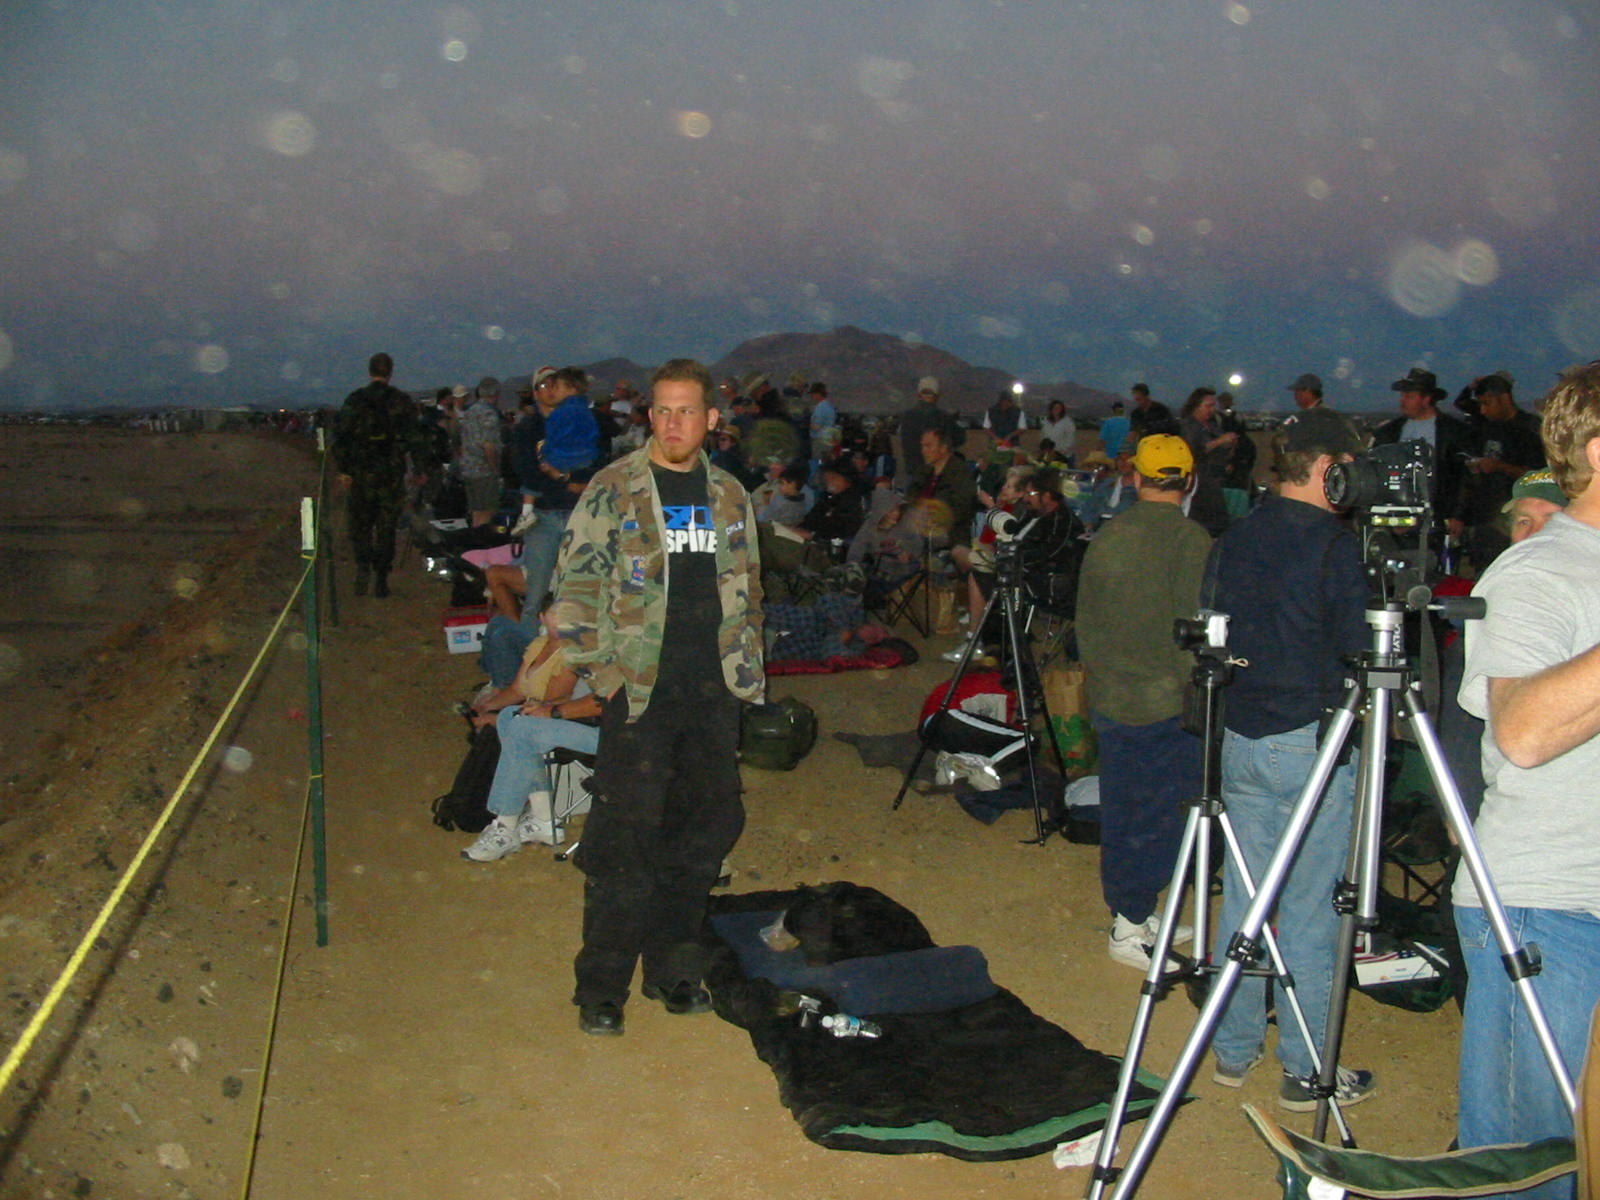
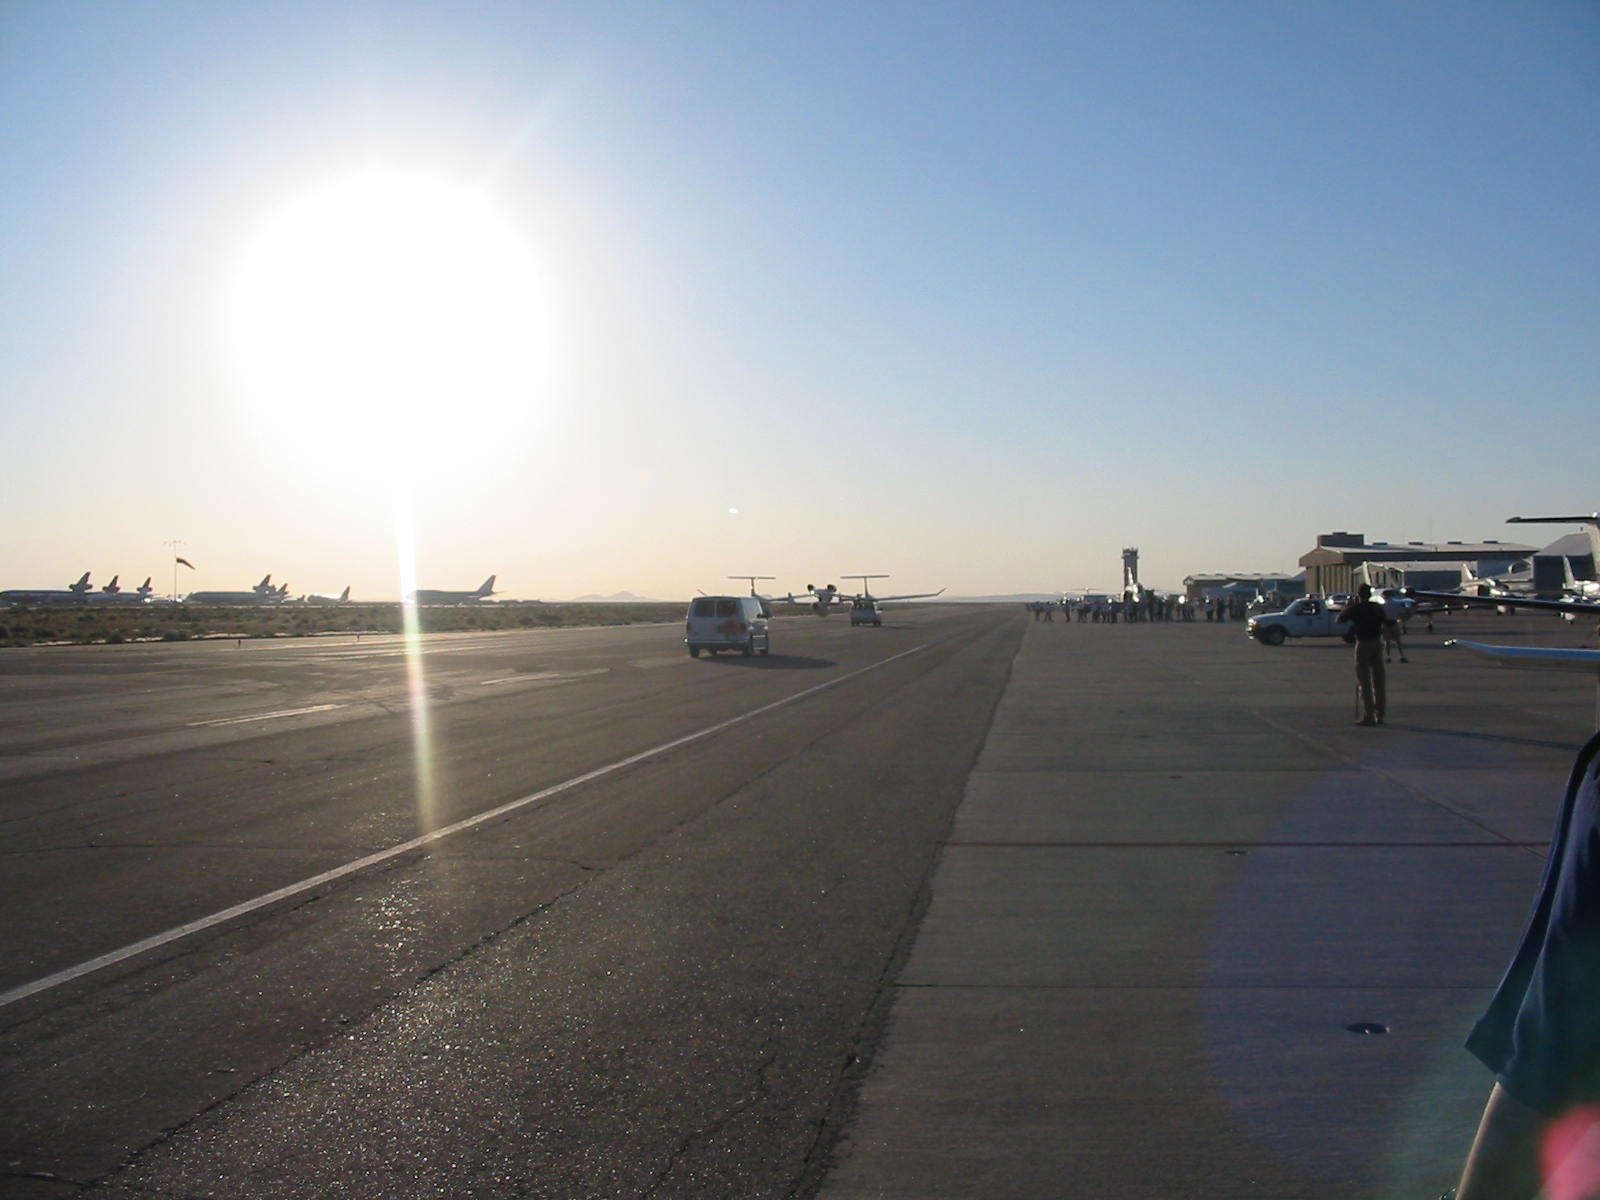
Crowds start to gather before dawn.
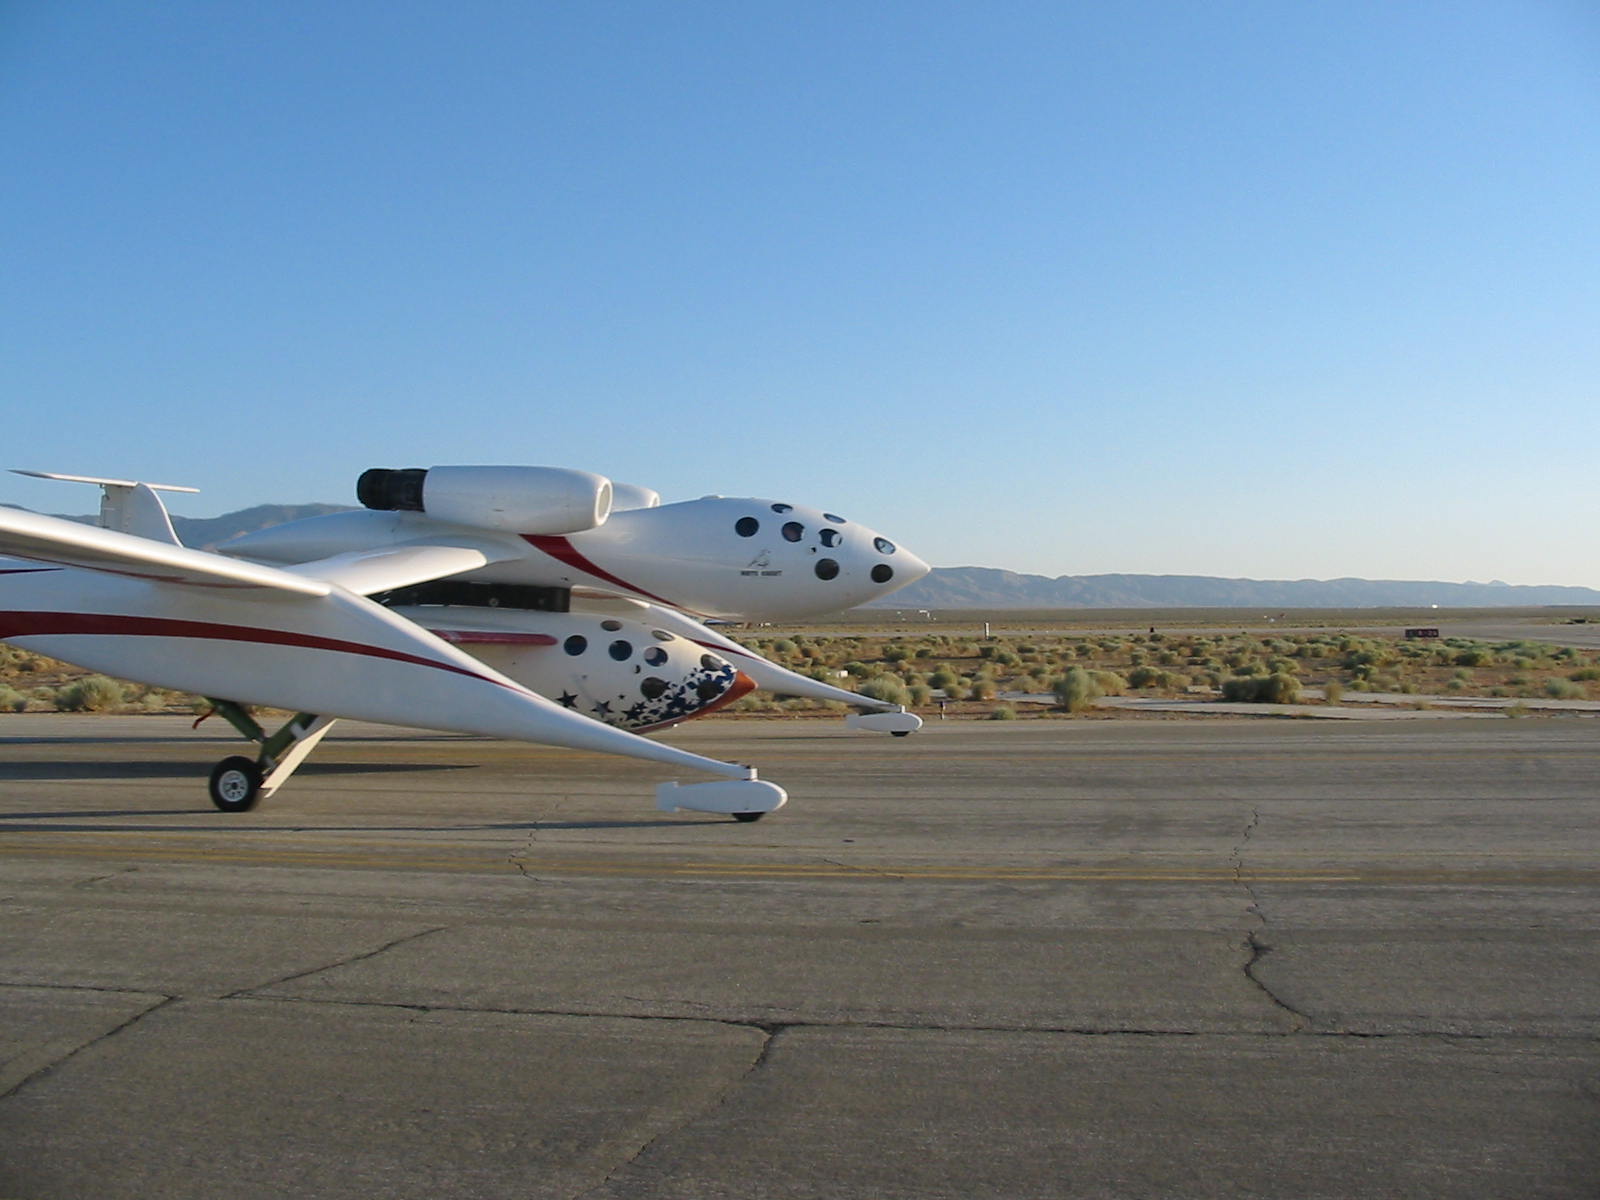
White Knight with SpaceShipOne slung underneath starts her taxi from outside the Scaled Hanger.
After taking one picture I realized that my camera batteries were flat and my spare batteries were back in my flight bag in the plane. So I decided to walk back and get them. This turned out to be a great idea. Only one Cop stopped me on my walk back. I whisked out my Pilots License and told him I was going to my plane. He took a quick look at the license and then asked me in a stern voice “You’re not planning to take off, are you ?”, I assured him I wasn’t and he let me pass. Life and liberty protected once again by our boys in blue. Once I got to the ramp, I could see White Knight just down the ramp outside the Scaled hanger so I decided to hang around as this seemed to be where all the action was and nobody seemed to care I had just walked in from the outside. I watched the Extra300 chase plane taxi past me and followed a little later by White Knight and then the Starship chase plane. Funny a Starship chasing a mere Spaceship.
White Knight & SpaceShipOne taxi past.
And off into History
Followed by a Starship.
I headed up towards the control tower and the VIP viewing area. The Extra300 and Starship both took off as I walked. I was waiting for someone to say – “Hey you, where is your ID badge ? What are you doing here ?”. But they never did. Some people were wearing badges of one type or another, but nobody seemed to be checking them. I had just reached the VIP area when White Knight took off. A beautiful sight. She made a climbing right turn and started the long assent to 50,000′. After a little while the Starship joined her and they spiraled up together. It got pretty hard to see them after a while. I decided to head back to my friends in the public viewing area to watch the landing.
I arrived back about 10 minutes before they launched SpaceShipOne. My friend had found out the radio frequency the control center was using to communicate with SpaceShipOne. They were just running through the final checklists. Boy the excitement started to build. Nobody knew exactly where in the sky they were located. We heard 3 minutes to launch – I shouted it out the the people around us who couldn’t hear the radio. We heard them order the ship to drop. Then it 10 seconds to launch, as if on queue we all spotted a set of three contrails in the east, right next to a blinding bright sun. One the radio, “Three Two One Fire!” I shouted it out as I heard it. Then another contrail appeared – the rocket was there – everybody cheered and it shot upwards. It seemed to twist a bit to the right and then straighten out. For about a minute it climbed and climbed to almost directly overhead and then disappeared. SpaceShipOne was on its way to space.
We listened to the radio. I missed whatever was said during the rocket launch, everyone was shouting and cheering. Then a heart stopping moment. We heard:
“Ground to SpaceShipOne”, silence in return.
“Ground to SpaceShipOne”, still silence.
“Ground to White Knight, contact SpaceShipOne”.
“White Knight to SpaceShipOne”, silence, then “SpaceShipOne to Ground” – he was OK, but I aged a few years!
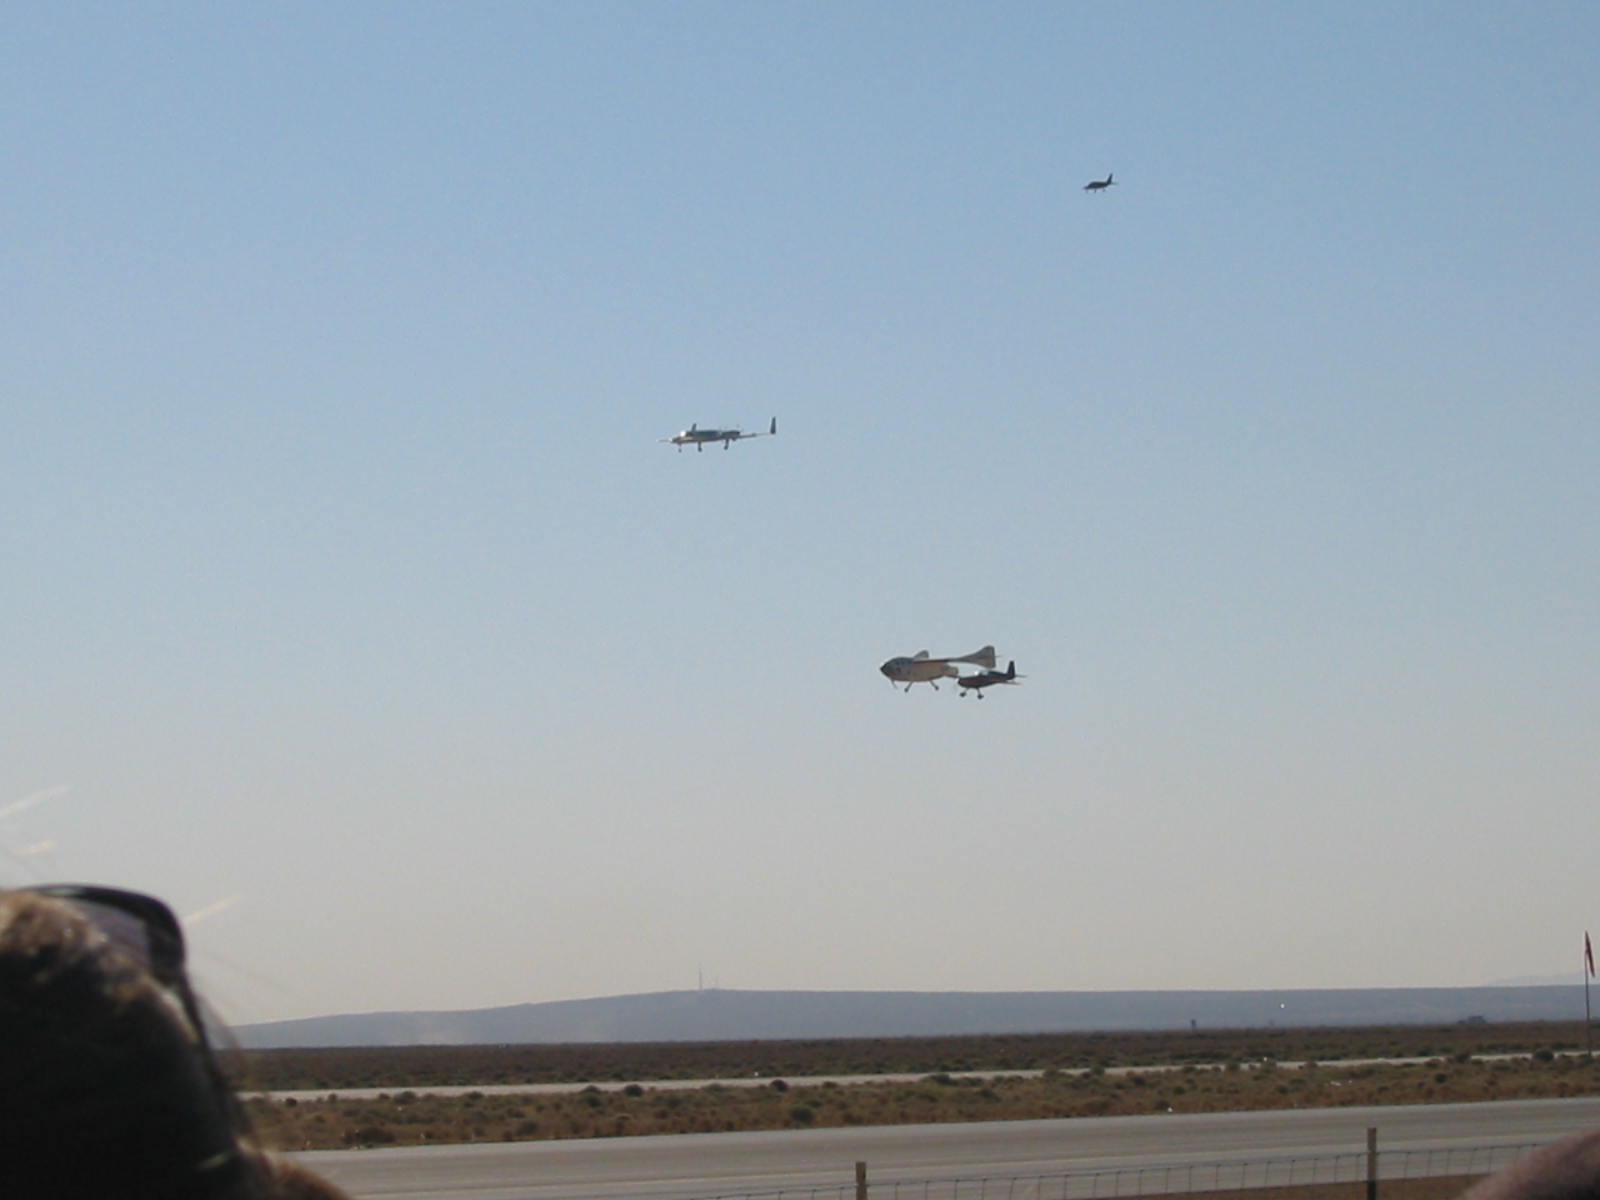
We listened in as he started to descend. It was hard to work out exactly where he was from the radio. But I heard “Passing through 200” and then later “45”. I think we caught sight of him around about 15,000 feet. We could hear on the radio that one or more of the chase planes had him in sight, but they were using the pilots names instead of the plane names so I couldn’t tell which planes had him in sight. The SpaceShipOne pilot was complaining about some pitching and lateral movements and the ground controllers where helping him fix the problem. There were also talking about a trim problem, which we later found out had caused a big problem when the rocket first fired and was the reason the it seemed to twist to the right at the start of its flight. I heard them talking about some loud bangs the pilot had heard. They were worried about damage to the landing gear. The Extra300 chase plane was told to move in close and inspect the gear and try and determine if anything else was wrong. We heard him report that the cowling under the rocket exhaust was buckled, but everything else looked good. We watched SpaceShipOne spiral down over the airport, then make a right turn for a right downwind entry for runway 30. All three chase planes were around him. He seemed to be last in line to land, but at the last second he dropped down and made a lovely landing. The chase planes flew overhead. Everyone was cheering and clapping – what a moment!
Take-Off!
A long Climb to 50,000′
Landing! And a unique image of all modes of airplane propulsion. Piston-Prop, Turbo-Prop, Jet and Rocket.
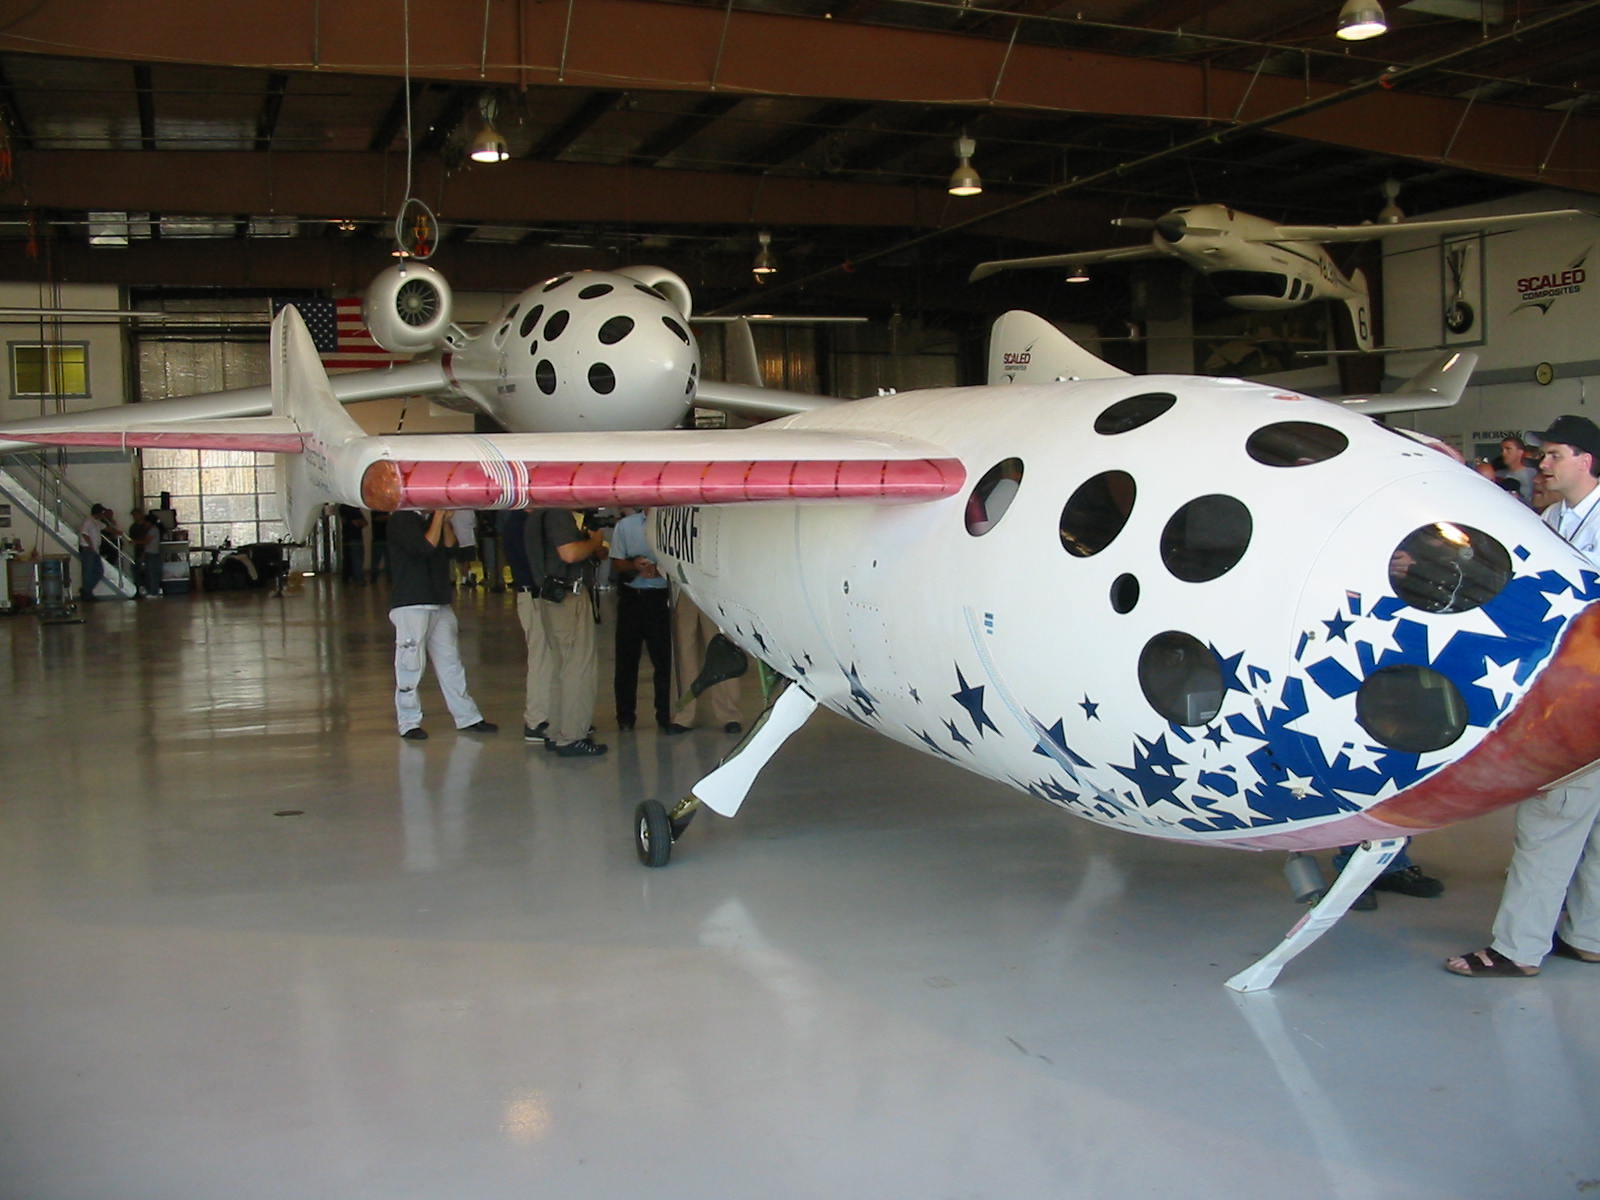
The three chase planes made a beautiful formation flight down the runway and then broke left to come in and land on runway 26. Then White Knight did the same making a really steep almost 90 degree bank as she turned. We started back towards the ramp to go to the Scaled Hanger. Nobody bothered us on the way until just before we got to the hanger when we were asked for our invitation. It was great, White Knight was already back and parked inside. Burt Rutan was running about. I’m sure there was a bunch of famous people there that I didn’t recognize. There was also cold soft drinks and food which was really welcome. We watched as they towed SpaceShipOne back inside and Mike Melville the pilot arrived. I was standing next to him as he hugged one of the guys in a yellow Scaled shirt. I heard him say “I though I wasn’t going to make it when I heard those bangs”. He looked relieved and happy – who could blame him. I saw then bring up an old gentleman wearing a NASA baseball cap and introduce him. I bet it was one of the original astronauts, but I didn’t know who he was. I saw Burt walk over to SpaceShipOne and stick his head inside the rocket exhaust for a look – I wish I had caught than one on camera. Pretty soon all the main players headed into a conference room for a debrief and I guess to give the press conference. It was kind of annoying, we were right there but we still didn’t know if they had made the 100km altitude an actually got into space. One guy said he heard 330,000′, later another guy said 328,500 which turned out to be right.
Back home again after a long and momentous journey.
A record of White Knight’s test flights.
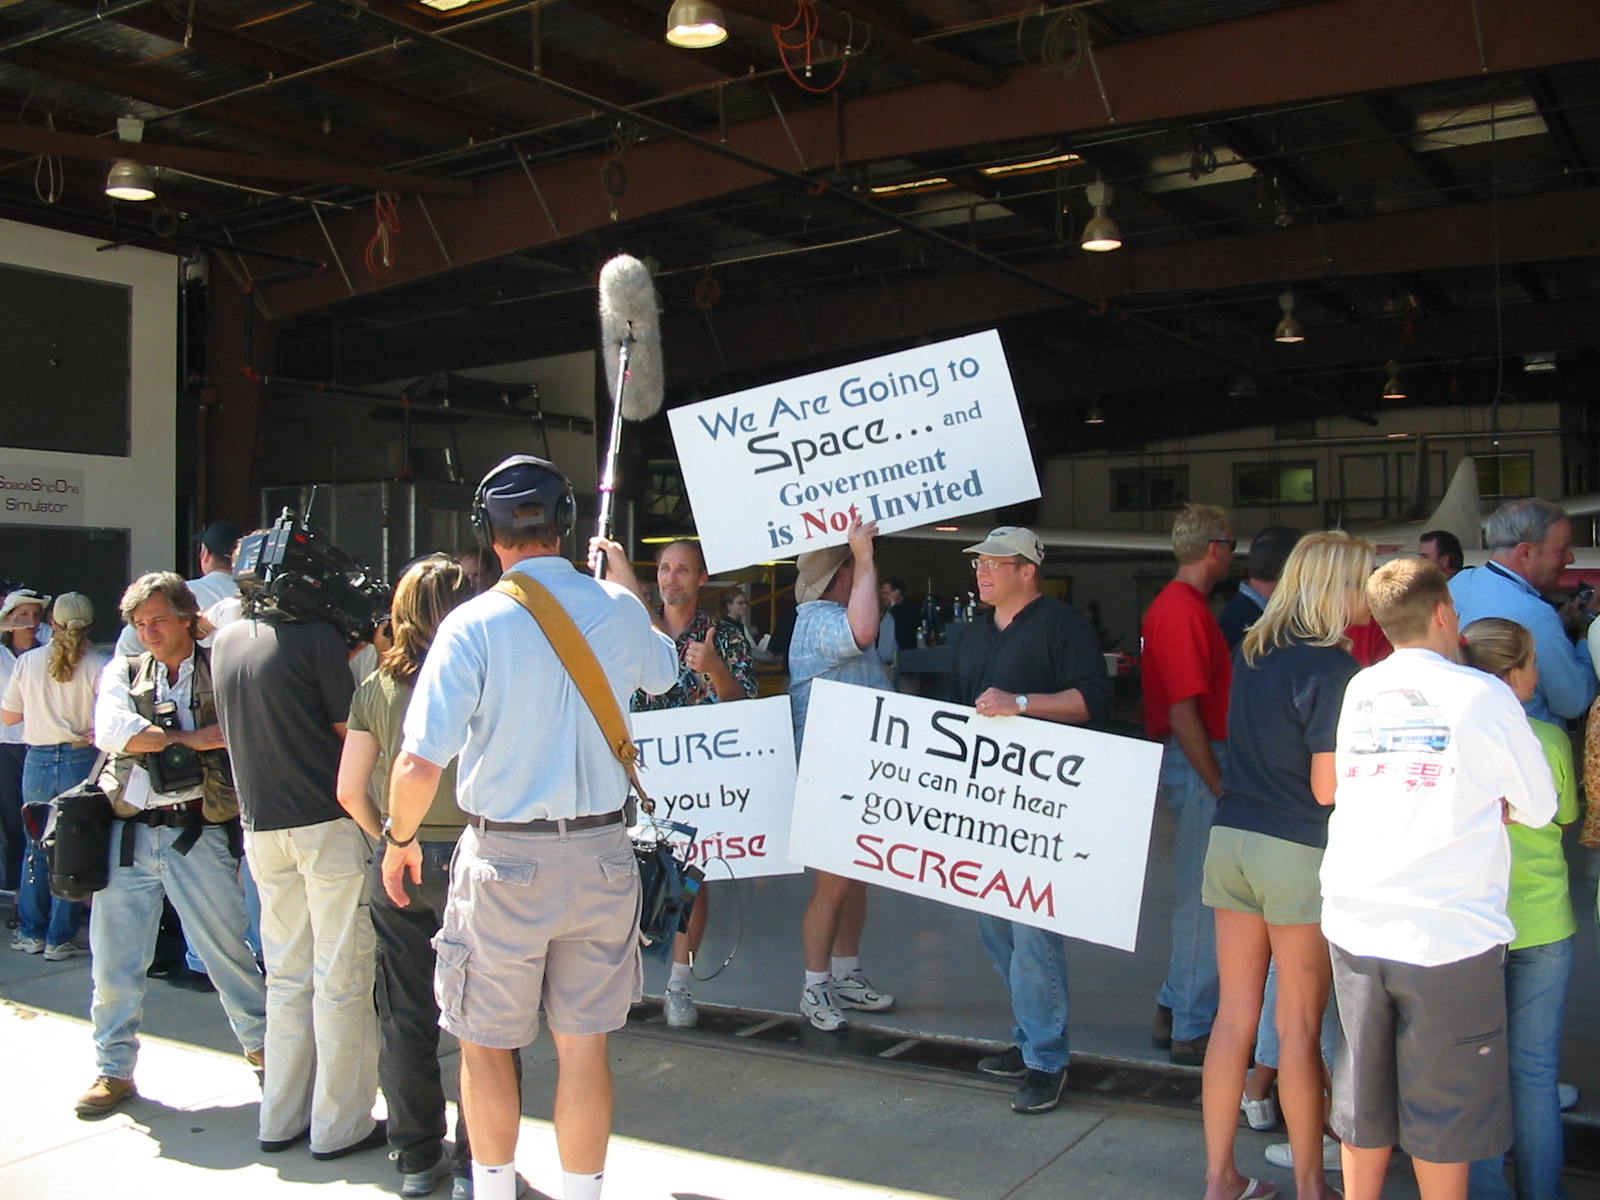
Some guys with signs who got a little tiresome after a while. We get the message!
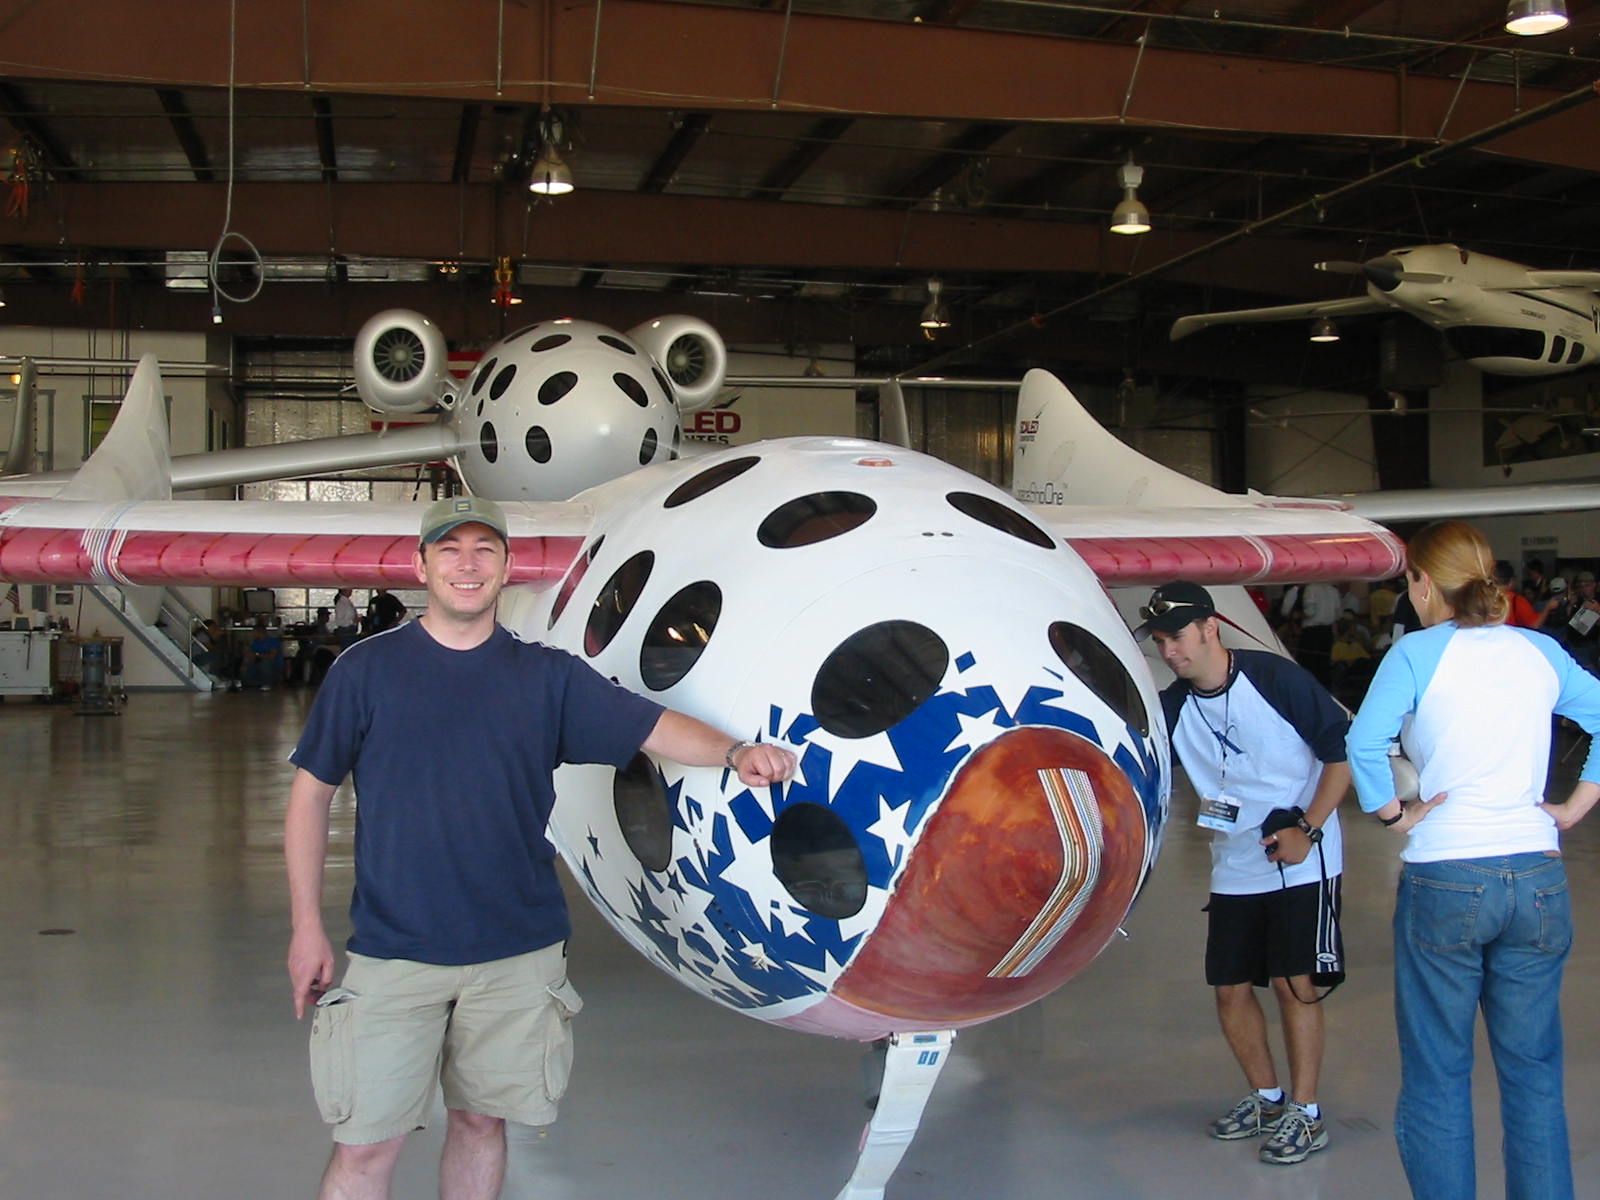
We talked to a bunch of people, one turned out to be a State Senator, nice guy, but he sounded like a Republican. But he was also a Pilot so he couldn’t be all bad. We hung out until about 10:30am on the rumor that they would tells us some details about how the flight had gone. Finally it appeared that that wasn’t going to happen so we decided to call it a day. Before we left, I took the opportunity to get my picture taken beside SpaceShipOne. It was roped off, and a guy came over and gave out to me afterwards, but I still had my picture.
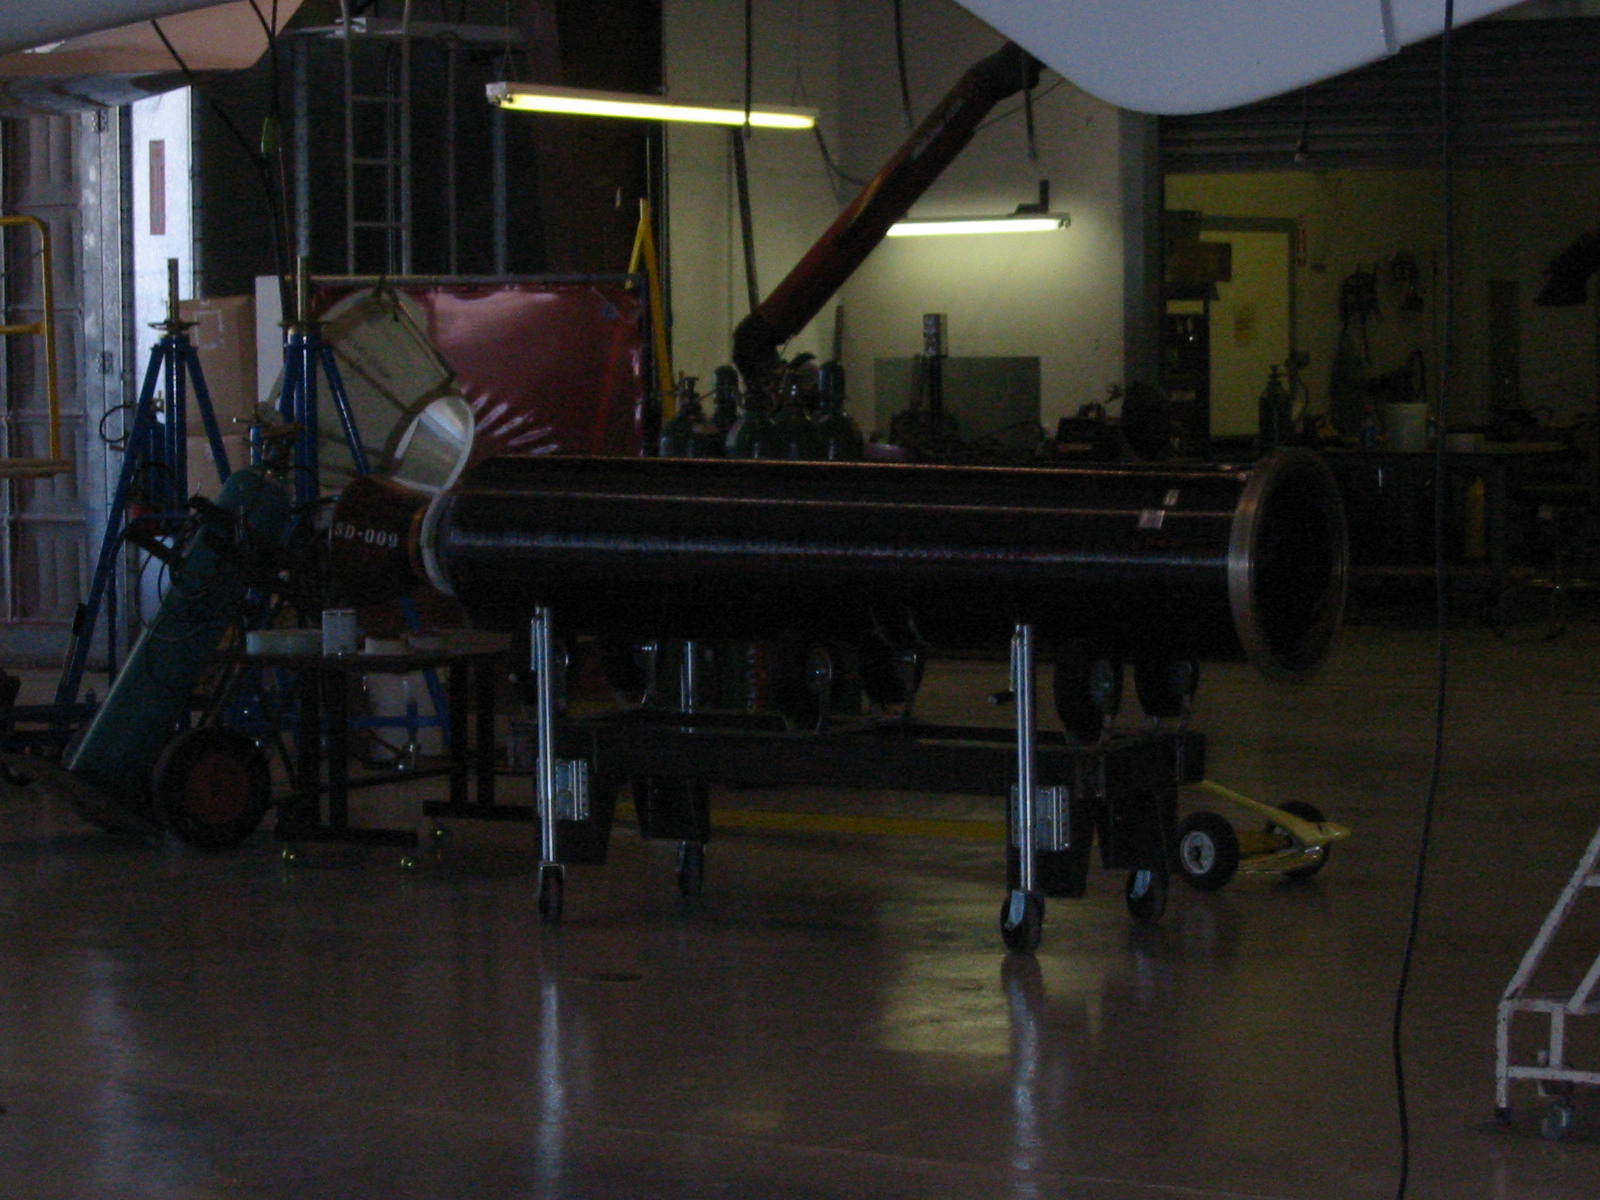
A Spare Rocket
Mixing it up with the very rich and famous.
I started patting one plane on the nose and ended patting another. Cool!
I was pretty tired and hungry so we had lunch at the Voyager Restaurant in the Airport Terminal. It was busy, but not too bad all things considered. The food was good. The flight back was pretty easy. The wind had died away to nothing so we took off from runway 8 and made a downwind departure. This gave me some extra time to climb to altitude before crossing the mountains West of the airport. I got in touch with Joshua Approach on the climb-out over the airport. Mojave is located in a Military Operations Area which can be active on weekdays so I wanted to be sure I had flight following. I didn’t bother with IFR, I was tired and the extra effort wasn’t worth it. I hand flew the plane over the mountains, then pretty much put a direct-to RHV flight plan into the GPS and then let the auto-pilot take us home. Have I mentioned I love these things. Two hours later we were back San Jose – a hell of a lot better than driving!
So, what a day it was. There was a real sense of history being made. Even if the world doesn’t realize it yet, I believe in the years to come this day will be looked upon like Lindbergh’s trans Atlantic flight or Beriot’s cross channel flight. What the 125 folks at Scaled have done is exceptional. They embody the very best of what America is all about. After the pretty crappy last few years since 2001 – and especially the last few months with the problems in Iraq, this event shows what makes America a great place to live and what is special about the people here.
My second tail dragger lesson started with a quick pre-brief with Bob on the maneuvers we were going to practice. Basically more coordination practice and stalls. This time I got to do the pre-flight on my own no issues found. Bob arrived, asked me about oil and fuel and then we went through the “brakes, throttle, contact” routine as he hand prop’d the plane. Unlike last time, I got to try and make the right turn out of the tie down spot – no luck, even with full right rudder she wouldn’t turn and we were headed for the fuel truck when Bob took over and made the turn – it is a difficult dance between holding full rudder, tapping the right brake and applying power to get around the corner. Once around however, I took care of the taxi all the way to the run-up area. One of the mags was a little rough on run-up but high power for about 20 seconds cleared it (there is no mixture control to lean the engine to help clear the plugs). We were cleared for take-off on 31L and this time I got to work all the controls. Stick about 2/3 forward, full power, keep her straight, 40 MPH, stick a little forward to bring up the tail – now really keep her straight, then we’re up. It was not pretty, I think I know what I’m doing wrong. When I make a correction, I hold that correction to bring the plane back to the center line (which is what I try to do in my Skylane). However, this is the wrong thing to do. Instead the aim is to just keep the tail behind the nose because once it starts to swing around it takes increasing force to correct. So being a bit off center line is fine, don’t worry about it (I’m sure that as I improve, I won’t get off center line in the first place) – just stop the sideways movement.
Anyway, we depart downwind towards IBM at 2500”, there is a broken ceiling today a little above 3000” so we’ll be staying low. The climb up is fairly smooth – I getting the hang of using a gentle touch with this plane. I practice some Dutch rolls on the way – not too bad, but I get out of sync quicker than I would like. We do some rudder turns as well. These are just using the rudder to dip the wings, I’m not quite sure what they teach you other than rudder on its own is a piss-poor way to turn an airplane. Once we get over the open country-side south of San Jose we start the airwork with a couple of clearing turns, there is not much traffic today because of the low ceiling. First off its a couple of steep turns just to get back into the feel of the plane. Then straight into stalls with power on and off. I make a reasonable job of these, still little too aggressive on dropping the nose for recovery. Then Bob takes control to show me what he calls “rudder stalls”, he warns me that these can get a little violent (that is an ominous term when applied to a plane). So, first he does a power off stall, on the stall break instead of recovering he holds the plane in the stall and then tries to keep the wings level using just the rudder. Now I have done this exact same maneuver in a Skyhawk during my Private Pilot training. I remember at the time telling my CFI that I was a bit scared when I stalled the plane that one wing would drop and I’d start to spin (this happened the very first time I tried a power-on stall and it scared the hell out me, I only had 5.8Hrs at the time). So the CFI says, “Don’t worry if that happens just use the rudder to level the wings, its easy”. He then proceeds to show me by stalling the plane and getting me to hold the wings level with a fixed heading using just the rudder while he held the plane in the stall. It was easy and we held the plane like that for maybe a minute or so. It was a great demo and it did a lot to reduce my fear of power-on stalls. So now I’m wondering why Bob is telling me “it could get a bit violent” doing the same thing in a Champ. It didn’t take long to find out. It was a bit like balancing on the edge of a blade. One wing would start to drop, quick rudder correction, the other wing would start down a little faster, after 3 or 4 oscillations, bam! time to recover! which was pretty easy, just let the nose drop out of the stall. Then it was my turn, I think the most I managed was 2 oscillations before I lost it and automatic (that is mild panic) recovery kicks in. I don’t like flying planes when they are nasty and unstable like this, but it doesn’t scare me nearly as much anymore.
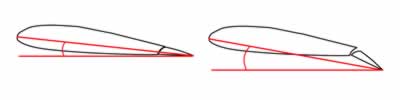
Next up Bob completely screws me up by covering the slip indicator (the ball). Now there is not many instruments in this plane, but I like this one the most and I glance at it a lot. But like all flight training, your favorite instrument is always the one the CFI takes away first! Now its back to steep turns, and I do a fairly poor job of staying coordinated. Basically, I always relied on the ball to tell me which rudder peddle to press. Now, I’m getting pushed out the side of the plane because of a slip or is it a skid? I’m not sure, so which peddle do I press ? Truth be told I’m still not that sure – I need to get this straight in my head the next time out. After a few turns I’m doing a little better, but its more by random experimentation with the peddles rather than an intellectual understanding of what I should be doing. Then its back to more stalls (with no ball!). This time I just try to keep the plane’s nose straight as I get into the stall and hope this keeps me coordinated enough that I don’t drop a wing too much on the break. Nothing too dramatic happens so it must have worked. Then Bob tells me to take my feet off the peddles, stall the plane and when a wing drops try and level it with the ailerons. In other words do everything wrong that you can when you stall a plane. So, feet off the rudder and pitch up. The plane starts yawing & turning to the right, then the stall break and the right wing drops. Quick left aileron to try to level the dropping wing. The result, the bottom drops out from under the right wing and we fall to the right in maybe an 80 degree wing down attitude. Whoa! I’m so surprised Bob has to remind me, “recover with rudder“. Quick left rudder, levels the wings, stick forward and recover from the stall, no problems, much excitement. Thankfully, Bob tells me that that is the most excitement we will have today. The moral of this story is don’t ever ever try to recover wings level in a stall using the aileron – it will just make an already bad day a whole lot worse. For those of you wondering why, what happens is this. When you stall while the airplane is uncoordinated one wing will stall before the other (it drops because it loses lift before the other wing – so the plane is unbalanced around its longitudinal axis ). Now, when you try and correct with aileron, you actually lower the aileron on the dropped wing (aileron down on a wing usually has the effect of increasing the wings lift and causing it to rise). However, the wing is stalled, so when the aileron lowers it changes the cord of the wing which increases the angle of attack (which is the angle between the wing cord and the relative wind).
Angle of Attack increases when the aileron drops
Now in a well behaved wing, the stall starts at the root first, the wing tips may not be stalled and are providing a little lift. Until you drop the aileron (which is out on near the wing tip) and increase the angle of attack in the last bit of wing that was working. The wing now totally stalls, stops being a wing and becomes dead weight heading towards the earth.
The last set of maneuvers was slips. First forward slips which are easy. Until you try to get smart and smoothly try to transition from left wing down to right wing down. Left to right, right to left, back and forth. This takes some fancy footwork and I confess I just couldn’t get it to work right. This I need to practice. Then we tried side slips, but not your simple drop a wing and keep the nose straight. Bob had me enter a slip and then vary the bank angle more and less while keeping the nose absolutely fixed straight ahead. First banked right then left and back again. Boy this was hard, I had the nose wandering all over the shop, but I can see how fine control of this skill will make cross-wind landing much easier.
At last it was time to head back to RHV. As I attempted to fly straight and level, Bob asked me why we were flying in a slip with the right wing down, dammit the ball is still covered and I can’t feel he slip in the seat of my pants. I try to get the wings as level as I can and the nose pointing in the same direction we are flying. This should be easy but it isn’t. About 3 miles out I’m back in a slip again, simply by virtue of getting the plane lined up with 31L and the nose pointing down the runway (rather than having a crab angle into the wind as one normally would with a slight crosswind). Bob decides I’m practicing my side slips from a long way out and I don’t tell him any different. We have a plane behind us so we keep the power up as we glide down. I hit 60 MPH over the numbers and then flare a little high again. I hold the flare, then as we sink bring the stick all the way back and bam, we set down all three wheels on the center line. I’m on the rudder peddles and we don’t swerve too much. I think Bob might have helped with the braking a little as we rollout. I think we got of at taxiway D which is a pretty long landing. We had asked for the option, so we taxi back to the hold short line and Bob asks the tower for a high speed taxi. This is basically to practice the takeoff roll. It doesn’t go well, we swerve all over the shop – I made the same mistakes I made on the takeoff. At the time I wasn’t sure what I was doing wrong, its only later after some thought that I think I know the mistake I’m making. We were going to practice a few more high speed taxi’s, but there are four planes down in the run-up area and things are getting busy. So we terminate with the tower and I taxi back all the way to the fuel truck outside Amelia’s. Part of a tail-wheel checkout at Amelia’s is to learn how to refuel the plane from the truck. Not too hard, but a new skill. Bob did it the first time, this time I did it.
So my second lesson is over. Again, it was great and again I learned a bunch of stuff about basic flying that just wasn’t that real to me before. Sure, I knew about not using ailerons in a stall, but today I really learned why. Sure, I knew about slips, but I never really had any fine control over them. I still don’t, but I’ve got a feeling that after some more practice I will. And lastly, my first unassisted tail wheel landing. Not too bad and actually easier than the takeoff. I’m looking forward to some pattern work to hone this skill.
….Time Passing….More Time Passing….Boom…2 Years Later…..
Well I finally finished my tail wheel endorsement on 4/1/2006, almost two years since I first started it. I flew 4 more times with Bob in the Champ with the last two flights doing pattern work and practicing landings. I got almost 9 hrs in total.Then life intervened, I headed off on a business trip. I never got around to scheduling a next flight with Bob and he never called me back (big sin for a CFI that wants to keep their business going). Frankly, he didn’t really click with me and the training experience wasn’t great. Either way, work got busier and I even stopped working on my commercial rating. I finally got back into the training grove and did my commercial checkride in December of 2004. Then in September 2005 my Private Pilot CFI, Grainne Gilvarry started working as a CFI in Amelia Reid and I re-started the tail wheel endorsement with her in the Citabria. It still took forever, 10 flights & 11hrs spread over 8 months to finally get the endorsement finished. Basically, both our schedules and the weather conspired to make it difficult to schedule flights.
I will say I’m a much better pilot today compared to when I first started flying tail draggers two years ago. Mainly just due to experience with almost twice as many hours. Tail draggers are a lot of fun, they are not all that hard to fly (or land for that matter), you just need to give them your full attention. Flying them WILL absolutely make you a better stick and rudder pilot, you will without doubt fly that Skyhawk or Skylane better. Also after landing the Citabria in a 10-knot crosswind I’m a lot more confident about crosswind landings – a skill that almost cause me to fail my commercial checkride.