Planet Python
Last update: April 18, 2024 01:44 AM UTC
April 17, 2024
Cédric Krier has found that trytond accepts compressed content from unauthenticated requests which makes it vulnerable to zip bomb attacks.
Impact
CVSS v3.0 Base Score: 5.3
- Attack Vector: Network
- Attack Complexity: Low
- Privileges Required: None
- User Interaction: None
- Scope: Unchanged
- Confidentiality: None
- Integrity: None
- Availability: Low
Workaround
A proxy can be deployed in front of the trytond server to forbid this kind of request.
Resolution
All affected users should upgrade trytond to the latest version.
Affected versions per series:
trytond:
- 7.0: <= 7.0.9
- 6.8: <= 6.8.14
- 6.0: <= 6.0.44
Non affected versions per series:
trytond:
- 7.0: >= 7.0.10
- 6.8: >= 6.8.15
- 6.0: >= 6.0.45
Reference
Concerns?
Any security concerns should be reported on the bug-tracker at https://bugs.tryton.org/ with the confidential checkbox checked.
1 post - 1 participant
Read full topic
April 17, 2024 04:00 PM UTC
What does every new developer do when they are first learning to program? They print out strings to their terminal. It’s how we learn! But printing out to the terminal isn’t what you do with most professional applications.
Support on Kickstarter
In those cases, you log into files. Sometimes, you log into multiple locations at once. These logs may serve as an audit trail for compliance purposes or help the engineers debug what went wrong.

Python Logging teaches you how to log in the Python programming language. Python is one of the most popular programming languages in the world. Python comes with a logging module that makes logging easy.
What You’ll Learn
In this book, you will learn how about the following:
- Logger objects
- Log levels
- Log handlers
- Formatting your logs
- Log configuration
- Logging decorators
- Rotating logs
- Logging and concurrency
- and more!
Book formats
The finished book will be made available in the following formats:
- paperback (at the appropriate reward level)
- PDF
- epub
The paperback is a 6″ x 9″ book and is approximately 150 pages long.
You can support the book by clicking the button below:
Support on Kickstarter
The post Announcing The Python Logging Book & Course Kickstarter appeared first on Mouse Vs Python.
April 17, 2024 02:12 PM UTC
You’ll often need to format and round a Python float to display the results of your calculations neatly within strings. In earlier versions of Python, this was a messy thing to do because you needed to round your numbers first and then use either string concatenation or the old string formatting technique to do this for you.
Since Python 3.6, the literal string interpolation, more commonly known as a formatted string literal or f-string, allows you to customize the content of your strings in a more readable way.
An f-string is a literal string prefixed with a lowercase or uppercase letter f and contains zero or more replacement fields enclosed within a pair of curly braces {...}. Each field contains an expression that produces a value. You can calculate the field’s content, but you can also use function calls or even variables.
While most strings have a constant value, f-strings are evaluated at runtime. This makes it possible for you to pass different data into the replacement fields of the same f-string and produce different output. This extensibility of f-strings makes them a great way to embed dynamic content neatly inside strings. However, even though f-strings have largely replaced the earlier methods, they do have their short-comings.
For example, one of the most common attacks performed on a relational database is a SQL injection attack. Often, users provide parameters to SQL queries, and if the query is formed within an f-string, it may be possible to damage a database by passing in rogue commands. F-strings can also be used in a denial-of-service attack by attacking Python’s logging module code.
In older versions of Python, f-strings had a number of other limitations that were only fixed with Python version 3.12. This version is used throughout this tutorial.
Take a look at the example below. It shows you how to embed the result of a calculation within an f-string:
Without any explicit rounding, once an expression has produced its value it’ll be inserted into the string using a default number of decimal places. Here, the result is shown to sixteen decimal places, which, in most cases, is more precision than you’ll ever need. So you’ll likely want to round your final answer to a more practical number of digits.
In this tutorial, you’ll learn how to use a Python f-string to format floats to meet your requirements.
Take the Quiz: Test your knowledge with our interactive “Format Floats Within F-Strings” quiz. Upon completion you will receive a score so you can track your learning progress over time:
Interactive Quiz
Format Floats Within F-Strings
In this quiz, you'll test your understanding of how to format floats within f-strings in Python. This knowledge will let you control the precision and appearance of floating-point numbers when you incorporate them into formatted strings.
To format a float for neat display within a Python f-string, you can use a format specifier. In its most basic form, this allows you to define the precision, or number of decimal places, the float will be displayed with.
The code below displays the same calculation as before, only it’s displayed more neatly:
To use Python’s format specifiers in a replacement field, you separate them from the expression with a colon (:). As you can see, your float has been rounded to two decimal places. You achieved this by adding the format specifier .2f into the replacement field. The 2 is the precision, while the lowercase f is an example of a presentation type. You’ll see more of these later.
Note: When you use a format specifier, you don’t actually change the underlying number. You only improve its display.
Python’s f-strings also have their own mini-language that allows you to format your output in a variety of different ways. Although this tutorial will focus on rounding, this is certainly not the only thing you can use them for. As you’ll see later, their mini-language is also used in other string formatting techniques.
In addition to displaying the result of calculations, the precision part of a format specifier can also be applied directly to variables and the return values of function calls:
This time, you’ve used multiple replacement fields in the same string. The first one formats a literal number, the second formats the result of a calculation, while the third formats the return value from a function call. Also, by inserting a comma (,) before the decimal point (.) in the format specifier, you add a thousands separator to your final output.
In everyday use, you display numbers with a fixed amount of decimals, but when performing scientific or engineering calculations, you may prefer to format them using significant figures. Your results are then assumed to be accurate to the number of significant figures you display them with.
If you want to round numbers to significant figures, you use the lowercase letter g in the format specifier. You can also use an uppercase G, but this automatically switches the format to scientific notation for large numbers.
Suppose you have a circle with a radius of 10.203 meters. To work out the area, you could use this code:
[ Improve Your Python With 🐍 Python Tricks 💌 – Get a short & sweet Python Trick delivered to your inbox every couple of days. >> Click here to learn more and see examples ]
April 17, 2024 02:00 PM UTC
OpenStreetMaps (OSM) is known for being an open source project that allows people to browse the world map and to plan routes. However it is more than that. Among others it provides a read-only API that allows users to query for very diverse map data: Overpass API
Data structure of OSM
To understand the structure of the queries, we first need to understand how OSM saves its data. OSM uses basic data structures: node, way, and relation. Each element can have multiple tags, which consist of a key-value pair and they help specify the features of each element.
Nodes also save a latitude and longitude, indicating where the node is located on the world. Ways contain a list of the nodes contained in the way. Finally, relations are groups of nodes, ways and relations defining a logical relationship for this elements, for example being part of the same street, neighbourhood, city, postal code area, etc.
If we go to https://www.openstreetmap.org/, right-click on some point of the map and then click on Query Features, we get a list of the elements of the area. By clicking on one of them, we can explore it’s characteristics. As an example, we can explore the node 1918872432, which we can see on the left picture. Looking at the data we can see that it is located at longitude 52.5024783 and latitude 13.4155630. On the tags we can see it has the name Oranienplatz and among others it contains a bench and a bin. The key highway contains the value bus_stop, which tells us it is a bus stop.
If we explore the way 1228261444 (right picture) we can see a list of all the nodes it contains. In addition on the key highway we can see it’s of the type footway, telling us it’s a way intended for pedestrians. In addition we can see that it is a lit way.


Many keywords like highway are normalized. As an example, we can find a list of standardized values for highway here.
Overpass Queries
Querying a single element
We can query the previous information using Overpass QL. For the query to get the information about the way 1228261444 we use way(1228261444). The default output format is in xml, so if we want to have it in json, we need to add [out:json] in front of it. Other possible formats are csv, for which we need to define the list of columns for it to work. We mark the end of the query with an out, so the complete query is:
[out:json];
way(1228261444);
out;
To execute the query we need to run it against an instance, thus the complete URL looks like this:
https://overpass-api.de/api/interpreter?data=[out:json];way(1228261444);out;
We can copy the URL directly on the browser, or we can use wget to see the result:
wget -O my_file_name.osm "https://overpass-api.de/api/interpreter?data=[out:json];way(1228261444);out;"
To query a single node or relation works in a parallel way.
Output format
{
  "version": 0.6,
  "generator": "Overpass API 0.7.61.5 4133829e",
  "osm3s": {
    "timestamp_osm_base": "2024-03-06T20:54:14Z",
    "copyright": "The data included in this document is from www.openstreetmap.org. The data is made available under ODbL."
  },
  "elements": [
{
  "type": "way",
  "id": 1228261444,
  "nodes": [
    9010521154,
    9010521155,
    11390038869,
    11390038870,
    9394918823,
    9394918824,
    4613855449,
    11390038871,
    11390038872,
    11390038873,
    9394918822
  ],
  "tags": {
    "footway": "sidewalk",
    "highway": "footway",
    "lit": "yes",
    "surface": "paving_stones"
  }
}
  ]
}
Here we can see two main blocks: the first with metadata like the version or the timestamp, and the second one with a list of the elements found with the query. Even if we queried for one specific element of type way, we still get it as a set formatted as list with length 1.
Querying many elements
If we don’t want the information of one singe way, but the information of all ways in an area, we need to change the query a little bit:
[out:json];
way(52.49505089381484,13.401961459729343,52.509912981033516,13.411502705004548);
out;
Here, instead of requesting one single way, we put 4 coordinates in the parenthesis: boundaries in the south, west, north and east.
This returns a set of all the ways contained in the bounding box defined by the given coordinates.
It is not always needed to know the coordinates to get information for an area. With the query
[out:json];
area[name="Zürich"];
out;
we get all areas called Zürich. In this example we can see that we can use special characters without problem. Most interestingly are both square parentheses behind area [name=”Zürich”]. This is a filter where we only get the areas that contain a tag with key name and value Zürich.
We can use more than one filter, for example to get only the element representing the city Zürich, in contrast to the canton Zürich. In that case we can just place them one after another like this:
[out:json];
area[name=”Zürich”][place=”city”];
out;
We can filter by elements containing a certain tag independently from it’s value.
[out:json];
area[name=”Zürich”][place];
out;
This returns a set of all areas containing the tag place, which in this case contains the same element as above.
Subqueries
We can use the area we got in the previous query to get a set of certain elements inside said area. For example, if we want to get all public toilets in Zürich, we can use the following query:
[out:json];
area[name="Zürich"][place="city"];
node[amenity="toilets"](area);
out;
First we get the area corresponding to the city Zürich, and then we get all nodes whose tag key amenity contains the value toilets. By passing the area between the round parenthesis we limit the set of nodes to the previous area.
The tag amenity describes a large number of important facilities from cafés, public bookcases, benches, vending machines, ATMs, etc.
Other useful tag names to find interesting places are tourism and historic.
TIL: there is also a value for public baking ovens, baking_oven. Apparently there are 2 of those which Zürich, which looks to me like a good reason to visit that city again. Seriously, how awesome is that?
Using overpass in Python
There are two ways to execute overpass queries with python that we will explore. One possibility is using the library and the other the library overpass-api-python-wrapper.
Requests
Example:
import requests

overpass_url = 'https://overpass-api.de/api/interpreter'
overpass_query = '''
[out:json];
area[name="Zürich"][place="city"];
node[amenity="toilets"](area);
out;
'''

response = requests.get(overpass_url, params={'data': overpass_query})
This way we send to the overpass interpreter the query in overpass_query and save the result in the variable response. If no error happened, response.text contains the data as string so we can decode it with:
decoded_data =json.loads(response.text)
If we had requested the information in xml or csv format, we would decode it accordingly.
Overpass-api-python-wrapper
The overpass-api-python-wrapper allows us to execute queries in a more concise and elegant way. First we need to initialize an overpass object.
import overpass
api = overpass.API(endpoint="https://overpass.myserver/interpreter", timeout=25)
All parameters are optional and the default values are the ones shown here.
query = 'area[name="Zürich"][place="city"];node[amenity="toilets"](area);'
response = api.get(query, responseformat='json')
By default, response contains a dictionary representing the returned json object, however we can define the output format with the parameter responseformat. With this query, the response is
{
    "features": [
        {
            "geometry": {
                "coordinates": [
                    8.534562,
                    47.350221
                ],
                "type": "Point"
            },
            "id": 75743585,
            "properties": {
                "amenity": "toilets",
                "capacity": "4",
                "check_date:wheelchair": "2022-06-06",
                "fee": "no",
                "name": "Landiwiese",
                "opening_hours": "24/7",
                "operator": "Z\u00fcriWC",
                "unisex": "yes",
                "wheelchair": "no"
            },
            "type": "Feature"
        },
etc
}
If we use xml as format, response will be a string, and with csv it will be a list.
Other Useful tools:
We can find a complete manual on Overpass QL here, where we can read about more awesome possibilities that Overpass has to offer to us.
You can also try out queries with overpass-turbo. However it will only display the returned nodes on the map, but you can also get the returned response as text in the tab Data.
Finally, you can find another cool tutorial for using overpass with python here. In this case, the author shows us new possibilities with overpass, including how to plot the queried data in plots.
I hope you could awake your curiosity about the potential that OpenStreetMaps and Overpass offers. For me in meant not only to learn about a powerful tool, but while exploring it and playing with it it allowed me to learn more about the possibilities our cities and towns have to offer to us. Did you know that there are public showers, including in some train stations? Or that there are public ovens?
What I finally have to say is: keep calm and keep building cool stuff!
April 17, 2024 12:58 PM UTC
Microsoft supports urllib3 with FOSS Fund 2024
Back in January we announced that urllib3 would be fundraising
to implement support for HTTP/2 in a backwards compatible
way to urllib3 v2.x and to ensure the project's development
remains sustainable in the long-term.
Microsoft has awarded urllib3 $5,000 USD as one of its
FOSS Fund recipients for 2024 🥳
Thank you, Microsoft for supporting open source software!
Since announcing our fundraiser we have raised $7,275 USD
in 3 months, many of the donations coming from individuals
and long-time sponsors like Sourcegraph and Sentry.
 Thanks Microsoft! ❤️
How to get started supporting your own dependencies?
Contribute directly to projects you depend on.
Many of them already have funding mechanisms documented like Open Collective, GitHub Sponsors, or similar.
Subscribe to an organization like Tidelift
to handle discovery of dependencies and fundable projects
and to get additional guarantees like security and long-term support.
Thanks.dev provides a lightweight option to throw money in open sources' direction.
Thanks for reading! ♡ Did you find this article helpful and want more content like it?
Get notified of new posts by subscribing to the RSS feed or the email newsletter.
April 17, 2024 12:00 AM UTC
April 16, 2024
Today, we’re excited to announce a new, improved experience for Python library reference documentation on Microsoft Learn, formerly Microsoft Docs. The new experience is now available for all Microsoft Python libraries on Learn, such as the Azure SDK for Python. In this blog post, we take a closer look at the specific changes made and how they improve the overall experience and accessibility of Python reference documentation on Learn.
Change Summary
The key changes made to Python reference documentation on Learn were improving the navigation experience with the table of contents (TOC), the organization of in-page content, and in-page navigation via the right rail. When combined, these three key changes greatly improve the experience of finding information in Python reference on Learn.
Table of Contents (TOC)
If you’ve used reference documentation before, you’ll know that the TOC serves as a uniquely pivotal tool for navigation between pages. Reference documentation, unlike conceptual articles and tutorials, rarely links together in an easy-to-follow way. This means that the TOC is often the only way for cross-page navigation in reference documentation, making it a key priority for us to get right.
TOC – Before
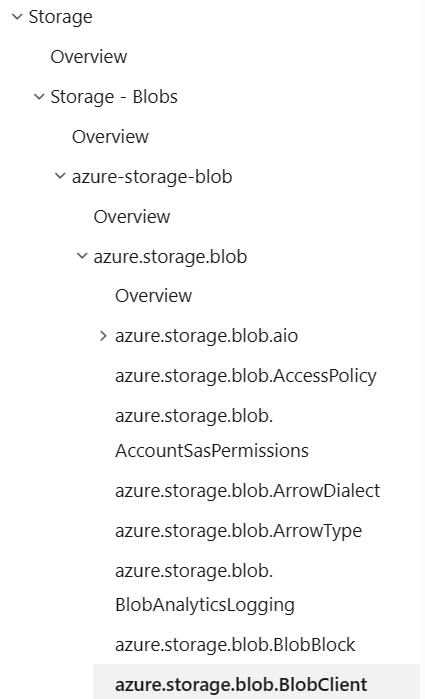
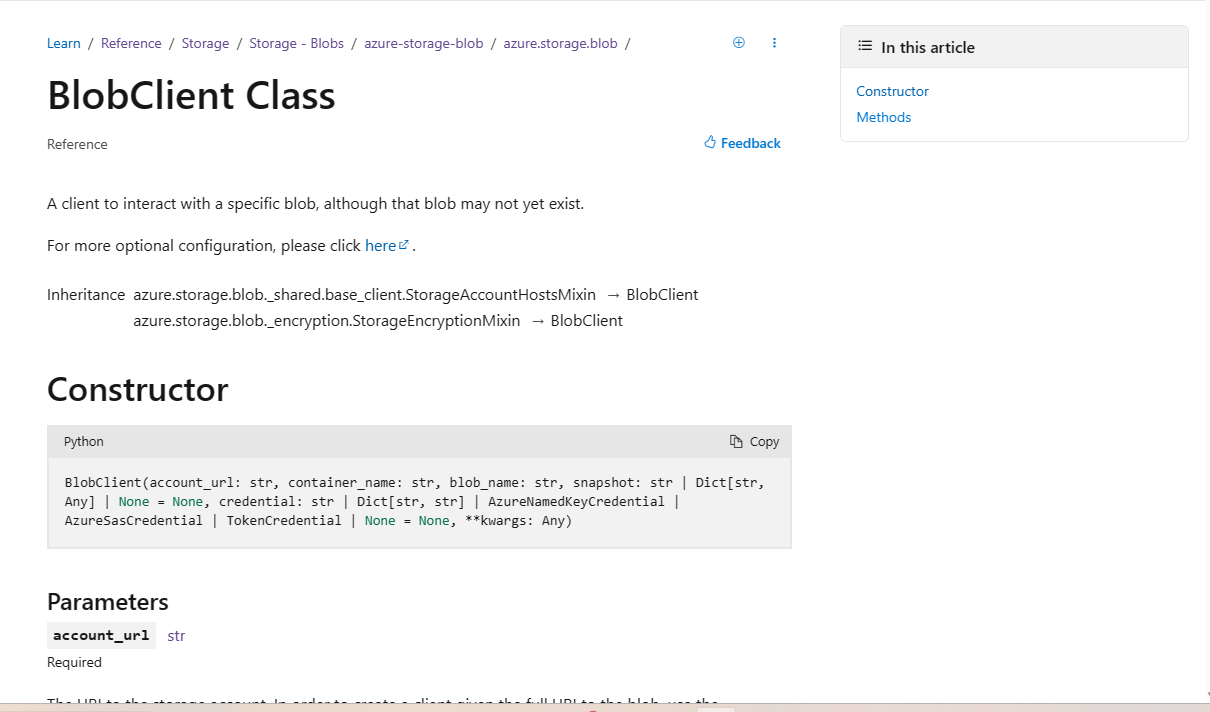
Previously, the table of contents for Python Reference documentation on Learn had a redundant layer of navigation for package names (in the screenshot below, the azure-storage-blob node), which added confusion for users looking to navigate deeper into the documentation. In addition, the table of contents had package prefixes attached to every item. This led to a cluttered experience, with some items in the TOC taking up two lines of space, further impacting readability and accessibility.
TOC – After
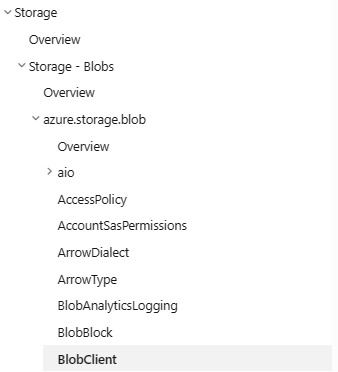
The new TOC design removes the package name overview page and trims the package prefix from TOC items, making it easier to scan and navigate. If you’ve bookmarked a package name overview page, don’t worry, as you’ll be redirected to the package overview page automatically.
In-Page Right Rail
The in-page right rail is a key part of reference documentation, allowing you to navigate in-page and quickly jump to different sections.
In-Page Right Rail – Before
Before, the right rail wasn’t “sticky”, meaning that once users scrolled on the page, the rail wouldn’t follow them, and the entire right side of the screen would be unused space. Additionally, the right rail links only covered H2 content on the page, resulting in a right rail that didn’t clarify any major details on the page. Finally, the right rail would be collapsed beyond four items, leading to extra effort from the user to see all of the H2 sections on the page. We recognize this design wasn’t consistent with the ways that other Python libraries design their documentation and made updates to better align with design patterns and expectations.
In-Page Right Rail – After
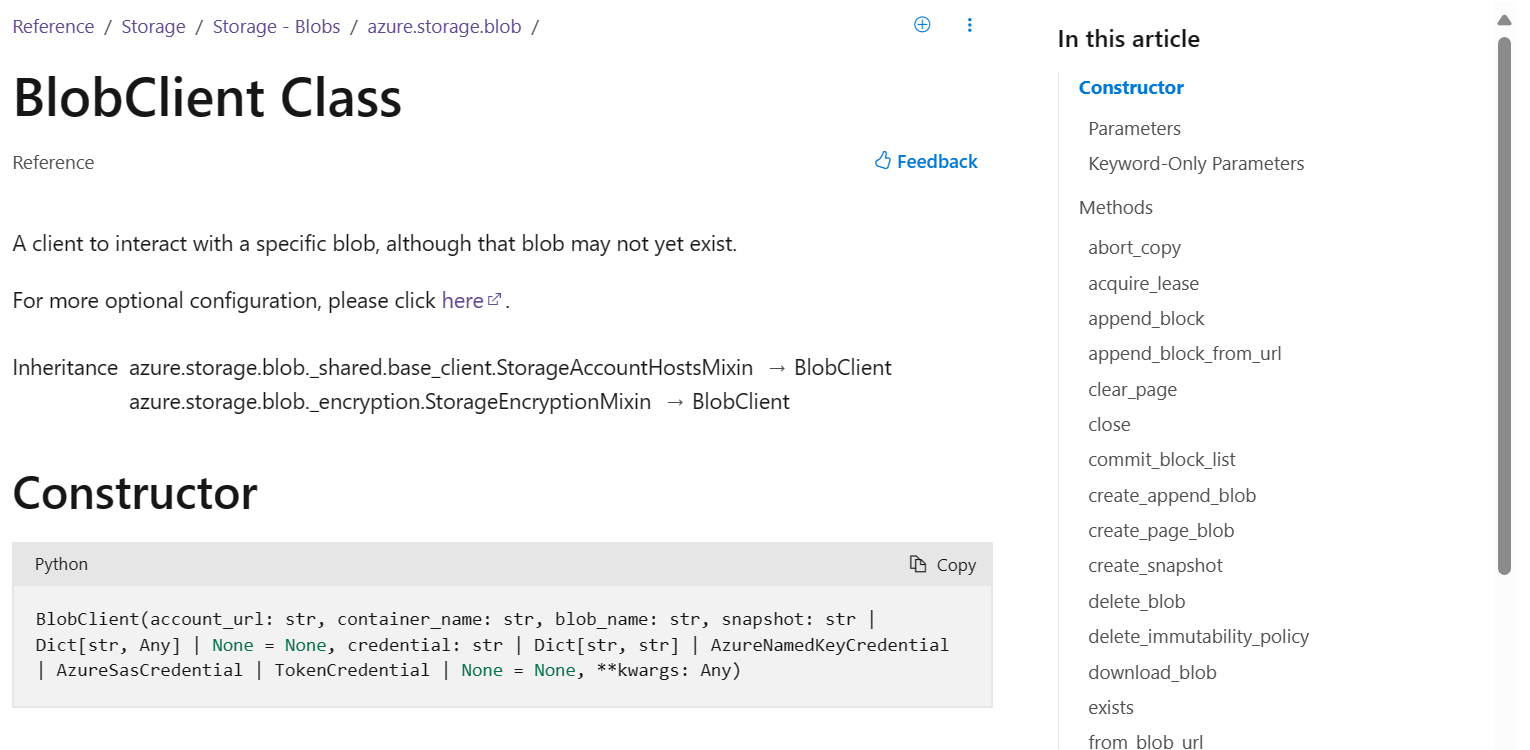
The enhanced experience adds an individually scrollable, sticky right rail with details down to H3s, giving much more detail into what content the page has. The right rail additionally has active highlighting for the current item on the screen, making it easier for you to understand your current position relative to other content.
Parameter, Return, and Exception Organization
While the first two major feature changes focus on both overall and in-page navigation, we also identified an opportunity to improve in-page organization as well. When you’re looking at our reference documentation, being able to easily identify key information such as parameters, return values, and exceptions is crucial.
In-Page Organization – Before
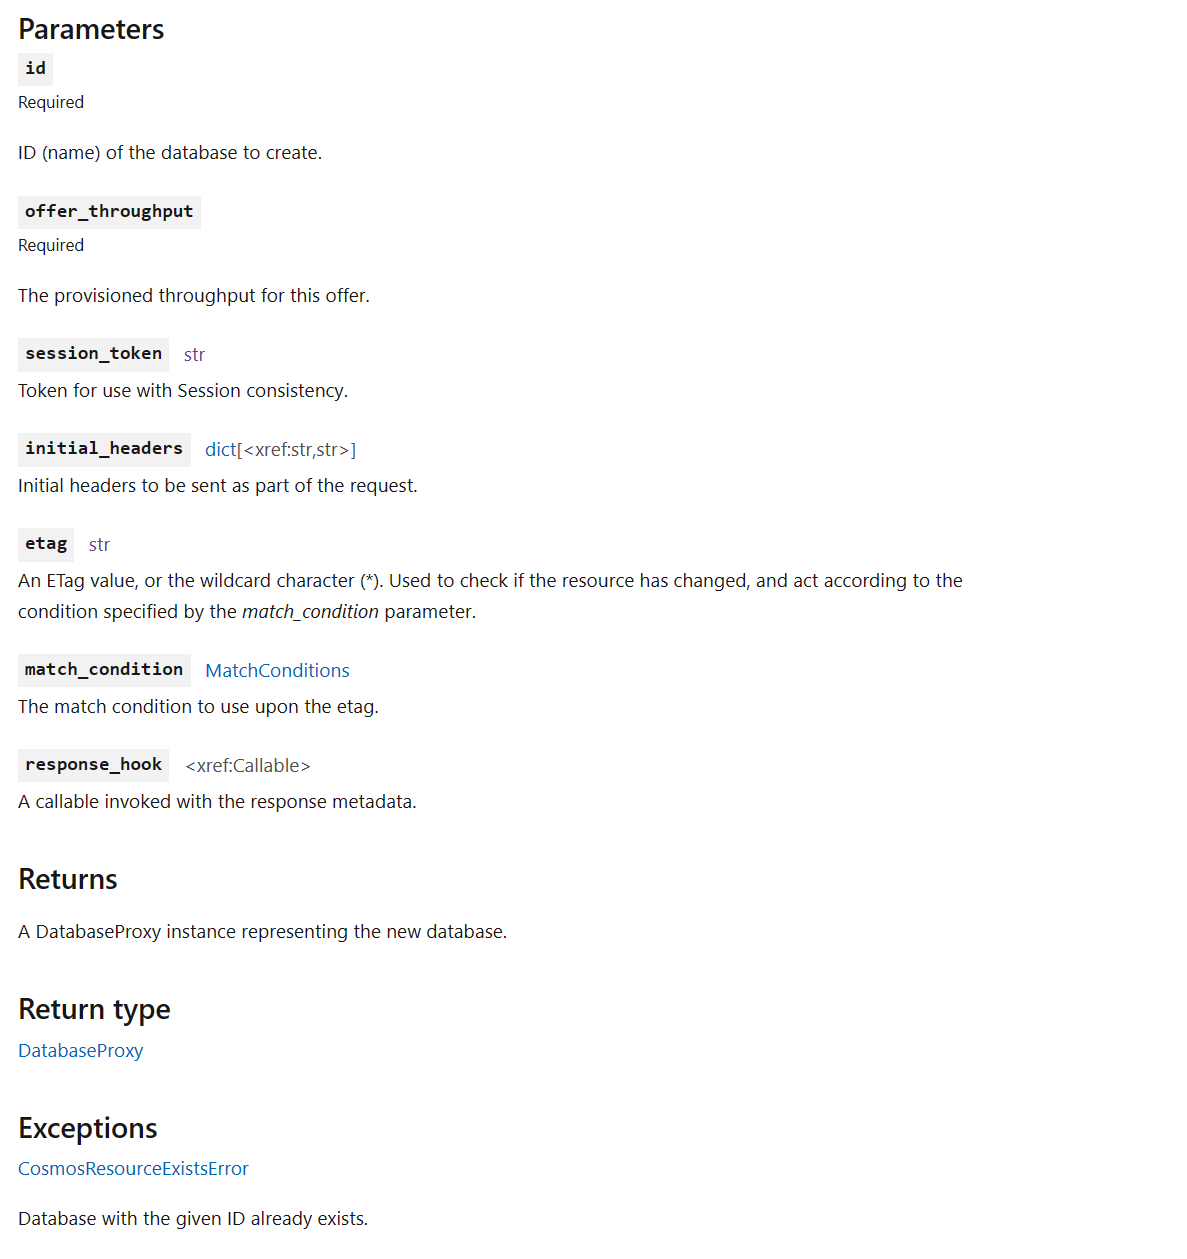
Before the updates, these details were listed but not clearly separated between classes, leading to a confusing experience where it’s not clear where items started or ended. Additionally, as a result of the formatting of these values, a significant amount of vertical space was used, leading to a lot of scrolling to find the information needed. Lastly, required parameters, default values, and keyword-only parameters weren’t clearly highlighted to follow accessibility best practices, resulting in extra effort to find crucial information.
In-Page Organization – After
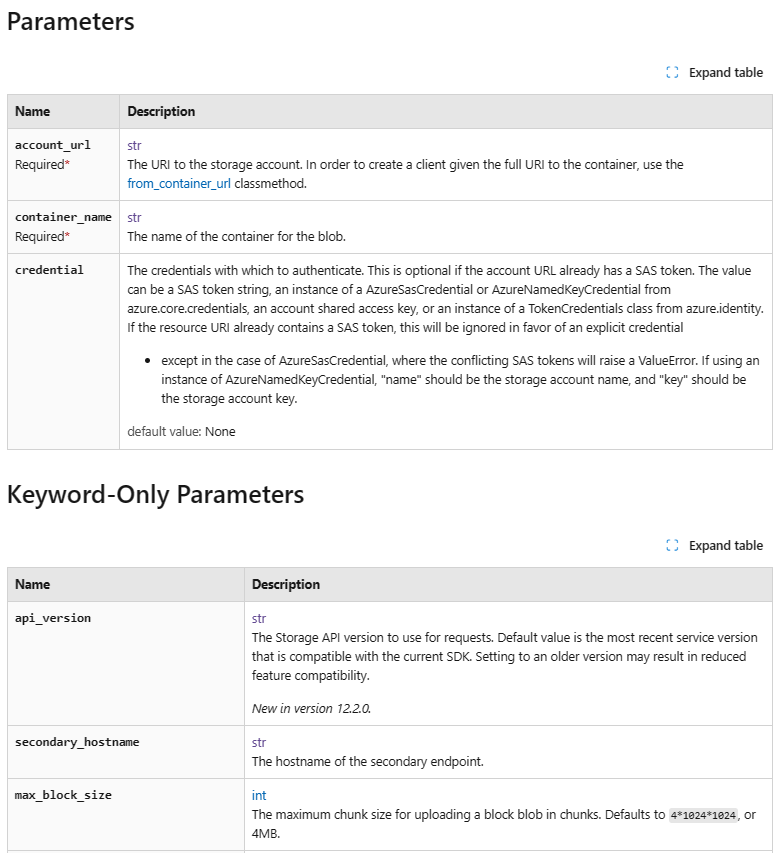
The new experience organizes parameters, return values, and exceptions into easy-to-scan tables. By using tables, default values, required tags, and types are clearly indicated. The end result is a cleaner and easier-to-use experience for all developers when scrolling through our documentation.
Conclusion
In short, the new Python reference documentation experience on Learn is a major improvement for any developer using Microsoft’s Python libraries. The new TOC, in-page right rail, and in-page organization changes make finding information easier, with an added visual upgrade. We’re excited to continue optimizing the Python developer experience across all of our libraries and tools.
We hope you enjoy the changes! If you have any thoughts, you can leave feedback in the Azure SDK for Python GitHub repo.
The post Glow up! A new look for Python Reference documentation on Microsoft Learn appeared first on Python.
April 16, 2024 09:41 PM UTC
In this post I’ll try to document the journey starting from a WebKit issue and
ending up improving third-party projects that WebKitGTK and WPEWebKit depend on.
I’ve been working on WebKit’s GStreamer backends for a while. Usually some new
feature needed on WebKit side would trigger work …
April 16, 2024 08:15 PM UTC
#625 – APRIL 16, 2024
View in Browser »

Discover the power of Pydantic, Python’s most popular data parsing, validation, and serialization library. In this hands-on tutorial, you’ll learn how to make your code more robust, trustworthy, and easier to debug with Pydantic.
REAL PYTHON
Coding on the web means you have to be more security conscious as everyone has access to your software. This article discusses key steps you can take to help make your code more secure.
ARJAN

With Sentry, you can trace issues from the frontend to the backend—detecting slow and broken code, to fix what’s broken faster. Installing the Python SDK is super easy and PyCoder’s Weekly subscribers get three full months of the team plan. Just use code “pycoder” on signup →
SENTRY sponsor
Michael of TalkPython fame gave this keynote at PyCon Philippines. He addresses topics such as Python trends in code, asyncio, Flask and Django, getting rid of the GIL and more.
MICHAEL KENNEDY video
Discussions
Articles & Tutorials
“Django’s system check framework provides fantastic protection for configuration mishaps. It’s like a targeted linter that runs when you start Django commands.” It also can be a bit slow for large projects. As part of the Django 5.1 release many optimizations have been applied. This blog posts discusses the work involved.
ADAM JOHNSON
“When talking flippantly about programming languages, it’s sometimes useful to glob a bunch of them together based on characteristics, whether superficial or not. This started with jokes about common features of ‘P languages’ like Perl, PHP, Python, JavaScript and Ruby, but you can classify other languages too.”
BRYCE KERLEY
In this video course, you’ll learn how to use Python to generate QR codes, from your standard black-and-white QR codes to beautiful ones with your favorite colors. You’ll learn how to format QR codes, rotate them, and even replace the static background with moving images.
REAL PYTHON course
Sometimes teachers or mentors ask students to contribute to an open source project, without the context of what that entails. This opinion piece covers just how much noise that causes for the projects and why you shouldn’t do it unless you truly mean to contribute.
DAVID LORD
Ashlynn ran into a problem where her code was initializing a connection to the Google Cloud API before the credentials for it had been imported. This blog post covers the problem and how she got around it.
ASHLYNN ANTROBUS
For a year and a half, Rodrigo worked at Textualize the company behind the popular open source Python projects Rich and Textual. This blog post talks about what he learned while he was there.
RODRIGO GIRÃO SERRÃO
Like many of us, Pawel uses f-strings a lot. Even with frequent use, it can be hard to remember how the formatting syntax works. This post covers some of the more common formats around.
PAWEL JASTRZEBSKI
What’s it mean to write clean code? What is clean Python code, specifically? This article talks about how to write code that is easier to read and the tools you can use to get there.
NIK TOMAZIC
Were you in the path of the eclipse last week? Would you like to figure out if you’ll be in the next one? This article shows you how using the Astropy library.
ERIK BERNHARDSSON
This guide walks you through transcribing video using the OpenAI Whisper model and seamlessly adding subtitles with FFmpeg tool.
EDITFRAME
Projects & Code
Events
Happy Pythoning!
This was PyCoder’s Weekly Issue #625.
View in Browser »

[ Subscribe to 🐍 PyCoder’s Weekly 💌 – Get the best Python news, articles, and tutorials delivered to your inbox once a week >> Click here to learn more ]
April 16, 2024 07:30 PM UTC
PyCon US 2024 is quickly approaching and we can’t wait to see all of you there! This year, we are reaching out to our community to help support one of our favorite events: the PyLadies Charity Auction. We know our wonderful community is bursting with creative, artsy, and generous folks. That’s why we are sending out a community wide call to donate items to this year’s auction. If you’d like to support PyLadies by making a donation, please fill out the PyLadies Charity Auction donation form. To learn more about the event and what to donate, read on!
What to Donate
Need inspiration? Over the years, we’ve seen that people love to bid on items that are artsy, nerdy, and Python-specific. Art, decor, customized tech, and vintage PyCon or Python related swag are all examples of things that will inspire a friendly bidding war. To get more inspiration search ‘PyLadies Auction’ on social media or check out the PyLadies Instagram.
Items that are personalized or have a story tend to attract bidders– DIYers, artists, crafters, and collectors, this is your time to shine! It's also worth thinking about what will show up well on stage. We have a magnifying camera, but smaller and less colorful items like jewelry and watches might be harder for bidders to see than a big piece of art or an adorable, bright colored snake stuffy!
Please note that we cannot accept donations of guns, alcohol, cars, real estate, or houses. We may decline other gifts that are inappropriate or impractical at the PSF’s discretion (for example, sorry, no real pythons!).
If you’ve got an item to contribute that you’d like to share in a sneak preview, feel free to post a photo and tag us on the social media platform of your choice!
Donation details
To donate an item, please fill out the PyLadies Charity Auction donation form. This form asks for required information around the person or organization donating, item specifics, and logistics. You will need to indicate if you will ship the item in advance or deliver it in person. You will receive shipping information once you complete the form. The deadline for donations is May 16th, 2024 (that’s the Thursday before the event!).
About the PyLadies Charity Auction
The twelfth PyLadies Charity Auction will be held in-person during PyCon US 2024 in Pittsburgh, Pennsylvania. It’s an evening of fun and refreshments while supporting the PyLadies community!
The Entry cover charge of $35.00 includes dinner and a drink ticket, while the Supporter cover charge of $50.00 includes dinner, a drink ticket, and a $15.00 contribution to PyLadies. Everyone who attends will also have access to the cash bar. To save your place at the Auction, add the PyLadies Auction to your PyCon US registration via your dashboard. Last year we sold out quickly, so if you’d like to go, reserve your ticket soon!
April 16, 2024 06:03 PM UTC
The time complexity of common operations on Python's many data structures.
Time Complexity ⏱️
Time complexity is one of those Computer Science concepts that's scary in its purest form, but often fairly practical as a rough "am I doing this right" measurement.
In the words of Ned Batchelder, time complexity is all about "how your code slows as your data grows".
Time complexity is usually discussed in terms of "Big O" notation.
This is basically a way to discuss the order of magnitude for a given operation while ignoring the exact number of computations it needs.
In "Big O" land, we don't care if something is twice as slow, but we do care whether it's n times slower where n is the length of our list/set/slice/etc.
Here's a graph of the common time complexity curves:
Remember that these lines are simply about orders of magnitude.
If an operation is on the order of n, that means 100 times more data will slow things down about 100 times.
If an operation is on the order of n² (that's n*n), that means 100 times more data will slow things down 100*100 times.
I usually think about those curves in terms of what would happen if we suddenly had 1,000 times more data to work with:
O(1): no change in time (constant time!)O(log n): ~10 times slow downO(n): 1,000 times slow downO(n log n): 10,000 times slow downO(n²): 1,000,000 times slow down! 😲
With that very quick recap behind us, let's take a look at the relative speeds of all common operations on each of Python's data structures.
List 📋
Python's lists are similar to …
April 16, 2024 03:00 PM UTC
In your Python journey, you’ll come across situations where you need to signal that something is going wrong in your code. For example, maybe a file doesn’t exist, a network or database connection fails, or your code gets invalid input. A common approach to tackle these issues is to raise an exception, notifying the user that an error has occurred. That’s what Python’s raise statement is for.
Learning about the raise statement allows you to effectively handle errors and exceptional situations in your code. This way, you’ll develop more robust programs and higher-quality code.
In this video course, you’ll learn how to:
- Raise exceptions in Python using the
raise statement
- Decide which exceptions to raise and when to raise them in your code
- Explore common use cases for raising exceptions in Python
- Apply best practices for raising exceptions in your Python code
[ Improve Your Python With 🐍 Python Tricks 💌 – Get a short & sweet Python Trick delivered to your inbox every couple of days. >> Click here to learn more and see examples ]
April 16, 2024 02:00 PM UTC
Do you know what custom GPTs are? They're configurable and shareable chat experiences with a name, logo, custom instructions, conversation starters, access to OpenAI tools, and custom API actions. And, you can build them with Python! Ian Maurer has been doing just that and is here to share his experience building them.<br/>
<br/>
<strong>Episode sponsors</strong><br/>
<br/>
<a href='https://talkpython.fm/sentry'>Sentry Error Monitoring, Code TALKPYTHON</a><br>
<a href='https://talkpython.fm/neo4j-notes'>Neo4j</a><br>
<a href='https://talkpython.fm/training'>Talk Python Courses</a><br/>
<br/>
<strong>Links from the show</strong><br/>
<br/>
<div><b>Ian on Twitter</b>: <a href="https://twitter.com/imaurer" target="_blank" rel="noopener">@imaurer</a><br/>
<br/>
<b>Mobile Navigation</b>: <a href="https://openai.com/blog/introducing-gpts" target="_blank" rel="noopener">openai.com</a><br/>
<b>What is a Custom GPT?</b>: <a href="https://www.imaurer.com/what-is-a-custom-gpt/" target="_blank" rel="noopener">imaurer.com</a><br/>
<b>Mobile Navigation</b>: <a href="https://openai.com/blog/introducing-the-gpt-store" target="_blank" rel="noopener">openai.com</a><br/>
<b>FuzzTypes: Pydantic library for auto-correcting types</b>: <a href="https://github.com/genomoncology/FuzzTypes" target="_blank" rel="noopener">github.com</a><br/>
<b>pypi-gpt</b>: <a href="https://github.com/imaurer/pypi-gpt" target="_blank" rel="noopener">github.com</a><br/>
<b>marvin</b>: <a href="https://github.com/prefecthq/marvin" target="_blank" rel="noopener">github.com</a><br/>
<b>instructor</b>: <a href="https://github.com/jxnl/instructor" target="_blank" rel="noopener">github.com</a><br/>
<b>outlines</b>: <a href="https://github.com/outlines-dev/outlines" target="_blank" rel="noopener">github.com</a><br/>
<b>llamafile</b>: <a href="https://github.com/Mozilla-Ocho/llamafile" target="_blank" rel="noopener">github.com</a><br/>
<b>llama-cpp-python</b>: <a href="https://github.com/abetlen/llama-cpp-python" target="_blank" rel="noopener">github.com</a><br/>
<b>LLM Dataset</b>: <a href="https://llm.datasette.io/en/stable/index.html" target="_blank" rel="noopener">llm.datasette.io</a><br/>
<b>Plugin directory</b>: <a href="https://llm.datasette.io/en/stable/plugins/directory.html" target="_blank" rel="noopener">llm.datasette.io</a><br/>
<b>Data exploration at your fingertips.</b>: <a href="https://www.visidata.org/" target="_blank" rel="noopener">visidata.org</a><br/>
<b>hottest new programming language is English</b>: <a href="https://twitter.com/karpathy/status/1617979122625712128" target="_blank" rel="noopener">twitter.com</a><br/>
<b>OpenAI & other LLM API Pricing Calculator</b>: <a href="https://docsbot.ai/tools/gpt-openai-api-pricing-calculator" target="_blank" rel="noopener">docsbot.ai</a><br/>
<b>Vector DB Comparison</b>: <a href="https://vdbs.superlinked.com/" target="_blank" rel="noopener">vdbs.superlinked.com</a><br/>
<b>bpytop</b>: <a href="https://github.com/aristocratos/bpytop" target="_blank" rel="noopener">github.com</a><br/>
<b>Source Graph</b>: <a href="https://about.sourcegraph.com/cody" target="_blank" rel="noopener">about.sourcegraph.com</a><br/>
<b>Watch this episode on YouTube</b>: <a href="https://www.youtube.com/watch?v=FwmbJiKdAG0" target="_blank" rel="noopener">youtube.com</a><br/>
<b>Episode transcripts</b>: <a href="https://talkpython.fm/episodes/transcript/456/building-gpt-actions-with-fastapi-and-pydantic" target="_blank" rel="noopener">talkpython.fm</a><br/>
<br/>
<b>--- Stay in touch with us ---</b><br/>
<b>Subscribe to us on YouTube</b>: <a href="https://talkpython.fm/youtube" target="_blank" rel="noopener">youtube.com</a><br/>
<b>Follow Talk Python on Mastodon</b>: <a href="https://fosstodon.org/web/@talkpython" target="_blank" rel="noopener"><i class="fa-brands fa-mastodon"></i>talkpython</a><br/>
<b>Follow Michael on Mastodon</b>: <a href="https://fosstodon.org/web/@mkennedy" target="_blank" rel="noopener"><i class="fa-brands fa-mastodon"></i>mkennedy</a><br/></div>
April 16, 2024 08:00 AM UTC
<strong>Topics covered in this episode:</strong><br>
<ul>
<li><a href="https://stefaniemolin.com/articles/devx/pre-commit/setup-guide/">How to Set Up Pre-Commit Hooks A step-by-step guide to installing and configuring pre-commit hooks on your project</a>.</li>
<li><a href="https://difftastic.wilfred.me.uk"><strong>difftastic</strong></a></li>
<li><a href="https://quarto.org"><strong>Quarto</strong></a></li>
<li><a href="https://github.com/saurabh0719/constable"><strong>constable</strong></a></li>
<li><strong>Extras</strong></li>
<li><strong>Joke</strong></li>
</ul><a href='https://www.youtube.com/watch?v=4PoBtLFRWGU' style='font-weight: bold;'data-umami-event="Livestream-Past" data-umami-event-episode="379">Watch on YouTube</a><br>
<p><strong>About the show</strong></p>
<p>Sponsored by us! Support our work through:</p>
<ul>
<li>Our <a href="https://training.talkpython.fm/"><strong>courses at Talk Python Training</strong></a></li>
<li><a href="https://courses.pythontest.com/p/the-complete-pytest-course"><strong>The Complete pytest Course</strong></a></li>
<li><a href="https://www.patreon.com/pythonbytes"><strong>Patreon Supporters</strong></a></li>
</ul>
<p><strong>Connect with the hosts</strong></p>
<ul>
<li>Michael: <a href="https://fosstodon.org/@mkennedy"><strong>@mkennedy@fosstodon.org</strong></a></li>
<li>Brian: <a href="https://fosstodon.org/@brianokken"><strong>@brianokken@fosstodon.org</strong></a></li>
<li>Show: <a href="https://fosstodon.org/@pythonbytes"><strong>@pythonbytes@fosstodon.org</strong></a></li>
</ul>
<p>Join us on YouTube at <a href="https://pythonbytes.fm/stream/live"><strong>pythonbytes.fm/live</strong></a> to be part of the audience. Usually Tuesdays at 11am PT. Older video versions available there too.</p>
<p>Finally, if you want an artisanal, hand-crafted digest of every week of </p>
<p>the show notes in email form? Add your name and email to <a href="https://pythonbytes.fm/friends-of-the-show">our friends of the show list</a>, we'll never share it.</p>
<p><strong>Michael #1:</strong> <a href="https://stefaniemolin.com/articles/devx/pre-commit/setup-guide/">How to Set Up Pre-Commit Hooks A step-by-step guide to installing and configuring pre-commit hooks on your project</a>.</p>
<ul>
<li>by <a href="https://stefaniemolin.com/"><strong>Stefanie Molin</strong></a></li>
<li>Pre-commit hooks are code checks that run as part of the “pre-commit” stage of the git commit process. </li>
<li>If any of these checks fail, git aborts the commit</li>
<li>Sometimes, we need to bypass the hooks temporarily. For these instances, we can pass the --no-verify option when we run git commit</li>
</ul>
<p><strong>Brian #2:</strong> <a href="https://difftastic.wilfred.me.uk"><strong>difftastic</strong></a></p>
<ul>
<li>Found this a couple years ago, but really using it a lot now.</li>
<li>Excellent structurally diff tool that compares code based on syntax, not line by line.</li>
</ul>
<p><strong>Michael #3:</strong> <a href="https://quarto.org"><strong>Quarto</strong></a></p>
<ul>
<li>via Mathias Johansson</li>
<li>An open-source scientific and technical publishing system</li>
<li>Transforming a notebook into a pdf / HTML / MS Word / ePub with minimal effort, or even all formats at once.</li>
<li>Author using <a href="https://jupyter.org/">Jupyter</a> notebooks or with plain text markdown in your favorite editor.</li>
<li>Write using <a href="https://pandoc.org/">Pandoc</a> markdown, including equations, citations, crossrefs, figure panels, callouts, advanced layout, and more.</li>
</ul>
<p><strong>Brian #4:</strong> <a href="https://github.com/saurabh0719/constable"><strong>constable</strong></a></p>
<ul>
<li>“inserts print statements directly into the AST at runtime “</li>
<li>“If you find yourself aimlessly adding print statements while debugging your code, this is for you. !”</li>
<li>Add decorators like @constable.trace('a', 'b') to functions and you’ll get nice output showing when and how a and b changed.</li>
<li>see also <a href="https://github.com/gruns/icecream">icecream</a> for another fun debugging with print project.</li>
</ul>
<p><strong>Extras</strong> </p>
<p>Brian:</p>
<ul>
<li><a href="https://www.reddit.com/r/Python/comments/1bt7rnw/pointerspy_being_added_to_the_standard_library/"><strong>pointers being added to the standard library</strong></a>
<ul>
<li>A couple weeks old, but still worth covering</li>
<li>Guido’s take on adding this, "Why the hell not?"</li>
</ul></li>
</ul>
<p>Michael:</p>
<ul>
<li><a href="https://docs.python.org/release/3.12.3/whatsnew/changelog.html#python-3-12-2">Python 3.12.3 is out</a></li>
</ul>
<p><strong>Joke:</strong> <a href="https://twitter.com/hynek/status/1777377316269883420">Hugo SciFi Award</a></p>
April 16, 2024 08:00 AM UTC
April 15, 2024
I’ve added experimental function and class coverage reports to coverage.py.
I’d like feedback
about whether they behave the way you want them to.
I haven’t made a PyPI release. To try the new reports, install coverage from
GitHub. Be sure to include the hash:
$ python3 -m pip install git+https://github.com/nedbat/coveragepy@f10c455b7c8fd26352de#egg=coverage==0.0
Then run coverage and make an HTML report as you usually do. You should
have two new pages, not linked from the index page (yet).
“htmlcov/function_index.html” is the function coverage report, and the classes
are in “htmlcov/class_index.html”.
I had to decide how to categorize nested functions and classes. Inner
functions are not counted as part of their outer functions. Classes consist of
the executable lines in their methods, but not lines outside of methods, because
those lines run on import. Each file has an entry in the function report for
all of the lines outside of any function, called “(no function)”. The class
report has “(no class)” entries for lines outside of any classes.
The result should be that every line is part of one function, or the “(no
function)” entry, and every line is part of one class, or the “(no class)”
entry. This is what made sense to me, but maybe there’s a compelling reason to
do it differently.
The reports have a sortable column for the file name, and a sortable column
for the function or class. Where functions or classes are nested, the name is a
dotted sequence, but is sorted by only the last component. Just like the
original file listing page, the new pages can be filtered to focus on areas of
interest.
You can look at some sample reports:
It would be helpful if you could give me
feedback on the
original issue about some questions:
- Is it useful to have “(no function)” and “(no class)” entries or is it just
distracting pedantry? With the entries, the total is the same as the file
report, but they don’t seem useful by themselves.
- Does the handling of nested functions and classes make sense?
- Should these reports be optional (requested with a switch) or always
produced?
- Is it reasonable to produce one page with every function? How large does a
project have to get before that’s not feasible or useful?
- And most importantly: do these reports help you understand how to improve
your code?
This is only in the HTML report for now, but we can do more in the future.
Other ideas
about improvements are of course welcome. Thanks!
April 15, 2024 08:02 PM UTC
Are you a regular Django user? Do you find yourself wanting to decouple your back end and front end? Do you want to handle data persistence in the API while you display the data in a single-page app (SPA) in the browser using a JavaScript framework like React or Vue?
If you answered yes to any of these questions, then you’re in luck. This tutorial will take you through the process of building a Django blog back end and a Vue front end, using GraphQL to communicate between them.
Projects are an effective way to learn and solidify concepts. This tutorial is structured as a step-by-step project so you can learn in a hands-on way and take breaks as needed.
In this tutorial, you’ll learn how to:
- Translate your Django models into a GraphQL API
- Run the Django server and a Vue application on your computer at the same time
- Administer your blog posts in the Django admin
- Consume a GraphQL API in Vue to show data in the browser
You can download all the source code you’ll use to build your Django blog application by clicking the link below:
Demo: A Django Blog Admin, a GraphQL API, and a Vue Front End
Blog applications are a common starter project because they involve create, read, update, and delete (CRUD) operations. In this project, you’ll use the Django admin to do the heavy CRUD lifting and you’ll focus on providing a GraphQL API for your blog data.
You’ll use Vue.js 3 and its composition API for the front end of your blog. Vue lets you create dynamic interfaces pretty smoothly, thanks to its reactive data binding and easy-to-manage components. Plus, since you’re dealing with data from a GraphQL API, you can leverage the Vue Apollo plugin.
Here’s a demonstration of the completed project in action:
Next, you’ll make sure you have all the necessary background information and tools before you dive in and build your blog application.
Project Overview
For this project, you’ll create a small blogging application with some rudimentary features:
- Authors can write many posts.
- Posts can have many tags and can be either published or unpublished.
You’ll build the back end of this blog in Django, complete with an admin for adding new blog content. Then you’ll expose the content data as a GraphQL API and use Vue to display that data in the browser.
You’ll accomplish this in several high-level steps. At the end of each step, you’ll find a link to the source code for that stage of the project.
If you’re curious about how the source code for each step looks, then you can click the link below:
Prerequisites
You’ll be best equipped for this tutorial if you already have a solid foundation in some web application concepts. You should understand how HTTP requests and responses and APIs work. You can check out Python & APIs: A Winning Combo for Reading Public Data to understand the details of using GraphQL APIs vs REST APIs.
Because you’ll use Django to build the back end for your blog, you’ll want to be familiar with starting a Django project and customizing the Django admin. If you haven’t used Django much before, you might also want to try building another Django-only project first. For a good introduction, check out Get Started with Django Part 1: Build a Portfolio App.
And because you’ll be using Vue on the front end, some experience with JavaScript will also help. If you’ve only used a JavaScript framework like jQuery in the past, the Vue introduction is a good foundation.
Familiarity with JSON is also important because GraphQL queries are JSON-like and return data in JSON format. You can read about Working with JSON Data in Python for an introduction.
[ Improve Your Python With 🐍 Python Tricks 💌 – Get a short & sweet Python Trick delivered to your inbox every couple of days. >> Click here to learn more and see examples ]
April 15, 2024 02:00 PM UTC
The following text is in German, since we're announcing a regional user group meeting in Düsseldorf, Germany.
Ankündigung
Das nächste Python Meeting Düsseldorf findet an folgendem Termin statt:
17.04.2024, 18:00 Uhr
Raum 1, 2.OG im Bürgerhaus Stadtteilzentrum Bilk
Düsseldorfer Arcaden, Bachstr. 145, 40217 Düsseldorf
Programm
Bereits angemeldete Vorträge
- Marc-André Lemburg:
Advanced parsing structured data with Python's new match statement
- Jens Diemer:
Anbindung von Tinkerforge in Home Assistant
- Charlie Clark:
Eine kleine Datenanalyse
- Detlef Lannert:
Überblick über CLI-Frameworks
Weitere Vorträge können gerne noch angemeldet werden. Bei Interesse, bitte unter
info@pyddf.de melden.
Startzeit und Ort
Wir treffen uns um 18:00 Uhr im Bürgerhaus in den
Düsseldorfer Arcaden.
Das Bürgerhaus teilt sich den Eingang mit dem Schwimmbad und befindet
sich an der Seite der Tiefgarageneinfahrt der Düsseldorfer Arcaden.
Über dem Eingang steht ein großes "Schwimm’ in Bilk" Logo. Hinter der Tür
direkt links zu den zwei Aufzügen, dann in den 2. Stock hochfahren. Der
Eingang zum Raum 1 liegt direkt links, wenn man aus dem Aufzug kommt.
>>> Eingang in Google Street View
⚠️ Wichtig: Bitte nur dann anmelden, wenn ihr absolut
sicher seid, dass ihr auch kommt. Angesichts der begrenzten Anzahl Plätze, haben
wir kein Verständnis für kurzfristige Absagen oder No-Shows.
Einleitung
Das Python Meeting Düsseldorf ist eine regelmäßige Veranstaltung in Düsseldorf, die sich an Python Begeisterte aus der Region wendet.
Einen guten Überblick über die Vorträge bietet unser
PyDDF YouTube-Kanal, auf dem wir Videos der Vorträge nach den Meetings veröffentlichen.
Veranstaltet wird das Meeting von der eGenix.com GmbH, Langenfeld, in Zusammenarbeit mit Clark Consulting & Research, Düsseldorf:
Format
Das Python Meeting Düsseldorf nutzt eine Mischung aus (Lightning) Talks und offener Diskussion.
Vorträge können vorher angemeldet werden, oder auch spontan
während des Treffens eingebracht werden. Ein Beamer mit HDMI und FullHD Auflösung
steht zur Verfügung.
(Lightning) Talk Anmeldung bitte formlos per EMail an info@pyddf.de
Kostenbeteiligung
Das Python Meeting Düsseldorf wird von Python Nutzern für Python Nutzer veranstaltet.
Da Tagungsraum, Beamer, Internet und Getränke Kosten produzieren,
bitten wir die Teilnehmer um einen Beitrag in Höhe von EUR 10,00 inkl.
19% Mwst. Schüler und Studenten zahlen EUR 5,00 inkl.
19% Mwst.
Wir möchten alle Teilnehmer bitten, den Betrag in bar mitzubringen.
Anmeldung
Da wir nur 25 Personen in dem angemieteten Raum empfangen können, möchten wir bitten, sich vorher anzumelden.
Meeting Anmeldung bitte per Meetup
Weitere Informationen
Weitere Informationen finden Sie auf der Webseite des Meetings:
https://pyddf.de/
Viel Spaß !
Marc-Andre Lemburg, eGenix.com
April 15, 2024 08:00 AM UTC
2024-04-15, by Dariusz Suchojad


An integral part of
Zato, its scalable, service-oriented scheduler makes it is possible to execute high-level API integration processes as background tasks. The scheduler runs periodic jobs which in turn trigger services and services are what is used to integrate systems.
Integration process
In this article we will check how to use the scheduler with three kinds of jobs, one-time, interval-based and Cron-style ones.
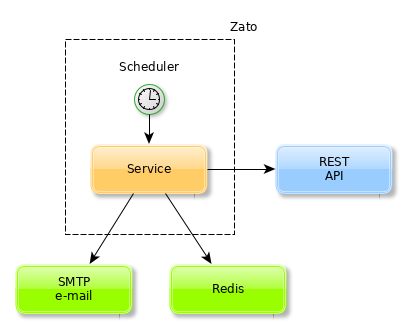
What we want to achieve is a sample yet fairly common use-case:
- Periodically consult a remote REST endpoint for new data
- Store data found in Redis
- Push data found as an e-mail attachment
Instead of, or in addition to, Redis or e-mail, we could use SQL and SMS, or MongoDB and AMQP or anything else - Redis and e-mail are just example technologies frequently used in data synchronisation processes that we use to highlight the workings of the scheduler.
No matter the input and output channels, the scheduler works always the same - a definition of a job is created and the job's underlying service is invoked according to the schedule. It is then up to the service to perform all the actions required in a given integration process.
Python code
Our integration service will read as below:
# -*- coding: utf-8 -*-
# Zato
from zato.common.api import SMTPMessage
from zato.server.service import Service
class SyncData(Service):
name = 'api.scheduler.sync'
def handle(self):
# Which REST outgoing connection to use
rest_out_name = 'My Data Source'
# Which SMTP connection to send an email through
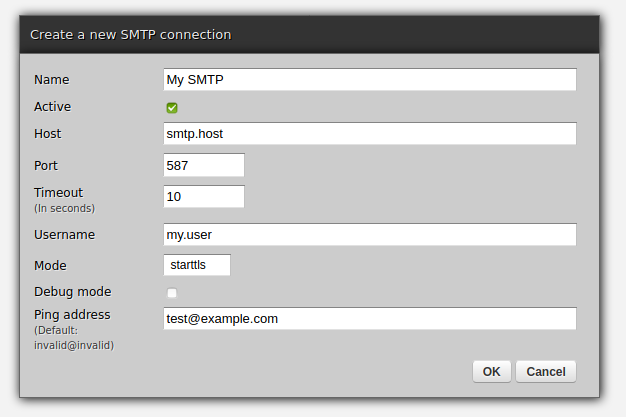
smtp_out_name = 'My SMTP'
# Who the recipient of the email will be
smtp_to = 'hello@example.com'
# Who to put on CC
smtp_cc = 'hello.cc@example.com'
# Now, let's get the new data from a remote endpoint ..
# .. get a REST connection by name ..
rest_conn = self.out.plain_http[rest_out_name].conn
# .. download newest data ..
data = rest_conn.get(self.cid).text
# .. construct a new e-mail message ..
message = SMTPMessage()
message.subject = 'New data'
message.body = 'Check attached data'
# .. add recipients ..
message.to = smtp_to
message.cc = smtp_cc
# .. attach the new data to the message ..
message.attach('my.data.txt', data)
# .. get an SMTP connection by name ..
smtp_conn = self.email.smtp[smtp_out_name].conn
# .. send the e-mail message with newest data ..
smtp_conn.send(message)
# .. and now store the data in Redis.
self.kvdb.conn.set('newest.data', data)
Now, we just need to make it run periodically in background.
Mind the timezone
In the next steps, we will use
the Zato Dashboard
to configure new jobs for the scheduler.
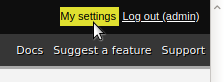
Keep it mind that any date and time that you enter in web-admin is always interepreted to be in your web-admin user's timezone and this applies to the scheduler too - by default the timezone is UTC. You can change it by clicking Settings and picking the right timezone to make sure that the scheduled jobs run as expected.
It does not matter what timezone your Zato servers are in - they may be in different ones than the user that is configuring the jobs.
Endpoint definitions
First, let's use web-admin to define the endpoints that the service uses. Note that Redis does not need an explicit declaration because it is always available under "self.kvdb" in each service.
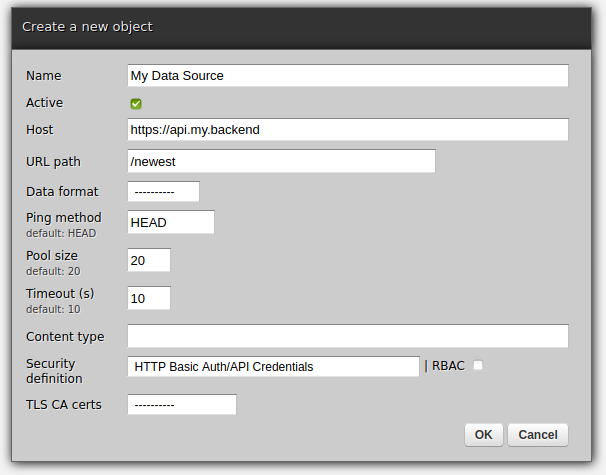
- Configuring outgoing REST APIs
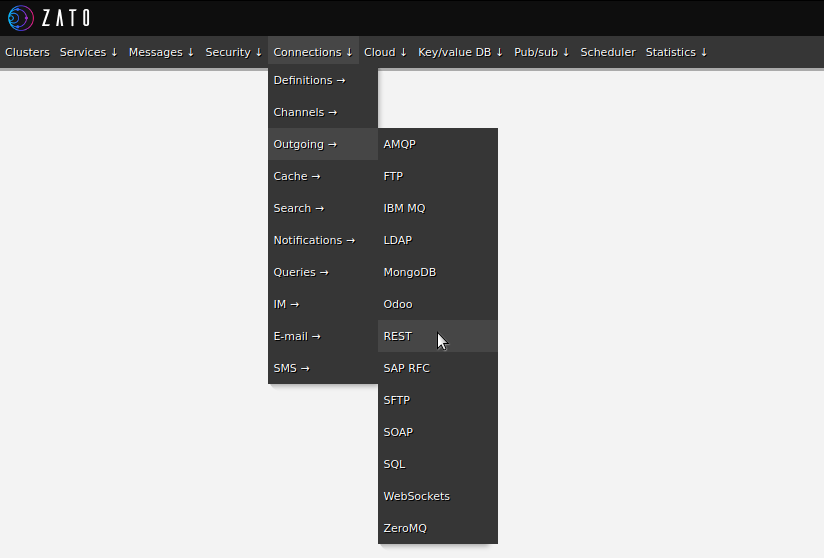

Now, we can move on to the actual scheduler jobs.
Three types of jobs
To cover different integration needs, three types of jobs are available:
- One-time - fires once only at a specific date and time and then never runs again
- Interval-based - for periodic processes, can use any combination of weeks, days, hours, minutes and seconds for the interval
- Cron-style - similar to interval-based but uses the syntax of Cron for its configuration

One-time
Select one-time if the job should not be repeated after it runs once.

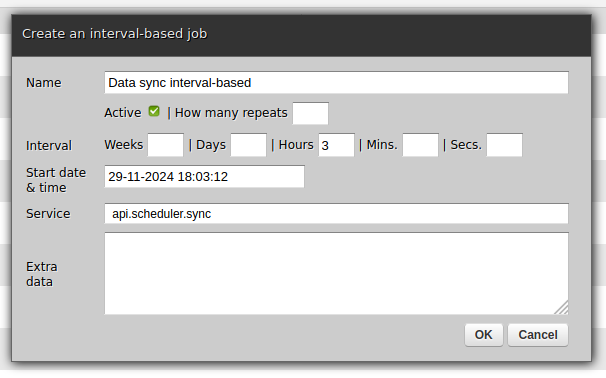
Interval-based
Select interval-based if the job should be repeated periodically. Note that such a job will by default run indefinitely but you can also specify after how many times it should stop, letting you to express concepts such as "Execute once per hour but for the next seven days".
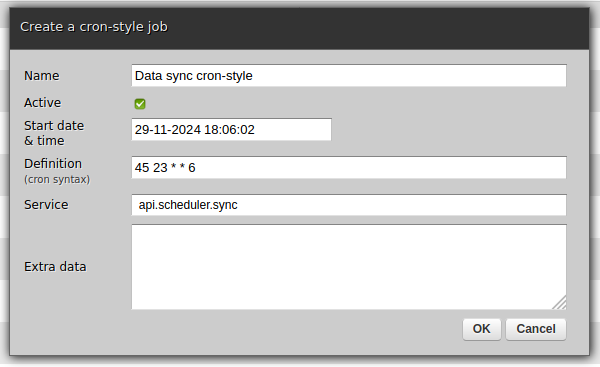
Cron-style
Select cron-style if you are already familiar with the syntax of
Cron
or if you have some Cron tasks that you would like to migrate to Zato.
Running jobs manually
At times, it is convenient to run a job on demand, no matter what its schedule is and regardless of what type a particular job is. Web-admin lets you always execute a job directly. Simply find the job in the listing, click "Execute" and it will run immediately.
It is very often useful to provide additional context data to a service that the scheduler runs - to achieve it, simply enter any arbitrary value in the "Extra" field when creating or an editing a job in web-admin.
Afterwards, that information will be available as self.request.raw_request in the service's handle method.
Reusability
There is nothing else required - all is done and the service will run in accordance with a job's schedule.
Yet, before concluding, observe that our integration service is completely reusable - there is nothing scheduler-specific in it despite the fact that we currently run it from the scheduler.
We could now invoke the service from command line. Or we could mount it on a REST, AMQP, WebSocket or trigger it from any other channel - exactly the same Python code will run in exactly the same fashion, without any new programming effort needed.
April 15, 2024 08:00 AM UTC
April 12, 2024
What is error culture, and how do you avoid it within your organization? How do you navigate alert and notification fatigue? Hey, it's episode #200! Real Python's editor-in-chief, Dan Bader, joins us this week to celebrate. Christopher Trudeau also returns to bring another batch of PyCoder's Weekly articles and projects.
[ Improve Your Python With 🐍 Python Tricks 💌 – Get a short & sweet Python Trick delivered to your inbox every couple of days. >> Click here to learn more and see examples ]
April 12, 2024 12:00 PM UTC
There is no such thing as a “root field”.
There is a common - seemingly universal - misconception that GraphQL root fields are somehow special, in both usage and implementation. The better conceptual model is that there are root types, and all types have fields. The difference is not just semantics; it leads to actual misunderstandings.
Multiple queries
A common beginner question is “can there be multiple queries in a request”. The question would be better phrased as “can multiple fields on the root query type be requested”. The answer is of course, because requesting multiple fields on a type is normal. The implementation would have to go out of its way to restrict that behavior on just the root type. The only need for further clarity would be to introduce aliases for duplicate fields.
Flat namespace
GraphQL types share a global namespace, causing conflicts when federating multiple graphs. Nothing can be done about that unless GraphQL adopts namespaces.
But many APIs design the root query type to have unnecessarily flat fields. One often sees a hierarchy of types and fields below the root, but the top-level fields resemble a loose collections of functions. Verbs at the top level; nouns the rest of the way down. This design choice appears to be in a feedback loop with the notion of “root fields”.
Even the convention of calling the root query type Query demonstrates a lack of specificity. In a service-oriented architecture, a particular service might be more narrowly defined.
Mutations
Top-level mutation fields are special in one aspect: they are executed in order. This has resulted in even flatter namespaces for mutations,
mutation {
    createUser # executed first
    deleteUser
}
This is not necessary, but seems widely believed that it is. Nested mutations work just fine.
mutation {
    user {
        create # executed in arbitrary order
        delete
    }
}
If the underlying reason is truly execution order, the client could be explicit instead.
mutation {
    created: user { # executed first
        create
    }
    deleted: user {
        delete
    }
}
There is no reason it has to influence API design.
Static methods
At the library level, the effect is top-level resolvers are implemented as functions (or static methods), whereas all other resolver are methods. This may lead to redundant or inefficient implementations, is oddly inconsistent, and is contrary to the documentation.
A resolver function receives four arguments:
obj The previous object, which for a field on the root Query type is often not used.
Sure, “often not used” by the developer of the API. That does not mean “should be unset” by the GraphQL library, but that is what has happened. Some libraries even exclude the object parameter entirely. In object-oriented libraries like strawberry, the code looks unnatural.
import strawberry


@strawberry.type
class Query:
    @strawberry.field
    def instance(self) -> bool | None:
        return None if self is None else isinstance(self, Query)


schema = strawberry.Schema(Query)
query = '{ instance }'
schema.execute_sync(query).data
Strawberry allows omitting self for this reason, creating an implicit staticmethod.
Root values
Libraries which follow the reference javascript implementation allow setting the root value explicitly.
schema.execute_sync(query, root_value=Query()).data
Strawberry unofficially supports supplying an instance, but it has no effect.
schema = strawberry.Schema(Query())
schema.execute_sync(query).data
And of course self can be of any type.
schema.execute_sync(query, root_value=...).data
Moreover, the execute functions are for internal usage. Each library will vary in how to configure the root in a production application. Strawberry requires subclassing the application type.
import strawberry.asgi


class GraphQL(strawberry.asgi.GraphQL):
    def __init__(self, root):
        super().__init__(strawberry.Schema(type(root)))
        self.root_value = root

    async def get_root_value(self, request):
        return self.root_value
Example
Consider a more practical example where data is loaded, and clearly should not be reloaded on each request.
@strawberry.type
class Dictionary:
    def __init__(self, source='/usr/share/dict/words'):
        self.words = {line.strip() for line in open(source)}

    @strawberry.field
    def is_word(self, text: str) -> bool:
        return text in self.words
Whether Dictionary is the query root - or attached to the query root - it should be instantiated only once. Of course it can be cached, but again there is a more natural way to write this outside the context of GraphQL.
@strawberry.type
class Query:
    dictionary: Dictionary

    def __init__(self):
        self.dictionary = Dictionary()
Caching, context values, and root values are all clunky workarounds compared to the consistency of letting the root be Query() instead of Query. The applications which do not require this feature would never notice the difference.
The notion of “root fields” behaving as “top-level functions” has resulted in needless confusion, poorer API design, and incorrect implementations.
April 12, 2024 12:00 AM UTC
April 11, 2024
Are you new to Django development? Are you already familiar with it and want to expand your knowledge? PyCharm has Django learning resources for everyone. In this article, you’ll find a compilation of all the Django-related resources created by the experts at PyCharm to help you navigate through them all. From creating a new Django […]
April 11, 2024 10:53 AM UTC
If you've ever thought about starting a podcast or a SaaS project, you'll want to listen to this episode.
Justin is one of the people who motivated me to get started podcasting.
He's also running a successful SaaS company, transistor.fm, which hosts this podcast.
Topics:
- Podcasting
- Building new SaaS (software as a service) products
- Balancing work, side hustle, and family
- Great places to snowboard in British Columbia
BTW. This episode was recorded last summer before I switched to transistor.fm.
I'm now on Transistor for most of a year now, and I love it.
Links from the show:
Sponsored by Mailtrap.io
- An Email Delivery Platform that developers love.
- An email-sending solution with industry-best analytics, SMTP, an email API, SDKs for major programming languages, and 24/7 human support.
- Try for Free at MAILTRAP.IO
Sponsored by PyCharm Pro
The Complete pytest Course
- For the fastest way to learn pytest, go to courses.pythontest.com
- Whether your new to testing or pytest, or just want to maximize your efficiency and effectiveness when testing.
<p>If you've ever thought about starting a podcast or a SaaS project, you'll want to listen to this episode.<br> <br>Justin is one of the people who motivated me to get started podcasting. <br>He's also running a successful SaaS company, <a href="https://transistor.fm/?via=okken">transistor.fm</a>, which hosts this podcast.</p><p>Topics:</p><ul><li>Podcasting</li><li>Building new SaaS (software as a service) products</li><li>Balancing work, side hustle, and family</li><li>Great places to snowboard in British Columbia</li></ul><p>BTW. This episode was recorded last summer before I switched to <a href="https://transistor.fm/?via=okken">transistor.fm</a>.<br>I'm now on Transistor for most of a year now, and I love it.</p><p>Links from the show:</p><ul><li><a href="https://transistor.fm/?via=okken">Transistor.fm</a> - excellent podcast hosting, Justin is a co-founder</li><li><a href="https://transistor.fm/how-to-start-a-podcast/?via=okken">How to start a podcast in 2024</a></li><li>Podcasts from Justin<ul><li><a href="https://saas.transistor.fm/">Build your SaaS</a> - current</li><li><a href="https://www.buildandlaunch.net/">Build & Launch</a> - an older one, but great</li><li><a href="https://podcast.megamaker.co/">MegaMaker</a> - from 2021 / 2022</li></ul></li></ul>
<br><p><strong>Sponsored by Mailtrap.io</strong></p><ul><li>An Email Delivery Platform that developers love. </li><li>An email-sending solution with industry-best analytics, SMTP, an email API, SDKs for major programming languages, and 24/7 human support. </li><li>Try for Free at <a href="https://l.rw.rw/pythontest">MAILTRAP.IO</a></li></ul><p><strong>Sponsored by PyCharm Pro</strong></p><ul><li>Use code PYTEST for 20% off PyCharm Professional at <a href="https://www.jetbrains.com/pycharm/">jetbrains.com/pycharm</a></li><li>Now with Full Line Code Completion</li><li>See how easy it is to run pytest from PyCharm at <a href="https://pythontest.com/pycharm/">pythontest.com/pycharm</a></li></ul><p><strong>The Complete pytest Course</strong></p><ul><li>For the fastest way to learn pytest, go to <a href="https://courses.pythontest.com/p/complete-pytest-course">courses.pythontest.com</a></li><li>Whether your new to testing or pytest, or just want to maximize your efficiency and effectiveness when testing.</li></ul>
April 11, 2024 07:36 AM UTC
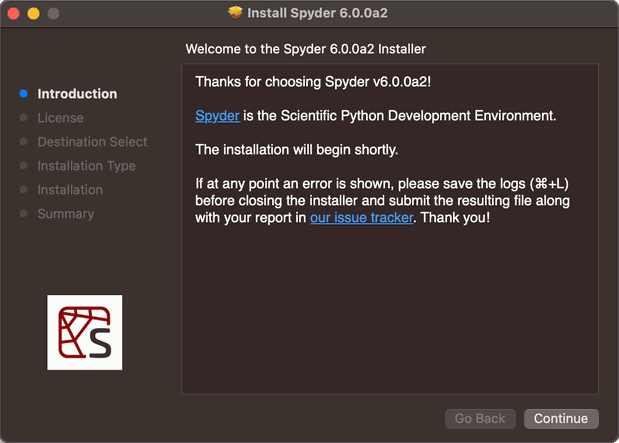
For the last several years, Spyder has offered standalone installers for Windows and macOS which isolate Spyder's runtime environment from users' development environments.
This provides a more stable user experience than traditional conda or pip installation methods.
However, these standalone installers did not allow implementing desirable features, such as automatic incremental updates or installing external Spyder plugins like Spyder-Notebook and Spyder-Unittest.
Additionally, these standalone applications were limited to Windows and macOS.
Our new installers will provide a more consistent experience for users across all platforms, including Linux, while maintaining the benefits of an isolated runtime environment for Spyder.
Additionally, they are fully compatible with incremental updates and external plugin management.
Look for future announcements about these and other features!
So, what will you see with these new installers?
If you are a Windows user, you will continue to have a graphical interface guiding you through the installation process, and will likely not notice any difference from the previous experience.
If you are a macOS user, you will now have a .pkg package installer instead of a .dmg disk image.
Rather than drag-and-drop the application to the Applications folder, the .pkg installer provides a graphical interface that will guide you through the installation process with more flexibility.
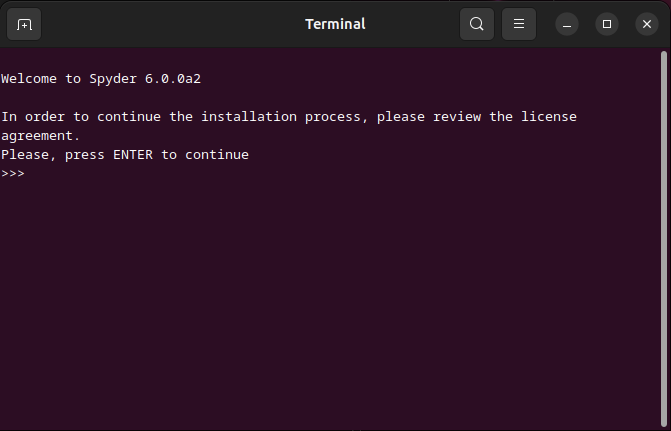
If you are a Linux user, you will have an interactive shell script guiding you through the installation process.
This ensures it is compatible with as many distributions and desktop environments as possible.
In all cases, you will not need to have Anaconda installed, nor do you need an existing Python environment; in fact, you don't even need a preexisting Python installation!
These installers are completely self-contained.
Spyder will continue to include popular packages such as NumPy, SciPy, Pandas and Matplotlib so you can start coding out-of-the-box.
However, you will still be able to use Spyder with your existing conda, venv, Python.org, and other Python installers and environments as before.
Furthermore, only Spyder and its critical dependencies will be updated on each new release, which will make getting the latest version a lean and frictionless process.
The Spyder team is really excited about these new installers and the new features they will make possible, and we hope you enjoy them too!
April 11, 2024 12:00 AM UTC
April 10, 2024

Let&aposs say that you&aposre working on a supervised Machine Learning problem, and you&aposre deciding how to encode the features in your training data.
With a categorical feature, you might consider using one-hot encoding or ordinal encoding. But with a continuous numeric feature, you would normally pass that feature directly to your model. (Makes sense, right?)
However, one alternative strategy that is sometimes used with continuous features is to "discretize" or "bin" them into categorical features before passing them to the model.
First, I&aposll show you how to do this in scikit-learn. Then, I&aposll explain whether I think it&aposs a good idea!
How to discretize in scikit-learn
In scikit-learn, we can discretize using the KBinsDiscretizer class:
When creating an instance of KBinsDiscretizer, you define the number of bins, the binning strategy, and the method used to encode the result:
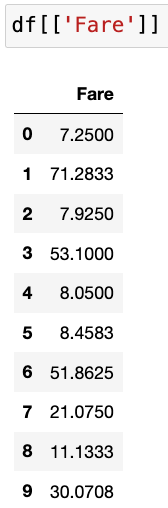
As an example, here&aposs a numeric feature from the famous Titanic dataset:
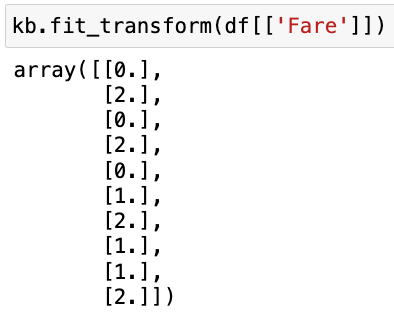
And here&aposs the output when we use KBinsDiscretizer to transform that feature:
Because we specified 3 bins, every sample has been assigned to bin 0 or 1 or 2. The smallest values were assigned to bin 0, the largest values were assigned to bin 2, and the values in between were assigned to bin 1.
Thus, we&aposve taken a continuous numeric feature and encoded it as an ordinal feature (meaning an ordered categorical feature), and this ordinal feature could be passed to the model in place of the numeric feature.
Is discretization a good idea?
Now that you know how to discretize, the obvious follow-up question is: Should you discretize your continuous features?
Theoretically, discretization can benefit linear models by helping them to learn non-linear trends. However, my general recommendation is to not use discretization, for three main reasons:
- Discretization removes all nuance from the data, which makes it harder for a model to learn the actual trends that are present in the data.
- Discretization reduces the variation in the data, which makes it easier to find trends that don&apost actually exist.
- Any possible benefits of discretization are highly dependent on the parameters used with KBinsDiscretizer. Making those decisions by hand creates a risk of overfitting the training data, and making those decisions during a tuning process adds both complexity and processing time. As such, neither option is attractive to me!
For all of those reasons, I don&apost recommend discretizing your continuous features unless you can demonstrate, through a proper model evaluation process, that it&aposs providing a meaningful benefit to your model.
Going further
🔗 Discretization in the scikit-learn User Guide
🔗 Discretize Predictors as a Last Resort from Feature Engineering and Selection (section 6.2.2)
This post is drawn directly from my upcoming course, Master Machine Learning with scikit-learn. If you&aposre interested in receiving more free lessons from the course, please join the waitlist below:
April 10, 2024 03:12 PM UTC
Pydantic is a powerful data validation and settings management library for Python, engineered to enhance the robustness and reliability of your codebase. From basic tasks, such as checking whether a variable is an integer, to more complex tasks, like ensuring highly-nested dictionary keys and values have the correct data types, Pydantic can handle just about any data validation scenario with minimal boilerplate code.
In this tutorial, you’ll learn how to:
- Work with data schemas with Pydantic’s
BaseModel
- Write custom validators for complex use cases
- Validate function arguments with Pydantic’s
@validate_call
- Manage settings and configure applications with
pydantic-settings
Throughout this tutorial, you’ll get hands-on examples of Pydantic’s functionalities, and by the end you’ll have a solid foundation for your own validation use cases. Before starting this tutorial, you’ll benefit from having an intermediate understanding of Python and object-oriented programming.
Python’s Pydantic Library
One of Python’s main attractions is that it’s a dynamically typed language. Dynamic typing means that variable types are determined at runtime, unlike statically typed languages where they are explicitly declared at compile time. While dynamic typing is great for rapid development and ease of use, you often need more robust type checking and data validation for real-world applications. This is where Python’s Pydantic library has you covered.
Pydantic has quickly gained popularity, and it’s now the most widely used data validation library for Python. In this first section, you’ll get an overview of Pydantic and a preview of the library’s powerful features. You’ll also learn how to install Pydantic along with the additional dependencies you’ll need for this tutorial.
Getting Familiar With Pydantic
Pydantic is a powerful Python library that leverages type hints to help you easily validate and serialize your data schemas. This makes your code more robust, readable, concise, and easier to debug. Pydantic also integrates well with many popular static typing tools and IDEs, which allows you to catch schema issues before running your code.
Some of Pydantic’s distinguishing features include:
-
Customization: There’s almost no limit to the kinds of data you can validate with Pydantic. From primitive Python types to highly nested data structures, Pydantic lets you validate and serialize nearly any Python object.
-
Flexibility: Pydantic gives you control over how strict or lax you want to be when validating your data. In some cases, you might want to coerce incoming data to the correct type. For example, you could accept data that’s intended to be a float but is received as an integer. In other cases, you might want to strictly enforce the data types you’re receiving. Pydantic enables you to do either.
-
Serialization: You can serialize and deserialize Pydantic objects as dictionaries and JSON strings. This means that you can seamlessly convert your Pydantic objects to and from JSON. This capability has led to self-documenting APIs and integration with just about any tool that supports JSON schemas.
-
Performance: Thanks to its core validation logic written in Rust, Pydantic is exceptionally fast. This performance advantage gives you swift and reliable data processing, especially in high-throughput applications such as REST APIs that need to scale to a large number of requests.
-
Ecosystem and Industry Adoption: Pydantic is a dependency of many popular Python libraries such as FastAPI, LangChain, and Polars. It’s also used by most of the largest tech companies and throughout many other industries. This is a testament to Pydantic’s community support, reliability, and resilience.
These are a few key features that make Pydantic an attractive data validation library, and you’ll get to see these in action throughout this tutorial. Up next, you’ll get an overview of how to install Pydantic along with its various dependencies.
Installing Pydantic
Pydantic is available on PyPI, and you can install it with pip. Open a terminal or command prompt, create a new virtual environment, and then run the following command to install Pydantic:
This command will install the latest version of Pydantic from PyPI onto your machine. To verify that the installation was successful, start a Python REPL and import Pydantic:
If the import runs without error, then you’ve successfully installed Pydantic, and you now have the core of Pydantic installed on your system.
Adding Optional Dependencies
You can install optional dependencies with Pydantic as well. For example, you’ll be working with email validation in this tutorial, and you can include these dependencies in your install:
Pydantic has a separate package for settings management, which you’ll also cover in this tutorial. To install this, run the following command:
With that, you’ve installed all the dependencies you’ll need for this tutorial, and you’re ready to start exploring Pydantic. You’ll start by covering models—Pydantic’s primary way of defining data schemas.
[ Improve Your Python With 🐍 Python Tricks 💌 – Get a short & sweet Python Trick delivered to your inbox every couple of days. >> Click here to learn more and see examples ]
April 10, 2024 02:00 PM UTC
This tutorial explains the steps to open Google Chrome using Selenium in Python.
To read this article in full, please click here
April 10, 2024 08:05 AM UTC